Make a birthday card. Beautiful DIY birthday cards. Step-by-step instructions with photos
I really like the appearance of 3D postcards, so I prefer to give only this type of postcard, and my own making. Make a card for Happy Father's Day, Happy Birthday, etc. - this is a great way to show your loved ones how much you love them, care about them and want to do something nice! I have created several types of cards that will serve as an example for you to make personal cards for any family holiday. All you need to do is buy the necessary material, use your imagination and have a little patience.
Every year I make an original card and give it to my friend, wishing her a happy birthday. This year I was able to surprise her with a very unusual card, which is shaped like a corset!
What unusual can a child give to his mother or grandmother on March 8th? Of course a postcard! I work as a kindergarten teacher, so every year I help children create cards for people close to them. In this article I will tell you about two very beautiful cards that you can make with your children.
As you know, on February 23 it is customary to congratulate all men, regardless of age, profession and position, on Defender of the Fatherland Day. Usually on this day, men receive purchased or homemade gifts and cards with warm, congratulatory words.
Mother's Day! Have you thought: “What to give?” Show your love for your mom by giving her a handmade card featuring beautiful, delicate flowers. Believe me, this will be a much more unexpected surprise than a traditional bouquet of flowers. This project may seem complicated at first, but once you read the instructions, you'll realize how easy it is to do.
A holiday is approaching, and you don’t know what gift or card to give to your dear and loved one, then we recommend reading our article! After reading our master class on, you can easily make not only a beautiful, but also a useful postcard - a notepad with your own hands. By spending a minimum of money and time, you can make a wonderful gift.
For most people, a birthday card is an integral part of a gift. With its help, you can congratulate the birthday person in an original way, express your attitude towards him and show how dear he is. It is often difficult to find the right one among the options available in the store. May not like the picture or words. Therefore, it is much better to make a postcard with your own hands. It may take more time, but it will be valued, since the person put his soul into it.
Photos of beautiful handmade cards
Some people, even as children, had to make greeting cards to please their parents or friends. For adults, a homemade card is always the best gift from their kids. But this does not mean at all that homemade greetings from colored paper or cardboard can only be made for children. Adults can also show their imagination and give an original gift to loved ones. You can add flowers, sweets and other nice things to it. Any grandmother, mother and other loved ones will appreciate this. This is much better than the animation sent on the Internet.
To get ideas for a postcard, you can look at interesting options from other artists:


Making a happy birthday card: step by step with photos and videos
Every person can make a homemade postcard. If you have never done this before, you can do a simple craft. Well, if you already have experience, then you can try to do something more complicated. The product can be addressed to mom, dad, husband, grandmother, grandfather, daughter, son, girlfriend, your man or woman and other people. Of course, it doesn’t hurt to take into account the characteristics of each age group, so as not to go wrong with your congratulations.
In this master class we propose to make an interesting option of medium complexity. First, you will need to stock up on materials that will be useful in the process.
What you will need:
- Mother-of-pearl base for postcard (10 by 19 cm).
- Golden-colored cardboard.
- White cotton ribbon.
- Decorative brown rope.
- Brown polka dot ribbon.
- 3 beige rhinestones.
- Brown button.
- Scissors, glue, tweezers.
The color scheme can be changed to suit your taste.
First, cut out the base for the product. Measure a rectangle 20 by 19 centimeters and bend it exactly in half. Now take a golden-colored cardboard and fit it to a triangular shape, the angle of which is 90 degrees, and the adjacent side is 9 cm. Glue it to the base. Take the gold cardboard again and cut out a 2.5 by 9 cm rectangle. Trim one corner. Now we do the following - we place the part on top of the base.

Glue a white ribbon onto the golden edges, cutting the corners to fit. It should turn out neat. Now take 10 cm of polka dot ribbon, fold and connect. Do the same with other parts, there should be 4 pieces in total.

You need to collect the ribbons into a flower. And it’s time to make the inscription: “Happy Birthday!” It can be done by hand or printed. The inscription must be pasted at the top under the gold detail. You need to cut out a triangle from golden cardboard, then take a brown lace and attach it to the back side. The triangle needs to be wrapped and the end secured with glue.

The part needs to be placed on the base approximately in the middle, and a ribbon flower should be placed on top.

Thread a rope through the button, make a knot, and then a bow. Place the resulting item on the craft. Add a few rhinestones to taste.

Now the postcard is ready. All that remains is to write a congratulation in verse inside and give it to the recipient. If you wish, you can draw something or diversify it with beautiful inscriptions. You can give this option to a girl or make it for your mother and grandmother. For your man or grandfather, it’s better to come up with a more masculine option.
You can watch the video for another do-it-yourself postcard option:
Poem options for beautiful birthday cards
Poems are an integral part of congratulations. It is better to write them yourself if you have poetic abilities. If you can’t rhyme words, then you can take ready-made options.
Gifts are an integral part of any holiday or memorable event; they help to express your feelings and make a magnificent, unforgettable surprise for the hero of the occasion, giving memorable memories and a great mood. Gifts are complemented by bouquets of flowers and cards with congratulations; instead, you can use bright and original greeting cards, offered in a wide variety by manufacturers on the market and produced in huge quantities.
The individuality of each person is emphasized by creative skills; looking at a variety of photos of hand-made postcards, you often want to make a hand-made masterpiece yourself and congratulate a close friend or family member.

To do this, just choose an original sketch, turn on your imagination, and use various materials to realize any ideas, creating a thematic greeting card dedicated to any holiday or special event.


Types and thematic styles of design
Conventionally, all greeting cards can be divided into several categories, choosing from them you can begin the creative process, the most numerous are:
- postcard in collage style. On a decorated base with a congratulatory or ceremonial inscription, you can apply images, flowers and figures of dear people cut out from photos and old postcards;
- voluminous, stylish cards. Inside a pre-prepared card, flowers connected and cut out of paper or soft cardboard are glued in a special way, creating a volume effect when opened;
- craft style postcards. The craft trend of decorating confectionery products, gifts and cards is gaining popularity due to its simplicity and presentable appearance, ease of implementation;
- decorated envelopes for money. Envelopes for money are a special type of greeting cards; they are used as an independent gift and are decorated with pleasant inscriptions or poems.

There are many master classes on how to make a postcard with your own hands, but first you need to decide on the design of this obligatory holiday attribute, which will help you decide on the further manufacturing process and selection of materials.

What you need to make an original postcard
An original and exclusive postcard will be created when you add a bit of imagination to ordinary cardboard or colored paper. The creative process of creation begins with choosing an idea and selecting materials for its implementation:
- It is better to choose thick and high-quality cardboard used as the basis for a postcard;
- basic decorations, strips of paper, cut out flowers or bright pictures, colored foil;
- additional decorations, which can be beads or seed beads, paper flowers and ribbons;
- paints and colored pencils, felt-tip pens and other coloring agents used for paper.

Having studied in detail the step-by-step instructions on how to make any postcard, it will become clear that for creativity you will need a set of simple tools, which include a needle and thread, scissors and a simple pencil, glue or a glue gun.

Step-by-step process for creating a greeting card
Self-made beautiful cards will delight adults and children and will be a wonderful addition to a pre-selected gift. Having picked up an idea for creating a masterpiece, you can start making it at home:
- preparing the base. To do this, use light cardboard or craft paper, which must be bent into two even halves;
- creating a composition. You can place decorations on the prepared base, creating an elegant and stylish composition according to the idea;
- securing decorations. After adjustment and arrangement, you can begin to attach the selected decorations to the cardboard base.


In the process of making a postcard, you can also decorate the inner surface of the greeting attribute; for this it is better to use elements of the main decorations, in accordance with the overall design idea.

After this, it is worth applying a memorial inscription, selected poems and congratulations that correspond to the theme of the holiday or upcoming celebration, a memorable date to which the presentation of a holiday card can be timed.

When planning to make a postcard at home, you need to carefully prepare, then the exciting creative process will become simple and easy, does not take much time, but will bring a lot of pleasure to everyone who participates in it.

Children of all ages can be involved in this activity; they will enjoy this pastime, and family and friends will be especially pleased with the masterpieces created by the whole family, under the guidance of adults.

Photos of postcards with your own hands


A voluminous postcard, which is made by hand, will be an unexpected and very pleasant surprise for a loved one. There are a huge number of beautiful cards for any event, so you can easily find the right holiday gift.
This is an original postcard, despite its apparent intricacy.
It is wonderful for every person close to you. The occasion could be Women's Day, New Year, or even Valentine's Day.
To make a postcard you will need:
- cardboard or paper thick enough
- knife
- First of all, you need to make a printout of the postcard template located here. There are several copies there.
You can try to sketch a drawing with a heart yourself. For this you need a ruler and a simple pencil. - Take a knife and use it to make special cuts on the resulting template.
- Try to fold the card as carefully as possible so as not to wrinkle it. First of all, you need to make the folds; in the picture they are drawn with a yellow pencil. Then slowly fold the card where you want it.
The remaining parts will form themselves. Iron each curve on the card well to ensure each individual element works smoothly.
To make it more convenient, you can attach the card with tape to the table. - Now it's time to decorate the card. Cover the edges with colored paper.
Almost everything is ready, you just need to add pleasant and good words.


Volumetric postcard Volcano of Hearts
This postcard consists of several parts that need to be connected using glue.

To create a postcard you will need:
- cardboard and colored paper
- scissors
- white glue.
- Download the template in a suitable format.
Templates for a three-dimensional postcard, which is made with your own hands.
Knowing some rules, you can draw hearts yourself. You will find the rules below. - Take out a huge heart from the middle. It is located on the fold.
- When cutting out the hearts, try not to touch the places where they bend (see picture).
- On the hearts shown in this figure, you need to make cuts to connect them together.
In order for the three-dimensional card to be closed as tightly as possible, you need to cut the paper on the middle fold to glue individual hearts to the base in the form of red cardboard. This cardboard is the background of the postcard. - After you have glued the halves to the base, you need to fasten the hearts using the cuts previously made on them.
The size of the hearts should be the same on all sides.
The line on the diagram, which is drawn in blue, indicates the same distance that there is from the center fold to the beginning of the cut, and the lines in red indicate that there is exactly the same distance between the hearts that are located closer to the middle of the card.


Ideas to note


On March 8, on a birthday or an anniversary, I would like to congratulate my beloved mother sincerely, from the bottom of my heart.
Buying a ready-made postcard in any design is not a problem nowadays.
But how many emotions will your mother receive if you give her a handmade card?
Handmade postcard– this is not just a small bonus to the main gift, but a real testimony of love and gratitude to dear mother. Such a souvenir will be kept in a visible place by mom for many years.
Such a postcard is always very beautiful, elegant, original, easy to make and does not require much time or material investment. Be sure to find a suitable option for yourself and create a postcard yourself - make your loved one happy!

You can take a soft cherry shade of cardboard as a basis and cut out a rectangle from it. Next, we take checkered cardboard and cut out a shape from it in any shape up to half of our cherry base, glue it, and decorate the gluing area with exquisite white lace. We decorate the card with bows, beads and buttons, add kind, sincere congratulations and our surprise for our beloved mother is ready!

The base of the postcard will be the same cardboard. We glue two strips of fabric of different widths onto the base. On the top wide strip you can stick the words “mom” in letters cut out of different cardboard. We leave the bottom strip for decoration and warm words of congratulations. The decor can be ribbons, beads, pieces of lace, various flowers, in general, everything that your imagination tells you.

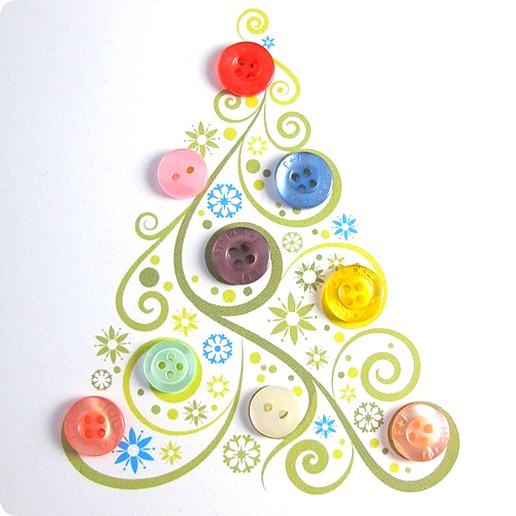
The base of the postcard will be white or other light cardboard. On top of the cardboard we glue flowers, leaves, hearts, ladybugs, cute birds, etc. in the form of an applique. colors must be selected very wisely - no more than 3 shades so that your card looks harmonious. For volume, you can add beads, laces, and buttons.
DIY birthday card for mom made of paper step by step.
For this we need:

To work, you will also need to print it on a printer. vase template.

Do you like such a miracle made on your own?
Unusual and voluminous
If you want to make a complex and unusual birthday card, there are many such options.
Which one is right for your mother personally is up to you to decide. Each of them is original, beautiful and easy to perform in its own way.

Magnificent and original
If you really want to give your mother something more complex, give her something that will truly surprise and give positive emotions.
Take some of your precious time and create a 3D postcard, or a postcard from unusual materials. This is not at all difficult to achieve, but it will require a little more time, as well as patience and perseverance, attention and hard work. But such a masterpiece will be truly appreciated and will cause a flurry of positive emotions!

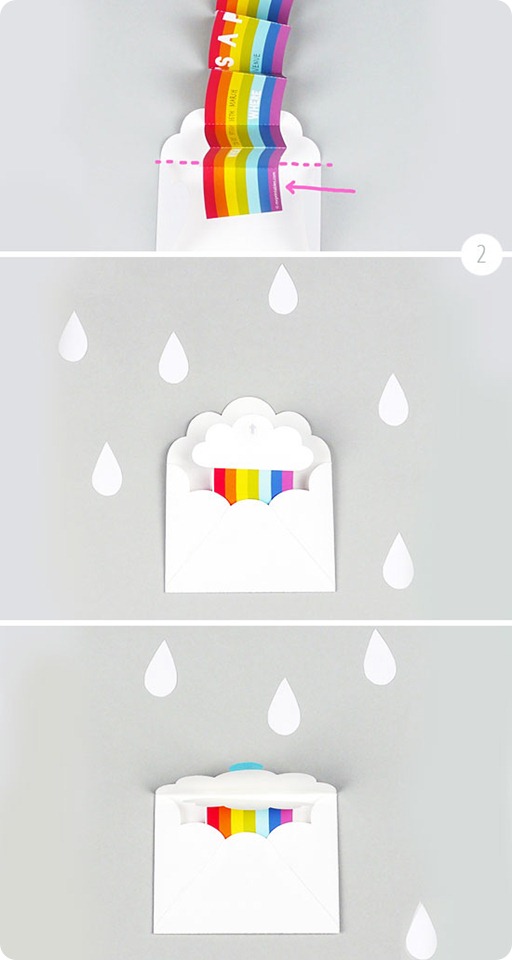
Master class “How to make an endless postcard?” watch in our video:

You can add your own twist, change colors or materials, add what you think are missing decorative elements, etc. but most importantly - kind, warm and sincere words for your beloved mother!

Beautiful card for your beloved mother's birthday
In order to create such an unusually beautiful card you will need:
- double-sided cardboard coated white;
- paper with poems, maybe with notes, with an aging effect;
- - artificial leaves and flowers;
- — two round stickers with congratulatory inscriptions;
- - blue ribbon;
- - colored sequins;
- — a sticker or pre-printed inscription “Congratulations!”;
- - pencil, scissors, ruler, double-sided tape, glue.
Let's get to work.

In conclusion, I would like to note that in your postcard, made with your own hands for your beloved mother, the most important thing is not the paper, ribbons or rhinestones, and not even the wishes that you write on the spread of the card. The most important thing is your sincere desire to please your mother, to show care and attention!
Views: 6,258


