Paracord bracelet with Thor's hammer. Paracord bracelet size. How to find out what length to weave a bracelet? Paracord bracelet with sleeves
Paracord bracelet
A paracord bracelet is not only an attribute of a real man’s style, but also an item necessary for survival in the wild. A wide range of components, colors, designs, technical characteristics will help you choose a model to suit any style and request. This accessory will really help you survive in any conditions: on a camping trip, in the wild, during hunting, fishing, yachting, and other extreme types of recreation. Also indispensable during work related to construction, heights (for example, industrial mountaineering), even as a towing rope, a tourniquet to stop bleeding, and the basis for a splint for fractures. Why do you need a paracord survival bracelet? We will look at how to make a paracord bracelet with your own hands and how to handle it further.
Paracord bracelet
The paracord survival bracelet (Figure 1) is made of heavy-duty nylon thread. The name comes from two English words - parachute and cord (cord).
The material is very light, durable, and can withstand up to 250 kilograms of load.
Unaffected by mold, moisture, sweat, and does not burn well.
Ultimately, the cord is divided into several components:
- Base. Consists of several strong ropes, easy to unravel. It is located under the outer shell and can be pulled out when necessary;
- The outer covering differs in structure and is made of weaving many thin threads. Once the core is pulled out, it can still be used as a cable, but the overall load capacity is reduced.
The load capacity is determined by thickness. The thicker the material, the greater the weight it will withstand.
Mostly, the market offers models with the following values:
- 100 type, diameter 1.6 millimeters, load capacity 45 kilograms;
- 425 type, diameter 3 millimeters, load capacity 181 kilograms;
- 550 type, diameter 4 millimeters, load capacity 249 kilograms.
There are also varieties for real professionals: 750 type for 340 kilograms, 1255 type for 566 kilograms. When calculating the required thickness, it is worth considering that each manufacturer’s characteristics for the same diameter may vary. It is recommended to purchase certified American ropes, since Chinese analogues can withstand 2-3 times less weight. When unbraided, the length of the cable ranges from 4 to 10 meters, depending on the type of manufacture.
Why do you need a paracord bracelet?
But why do you need a paracord bracelet if you can use an ordinary cable or rope? The accessory was originally invented by those who regularly faced threats to their lives - American paratroopers. Each parachute is equipped with a reliable paracord cable, which, after landing, the military cut off and used for their needs. From such a cord you can make a trap (snares) for birds and small game, and, if desired, even a lasso and bow string. With its help you can secure a tent, a sail on a yacht, fasten logs, assemble a raft (Figure 2).
 Figure 2. Application options for paracord
 It is also used for climbing rocks or descending from a height, providing reliable insurance. These are just a few of the most common uses. The advantage is its quick availability, since it is always on hand. In extreme conditions, it is not always possible and time to get a rope out of a backpack or duffel bag; sometimes an instant reaction is needed to save life. That is why the main feature can be called the way it is woven, which makes it possible to untie the product in one movement. Some models are equipped with a silicon clasp, a carabiner, which can also be used for survival, and even a compass. A carbine will allow you to secure the belay, and flint is the oldest and most proven method of starting a fire.
Weaving a paracord bracelet: weaving patterns
If you choose between homemade and store-bought options (Figure 3), it is recommended to create a tactical paracord bracelet with your own hands. This will allow us to produce the most reliable accessory that meets your needs. The selection of color, material characteristics, carbine, flint, and additional components is carried out individually.
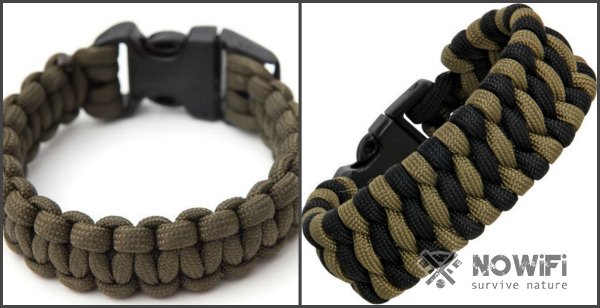 Figure 3. Try to determine which of these bracelets is homemade? The correct answer is both
 However, before moving on to the diagrams, you need to practice on ordinary shoe laces or thick ropes. To make a product correctly, without spoiling the material, practice is necessary. After several unsuccessful attempts, you will begin to get an accessory that will help you more than once in difficult times. For paracord bracelets, weaving patterns vary greatly, each of them has its own level of complexity. The most popular are the classic, cobra and king cobra, as well as fish tail. Schemes on how to knit a paracord bracelet are given below.
Traditional paracord bracelet
To create a tactical paracord bracelet with your own hands, you will need a 2-meter cord, a standard fastening (with a screw or a carbine), a lighter or matches, and sharp stationery scissors.
Instructions for creating a bracelet:
- The cable is folded in half and inserted into the hole on the carabiner. The edges are put into the loop, the so-called cow knot is tied;
- Then the second component of the fastener is put on the free ends, and an approximate measurement of the length of the product is made directly on the hand. The tightness of the loops depends on the required width;
- Knitting loops is carried out by alternately tracing the ends through two fixed and stretched segments. The edges are wound from the bottom up in one direction and from the top down in the other. Ultimately the pattern is similar to a braid.
- The ends are passed through the fastener a second time, cut off and melted over a fire (it is recommended to use a lighter).
The execution of this model is accessible to everyone and is an initial level of complexity.
Weaving a bracelet from Cobra paracord
It is considered one of the most popular options. This is due to the fact that a longer cord is used during creation.
How to weave a “Cobra” paracord bracelet (Figure 4):
- Bend a cord with a length of 3 meters and secure it with a cow knot on the first component of the buckle - a screw or flint with thread. Do not tighten the loop too much - the base should be moderately movable;
- The second component of the fastener, made in the shape of the Greek letter “omega” (similar to a horse’s horseshoe), is placed on top of the base at a distance that will be comfortable for wearing with an indentation of 2 fingers. Indentation will be needed since the knitting is double-sided;
- The free edges are folded over the clasp once. Tight and motionless ropes in the center will become the base, and the ends will be braided around them;
- To begin, take the left end and place it perpendicular to the base. Both working tips will point to the right, and a loop will appear on the left;
- The right end should go around the left one from above, and the chassis should be inserted into the loop from below. The working tips will look in different directions. You need to pull them and the first turn will tighten;
- Then the operation is repeated in the opposite order. After tightening each turn, the guides are changed until the entire central space is filled;
- All loops must be the same in tension and width. Too tight or loose loops will make further wearing uncomfortable;
- After finishing knitting the first side, the product is turned over, you need to move to the other side until the free thread runs out. Depending on how much length you want to use, a certain number of layers is selected. Finally, the remaining ends are tied in the standard way and cauterized until melted.
 Figure 4. Diagram of the "Cobra" bracelet
 King Cobra weaving pattern
Weaving a bracelet from paracord “King Cobra” is carried out up to half according to the same pattern as “Cobra”. To determine how much paracord is needed for a bracelet, you need to do a calculation: add another 0.5 of this value to the length already used (for example, 3 meters) (it turns out 1.5 meters).
Further steps when weaving (Figure 5):
- After creating the base, a cable of a different color is often taken and threaded under the product with a loop on the left and two free ends to the right;
- We draw the lower free tip along the front part and insert it into the loop, tighten it;
- We repeat the operation for the right side and alternate sides until the process is completed;
- Finally, the excess length is cut off, the ends are cauterized and threaded inside or into the buckle.
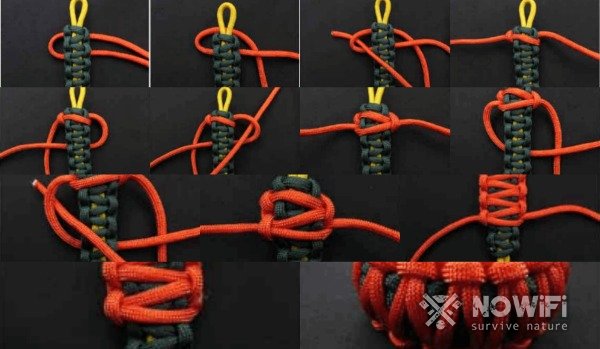 Figure 5. Scheme "King Cobra"
 Such an accessory not only looks luxurious, but also provides the opportunity to use several cables at once: first the top one, then, if necessary, unravel the main one.
A similar paracord product is now called a survival bracelet, since it serves not only for beauty, but can also help in a difficult situation. Not in all, of course, but in many where a cable may be needed. Owners of such bracelets can instantly receive a strong rope up to 4 meters. Another advantage is that such a product can be woven into various little things that may be useful, for example, nuts, bolts, carabiners, etc.
First, let's figure out what paracord is. This is a nylon polymer cable that is famous for its lightness and strength. It is used in the manufacture of parachutes, so there is no doubt about its reliability.
Having familiarized ourselves with the main material of our product, let's find out the patterns for weaving paracord bracelets.
Weaving patterns

By following the pictures shown below, you can easily weave different types of bracelets. All you need to know is the circumference of your arm so that the product is not too small, but does not fall off. The most famous is the Cobra bracelet, shown in the first version.
Scheme No. 1

Threads numbered 2 and 3 are the circumference of your brush.
Scheme No. 2

In this version, the bend shown in the first picture is the circumference of the hand, plus 2-3 cm for the fastener.
Scheme No. 3
 For convenience, a clasp can be woven into the bracelet.
Scheme No. 4
 The peculiarity of this weaving is that in this way you can weave a cable up to 10 meters.

Important! Pay attention to the fasteners. If you want to constantly tie the ends, then they are not needed. And for those who find it inconvenient to weave knots with one hand, these are the fasteners that can be found in any store that sells outdoor gear. But remember that you need to start weaving with them.
What is paracord?
Paracord- this is a light cable or cord made of polymer material, mainly nylon, ideally intended for parachutes, as slings. But this extremely necessary thing has found its practical application not only in military technologies, but also for completely peaceful purposes.
Due to its structure, the cable has elastic properties and a smooth surface. Paracord has found wide application in many areas of life.
It can be used not only as a regular fastening tool, but also by extracting thinner threads from its core and using them in mending clothing and assembling improvised fishing gear in extreme conditions. It is also great for lacing shoes.

The material has long since reached the level of a commercial product. Many of its options, intended for ordinary people, unfortunately, are of lower quality. This is expressed by a lower fiber content in the cable structure or a different material of manufacture.
Paracord is included in many so-called survival items. It is used to make special bracelets and belts that have both decorative value and direct practical use.
Features and application of a paracord bracelet
For a long time, such things have been held in high esteem by many fans of extreme sports. Paracord bracelet thoroughly entered into the items of their ammunition. Sometimes, indeed, a few meters of first-class cord are not superfluous.

This is exactly how much is used in the manufacture of a compact product that can easily be worn on. At the same time, it does not interfere at all, and looks extremely aesthetically pleasing and appropriate. It can easily be mistaken for a creative decoration. But in reality, paracord survival bracelet, an extremely practical thing.
It can be used both for securing transported loads and for rescuing a person, for example, in water or at height. Although this is not the best option for climbers. But it is capable of supporting the weight of a person. It can be used as a tourniquet to stop bleeding, but as an option it is better to use something else; its diameter is too small for this.

In addition, belts and leashes are made from it; it can be used to braid another object, for example, a knife handle. An excellent option would be paracord watch bracelet.
Things made from this durable material are produced by many firms and companies specializing in this kind of thing and by private craftsmen. But it’s quite possible to make one yourself.

How to weave paracord bracelets
With the desire and a little skill, this is a very real task. There is a wide range of kits for creating it, to suit every taste. They can be found in many stores at a relatively low price.

They are accompanied by the necessary elements in the form of special fasteners, made of various materials, mainly metal and plastic. But a reasonable question arises - why a paracord bracelet? spend a lot of time and weave it yourself, when can you buy it?
Weaving is done mainly for one’s own pleasure, because the price for them is extremely low. At least in Russia and the CIS countries. The device of the product is so simple that handmade work will be little different from a thing made in production.

There are many manufacturers, but the quality is similar for this reason. That's why weaving a paracord bracelet First of all, it is a fun and useful activity. We can say that every man in his life must make at least one such thing.
But do not be deceived by the apparent simplicity of the product; in fact, the whole process may turn out to be more labor-intensive than it seems at first glance.

You need to take the work seriously, and be prepared for the fact that you may have to redo it more than once until you get something better. During its manufacture, additions can be woven into it in the form of decorative elements.
As a working material, you can use not only the nylon from which paracord is made. There are analogues similar in appearance. For example, you can practice on regular laces before going out to buy original ones. But in this case, you can’t call it combat anymore.

You can also find suitable substitutes for fasteners, including regular pins or small plastic fasteners from a child’s backpack.
Paracord bracelets, diagrams the weaving of which has several variations should sit extremely comfortably on the hand and not interfere with its owner during any activity. It is desirable that it be flat for any pattern made.
There are several bracelets with provocative names, for example paracord cobra bracelet, having at least two variations, “dragon language”, etc. Each option has several names, but don’t get lost when searching for the one that suits you best—in practice, there aren’t many of them.
The Internet is replete with detailed instructions on how to make things woven from paracord. A huge number of photos and videos on this topic have been posted. But many of them are quite primitive, and in order to do something really worthwhile, you need to turn to serious sources. In them, a person can familiarize themselves with detailed descriptions of the entire process and view its entire visual part in high-quality form.
How to make a paracord bracelet? Step-by-step instruction
1. Take three meters of cord.
2. Folds in half.
3. Wraps around the wrist, you can pass the loose ends through the middle, tightening it with a loop.


5. The first end must be passed through the loop.

6. The second end is inserted under it, remaining above the loop.

7. Now you can tie a knot out of them.

8. The first end goes through the loop again.

The second end also passes over it and is tied again. To make the bracelet even, you need to alternate the ends, alternately winding them from different sides.
The process continues until three centimeters remain of the cord. Then the ends are cut off and melted so that the bracelet does not unravel.
Finally, you need to sew a button or decorative fastener onto the end of the product. It is important that it does not fly off the opposite loop.
Now you can remove the tie made at the beginning of the process and safely wear the bracelet.
Ready-made paracord bracelets (photo) - homemade and branded.

Do DIY paracord bracelet It’s not difficult, but some people still prefer to buy it ready-made.
Price for paracord and paracord bracelets
The cost of the material itself is quite low, it all depends on its quality and manufacturer. Usually it does not exceed $1 per meter; you can find cheaper options. But it is not recommended to save money, otherwise it will be a stretch for combat.

With the same success, you can weave a bracelet from your laces and show it off to your friends. It’s better to take high-quality material; you can even try to get hold of a line from a real parachute.
Paracord bracelets, buy It’s also possible at a reasonable price, if you don’t look three ways from foreign, branded manufacturers. As already said, the quality will not differ much from cheaper analogues. The most acceptable price for them can be considered ten dollars.

Paracord weaving – the task is painstaking, but not difficult. With the right approach and following the instructions, everything turns into an interesting creative process. This is sometimes called a survival bracelet due to the ability to use its cord in extreme situations. For example, in the West, all boy scouts are taught how to weave a paracord bracelet.
In contact with
Since the thread goes up to 10 meters, the paracord cord can be used as a rescue rope, and such a rope, with good quality paracord, can withstand up to 250 kilograms. Some people use a bracelet for going outdoors, while others are more interested in decorating their wrist with the product. The article will satisfy the needs of people involved in hunting and extreme tourism, as well as simply lovers of beautiful accessories. Next, detailed patterns for weaving a paracord bracelet and lanyard will be given.
1. Select the material
To get a quality item, you need to choose the right material.. Today there is a wide variety of paracord on the shelves and therefore you need to be careful. Avoid Chinese products - they often break when the load on the cable exceeds 50 kilograms. For those who need a cord not for aesthetic purposes, take paracord of technical standard III (paracord 550) or IV, in such cases the color will be protective green, and the core will be thicker in section (about 4 mm).
For other purposes, any type of paracord will do. The range of colors in this case will be much wider. The price of paracord usually ranges from $1 to $10, depending on the manufacturer. Optional, additional clasps for the bracelet are purchased(fastex or carbine).
2. Weaving a bracelet
You will need:
- paracord (about 5 meters);
- scissors;
- lighter;
- tweezers (may be useful for those who find it difficult to thread the paracord thread into the loops with their fingers).
First, measure the circumference of your hand. Typically, 2 meters of paracord cord is required for 10 centimeters of the required length of the bracelet. Below are several options for weaving paracord bracelets. The weaving patterns will be as follows: quickly dismountable and crawling snake.
Quickly disassemble survival bracelet
This type of paracord weaving is suitable for those who engage in extreme tourism and hunting.. You can disassemble the bracelet in one motion - by pulling the handle.
To begin, take a paracord cord (5 meters in the article) and fold it in half, the bent end of the cord is wrapped with a thick thread at the tip so that the bend is held tightly. We measure the length of the bracelet: apply the fixed end to the bend of your hand and wrap it around your hand. Fix the resulting length with your fingers. We make two more bends of the cable on both sides and pull it to a fixed bend. You should get four parallel rows of cord. Now, from left to right, we make a loop with the left outermost cord and put it on the right outer one. Pull the end of the right outer cord out. We make a fixing loop.

Now we pass the leftmost cord over the top, then through the bottom of the two middle cords we pass it to the right and bring it over the rightmost cord. Next, we bring the end of the far right cord through the resulting left loop. The first node is ready.
Then we start from the right side - take the rightmost cord and bring it under the bottom of the nearest two, and then through the top of the two left ones. We bring the end of the leftmost one through the formed right loop and tighten it into a knot. Now we remove the thick thread wound at first - it is no longer needed. We weave in this way until the bitter end, alternating the leftmost and rightmost cords.
 When the desired length of the bracelet is obtained, we find two ears from the paracord rope from below. We pull the left outer cable through the ears to the right side, and then the right one to the left. We tighten everything. Next, we tie the resulting two cords, as shown in Figures 19, 20. Next, we tighten everything up and it’s ready! Check that the bracelet fits tightly.

Survival Bracelet "Crawling Snake"
To make a Paracord bracelet of the “crawling snake” type, we will need:
- two paracord cords of different colors, approximately 1.5 meters each (each person will have their own meter, for this you need to measure the length of the wrist circumference);
- fastex.
Weaving paracord in this case is different from the previous one and is more suitable for people pursuing aesthetic goals. The accessory will be beautiful, but less reliable for extreme cases.
We connect both cables to each other; to do this, you need to make a 1.5 centimeter recess in one of the cables (remove the core), and insert the second into the resulting recess and solder it using a lighter. Usually paracord fuses very well and you can weave further without fear of breaking. In extreme situations, the use of fused cord is strictly prohibited.
Now you will need a pre-prepared fastex. We tie the cable obtained after fusion to the fastex. It’s important not to mess up with fasteners – pay attention to which side is the front. After the length of the bracelet is set (picture 5), we begin to weave the bracelet according to the diagrams below.


The weaving does not look complicated, but you need to tighten the knots more tightly so that it does not slip down. We bring the weaving to its logical conclusion and, to complete our accessory, tighten the knot as in picture 22. The ends can be cut and soldered. The “crawling snake” paracord bracelet is ready!
3. Weaving a lanyard
Another interesting product made from paracord is a lanyard. This name is given to braided cords in the shape of a loop, which are attached to the handles of axes or other bladed weapons. Usually the lanyard is put on the hand so that if you let go of the ax you won’t lose it. The handle of modern edged weapons often has a technical hole just for lanyards or other accessories.
The weaving here is different from the first two and, additionally, you can use a carabiner clasp. As in the second weaving, we take 1.5 meters of two different paracord cables. We fuse them in the same way as indicated in the “crawling snake” weaving. Fold the resulting solid cable in half and thread it through the carabiner clasp.
Take the end of the right cable and pass it under the central loop. We bring it under another loop and return the same end back on top, inserting it into the resulting right loop (diagram below). Now we take the other end (of a different color), pass it over the loop, bring it under the entire structure and bring it up from the left of the loop. Now we tighten everything and pull it closer to the top. Now let's turn it over (image 10). Take tweezers and loosen the tightened loops a little. Next, draw the right end (blue color) under the bottom of all loops and, using tweezers, pull it out of the top tightened loop to the right (Figure 13). We tighten it.
Next, we turn the lanyard over again and put everything in order. Take the tweezers again and pull up the loop of the opposite color (blue in this case). We take the right end (yellow) and pass it under all the loops, and then use tweezers to pull it out of the previously tightened loop (blue) to the right. We tighten again. We carry out the previous steps until we obtain the desired length of the lanyard. We cut off the ends of the product and melt it with a lighter. The lanyard is ready!
The latest fashion trend is various hobbies related to weaving - this can be beads, floss, elastic bands, wire, and such a not very well-known thing as paracord. However, it is worth noting that the term “paracord” is not familiar only to the average person, but fans of extreme sports such as mountaineering, rock climbing, or those who simply go on frequent hikes are not only familiar with this concept, but have also worked with it. Paracord is a strong nylon rope that can support a lot of weight and be used for other practical purposes. Today we will tell you about paracord weaving; you can see the diagrams in our videos.
Bracelet weaving pattern
If this is your first time encountering paracord, then you may have a natural question: if it is part of the equipment, then why weave bracelets from it. The thing is that on a hike it is very important to pack all the equipment as competently as possible, and so that it takes up as little space as possible, and during the Second World War, soldiers came up with the idea that they could put this cable not in a backpack, but make a bracelet or something out of it -something that you can put on yourself, and, if necessary, quickly dismantle and use for its intended purpose. For a paracord bracelet, the weaving pattern becomes most clear after watching the video:
Weaving lanyards
A lanyard is a cord that is attached to the handles of camp knives, daggers, or combat knives during military operations. This is necessary so that you can put it on your hand and it won’t get lost. In peacetime, they are simply a decorative decoration for the handle. Weaving lanyards from paracord, diagrams that you can see on the Internet will tell you how to decorate your favorite camping knife:
Node diagrams
The fundamental principle in weaving from paracord is to master the main types of knots; after you have studied them, you can start weaving diagrams of knots from paracord:
conclusions
Weaving from paracord can captivate you so much that from the usual means of packing a cable, it will become your hobby, and you will be able to make beautiful gifts for the holidays to men you know; they will be especially happy with such a pleasant and useful gift if hiking, hunting or fishing are among their activities favorite activities.


