Easy DIY gifts. DIY crafts for birthdays - making the holiday unforgettable. Making an easy holiday gift
Holidays are the most favorite time for children. It doesn’t matter what the name of the holiday is, be it New Year or Birthday, the main thing for children is to receive a long-awaited gift. In anticipation of extraordinary surprises, boys and girls are counting down the days to bring the fabulous time to receive gifts closer. It is sometimes very difficult for parents to make a good present due to various reasons. Some cannot afford to buy an expensive gift for a child, while others have already given everything before, so now they cannot come up with anything original.
An alternative to choosing holiday surprises in various situations can be a gift made by yourself. An original gift for a child, created with their own hands, will be more valuable than a purchased one, because when making it, parents put all their love and warmth into the product. It doesn’t matter how old the child is, the main thing is to give a gift that will be unique and unforgettable.
What gift should I make?
Sometimes it happens that many mothers and grandmothers lack ideas for making creative things. But this is not a problem, it’s worth observing the child and, having learned about his preferences, get to work. Children under ten years old can safely sew, knit, glue various toys from cardboard and other materials. For older people, homemade earrings, beads, bracelets, sweaters, bags and other things are suitable. In fact, the choice of things for needlework is very large, and anyone can always make exactly the one that suits them.
Universal gifts
A great surprise for any holiday, as a main gift or as an addition to something, will be the so-called universal gift. Most often this is what sweets are called, but not just a bar of chocolate or a box of chocolates, because you can buy and eat them on a weekday, but a chic set consisting of various delicacies. A basket of sweets, filled to the brim with delicious surprises, will be remembered for a long time by anyone, regardless of their age.

Candy heaven
There are probably no children who don’t like candy. Multi-colored jellies, delicious caramels and chocolate candies in beautiful wrappers will not leave any child indifferent. With the help of all these goodies you can create a beautiful souvenir if you make a shape out of sweets. DIY gifts for children made from sweets look very beautiful and unusual.
To create such a gift you will need some tools: thick cardboard, scissors, double-sided and regular tape, corrugated paper, ribbons, glue. Materials are selected depending on the type of product, so they can be supplemented with all kinds of decorations.

The principle of operation is to make a three-dimensional frame of the required shape from cardboard. For example, if you are making a car, you must first glue it together from cardboard, then give it a presentable look by covering it with corrugated paper and edging it with ribbons. Only after the work has been done should you start decorating with candies. Sweets must be chosen taking into account the shape of the product; for some round sweets are suitable, for others - rectangular or square. The selected goodies must be glued in such a way that bare spots are not visible from under them. Candies should be glued only with double-sided tape and under no circumstances should glue be used. The final stage will be packaging the candy souvenir in transparent gift film. For these types of gifts, you need to choose candies in very colorful wrappers, then the prepared gift will look festive and will undoubtedly cause a sea of applause.
New Year's fantasies
Children of all ages are undoubtedly looking forward to such an unusually fabulous holiday. Looking out for gifts from Santa Claus, children spend a lot of time under the tree. Parents should never disappoint their children, so it is important to make the most unforgettable souvenir from a fairy-tale grandfather. A very good gift would be Santa Claus, made with his own hands; he will always remind the child of the winter holidays. You can make such a souvenir from various durable materials so that the gift can last for a long time.

A gift Santa Claus can be created from sweets using the method described earlier, but then it will be short-lived. Santa Claus, made with his own hands from threads, looks extraordinary. To make it you will need the following materials: white threads, two inflatable balls, PVA glue, pieces of black and red felt, white fleecy threads (for the beard), a small piece of scarlet corduroy or velvet fabric (for clothes) and strips of any white or golden color. Having collected all the necessary materials, you can start working:
- Inflate two balloons, one large (for the body), the other smaller (for the head).
- Carefully coat the balls one by one with PVA glue.
- The ball coated with glue must be wrapped with white threads so that there are no large bald spots between them. Externally, such a ball looks like an openwork product. Do the same with the second ball as with the first. After this, you need to let the glue on the spheres dry.
- When the glue is completely dry, you will need to pierce the balls with a needle and carefully remove them. This way you will get strong balls of thread.
- Next you need to start gluing the body and head of the future Santa Claus. This is done using PVA glue.
- The next step is to make clothes for the fairy-tale hero. The easiest way is to make a cape from red fabric that will look like a coat. To do this, you need to take the fabric and cut out a circle from it, the size of which will fit the large ball (torso). Make a small circle in the center of the large circle, you need to cut it out, this will be the neck. Then make a cut from one edge of the large circle to the neckline. Thus, you will get a cape that will need to be glued to the body.
- Along the edge of the cape and on the neckline you need to glue a white border made of fluffy fabric.
- Next you should start making the beard. Take fleecy threads and, cutting them into small pieces, glue them in the place where the beard will be attached. In the same way, make and glue the hair to Santa Claus.
- Now it's time to start gluing on the eyes cut out of felt, the nose and eyebrows.
- All that remains is to make a hat for the holiday hero. To do this, you need to cut an oval out of red fabric, bend it in half and glue it on the sides. Glue the same material to the bottom of the hat as on the hem of the cape. Glue the cap to the head of the main character. Santa Claus is ready.
If you wish, you can make grandpa a small gift bag that can hold small souvenirs for the children. If Santa Claus is intended for a girl, then you can put hairpins and elastic bands or other jewelry in the bag. For boys, you can put together small cars or construction sets. A bag filled with candy would also look nice. Such a gift will be good not only as a toy, but also as an annual decoration for the New Year tree.
By doing it yourself, you can not only create a creative thing, but also have a great rest. After all, the creative process allows a person to step away from the hustle and bustle of everyday problems and relax in the process of bringing his plans to life.
To make gifts for children for the New Year with your own hands, you do not have to buy expensive materials to make them. Surely every home has everything you need for this. After all, you can make amazing toys from various unsightly pieces of fabric, beads, ribbons and threads.
Little fashionistas
Making a gift for a girl with your own hands sometimes seems easier than for a boy. After all, you can always please little fashionistas by giving them homemade beads, hairpins, bracelets, rings and other little things. A handmade bag would be a suitable gift for a young lady. Even if the child already has bags, one more will not hurt, because it will differ from others in its unique design. And children always want to show off to their peers their original new clothes that no one else will have.

Before you start making your own baby bags, you need to be sure that you can do the job efficiently. Therefore, if you do not have much experience in knitting, crocheting or you do not know how to sew, then choose bag models a little easier.
There is a huge selection of patterns and patterns for making children's handbags with your own hands, but if you wish, you can come up with a completely unique model. Small handbags knitted on knitting needles look very beautiful. To make a simple model of such a bag, you need to knit a fabric measuring 20 x 20 cm. Choose the thread size at your discretion. If you plan to make a lining, then the threads can be of medium thickness; if without it, then choose a thicker yarn.
The fabric can be knitted in any pattern; for beginners, it is best to knit it with either purl or knit stitches. It is then sewn together on the sides with a needle or crochet hook. To make handles for a bag, you need to knit two identical strips 5 cm wide on knitting needles, the length will depend on the height of the child (the handles should not be too long or short). Then, after sewing the handles to the bag, you need to start decorating the product. Even a bag of the simplest style can be turned into a designer item by properly decorating it with various little things.
The product can be decorated with various beads or embroidered with crocheted flowers. Original badges, which may contain inscriptions with the girl’s name, also look beautiful on a knitted bag. If desired, the handles and edges of the bag can be additionally tied with threads of other colors using a hook or a large needle. It is not necessary to sew a zipper into such bags, but if a child will carry a bunch of small things in it, then in order not to lose them, you will have to install a zipper into the product. Multi-colored lightning bolts are most suitable for these purposes.
Having made a gift for children with your own hands in the form of such a handbag, it can additionally be filled with various surprises. For example, if you put a beautiful mirror and a comb in your purse, as well as perfume and nail polish intended for little fashionistas, you can certainly surprise your child with such a surprise.
Little defenders
To please your little son or grandson with a gift, you don’t need to sit and waste time thinking about what to make so interesting. A beautiful car is an excellent gift for a boy, which will be very easy and simple to make with your own hands. It will be possible to involve fathers and grandfathers in such work, because they know more about cars and will probably be able to suggest good ideas.

By giving such a gift to children with your own hands, you will definitely please them, because there are no boys who don’t like cars. The choice of car models is very large, from a truck to a racing car version.
Which one to choose?
It is very difficult not to get confused when choosing a car model for handmade work, because it is not always possible to make a miniature copy of a real car. But it’s very easy to get out of this situation by making a large model out of cardboard. The homemade car does not have to be the same size as the real thing, but large enough for the child to fit in it.
Almost everyone at home has unnecessary cardboard boxes left over from the purchase of household appliances, and it is from these that you can make a wonderful machine with your own hands. To do this, you need to take a large box, for example from a washing machine, and give it the shape of a car. To make a windshield, you need to bend one of the closing sides of the top in half and straighten it, then attach the lid to the box with tape up to the fold. The rest of the closing top (unused) must be cut off.

The entire car should be covered with colorful paper or painted. Then draw all the necessary parts of the car on top of colored paper (doors, handles). You can draw wheels too, but there is another option. Turn the plastic plate upside down, paint it blue and attach it to the center of the painted tires, these will be the rims. The steering wheel is also made from a plastic plate, attaching it to the right place using a safe mount that will allow the steering wheel to rotate. Paint the headlights and paint them with yellow paint. That's all, the machine was created with your own hands! Now all that remains is to decorate it with a gift bow.
Will you like it?
When making a gift for children with their own hands, many worry about whether they will like the thing they have made. What if the gift is not to your liking and the child gets upset? In fact, all young children are always happy with any gifts. And when they find out that the item was specially made for them by their loved ones, they appreciate the gifts even more.
What should the little ones do?
Sometimes it is very difficult for parents to come up with a gift for their youngest children. They think that children from 3 to 5 years old need completely different surprises. Undoubtedly, all toys should be appropriate for the child’s age and participate in his development. But little girls and boys will be happy to play with various homemade products, the main thing is not to use small parts to make them. When making a gift for a child with your own hands (whether he is 5 years old or 10, it doesn’t matter), you need to remember one thing - all materials for gifts must be non-toxic and safe.
Gift packaging
When preparing for the holidays and making gifts yourself, you need to think through everything to the end, because in this matter, as in any other, the little things matter. Therefore, after you have made a gift for children with your own hands, you need to take care of its colorful wrapping. It doesn’t matter at all whether it’s a beautiful oilcloth or a package made with your own hands, the main thing is that it should be as bright and colorful as possible. Your children will remember such vivid impressions of the holidays for a long time.
In modern stores it is not difficult to buy a gift for every taste. However, DIY birthday crafts can become an original and sincere gift to a loved one. Plus, making homemade gifts is fun and interesting. Beautiful crafts as gifts can be made from different materials. It is worth considering the age of the recipient and his personal preferences. After all, a gift to an older person should be significantly different from a gift to a peer. What can you make yourself and what do you need to prepare for this?
The article contains the best gift ideas for family members and friends.
What can you give?
There are a lot of ideas for gifts and their design, and sometimes it’s easier to show your imagination in creating a present than to decide what exactly to give. Among the most popular gifts that you can make yourself are:
- designer postcards in various techniques;
- Photo frame;
- original notebooks;
- caskets;
- candles and candlesticks;
- interior vases;
- unusual pillows and decorative toys;
- mugs.
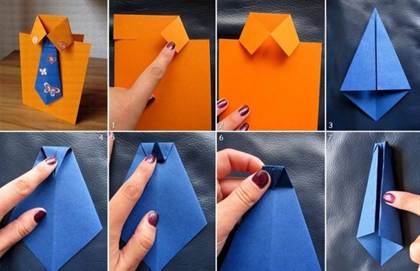
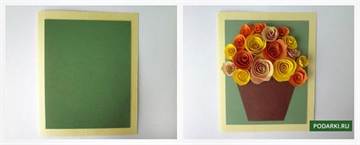
A postcard is the simplest gift, which at the same time provides a large field for creativity. Everyone loves to receive postcards with nice words, regardless of age and status. The only thing worth considering is that the design of the card must match the birthday person. For example, if this is a card for a man, then it can be designed in the form of a shirt, tuxedo or decorated with ties. If this is a card for a woman, then it can be decorated with flowers and other “feminine” items - a hat, dress, beads, lipstick.

A postcard can be decorated with various materials and objects - fabric, lace, leather, accessories, dried flowers, etc.

In addition to cards, you can make many other gifts from paper, for example, in origami style or using the quilling technique. Even a beginner can fold paper into a flower or decorate a box with rolled strips of paper.


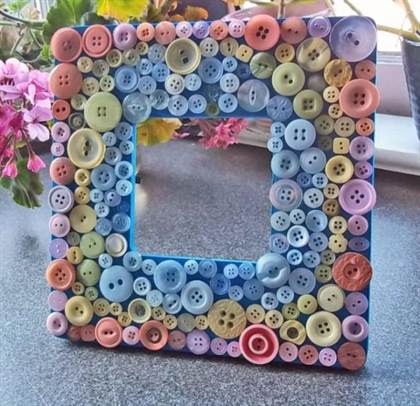
You can also experiment with a photo frame. To do this, just stock up on a ready-made wooden frame (cut it out of cardboard), a glue gun and the necessary materials for decoration. The frame can be painted and painted, decorated with decoupage or covered with shells or buttons.

You can also decorate boxes, candlesticks, vases and mugs. Craftswomen who love to sew can easily make textile interior items. The main thing is to use ideas and show a little imagination and skill.

To each his own
Each family member should have their own gift. Let's try to figure out which birthday boys will like what.
Dad with a mathematical mind will love the unusual Rubik's cube, which will remind him of pleasant family moments.
For the craft you need to prepare:
- Rubik's Cube;
- any photographs (6 pcs.);
- scissors;
- glue.
How to do:
- Remove the colored stickers from the puzzle (the colored cube can be left untreated);

- Select photographs according to the size of the cube and cut them into 9 squares, matching in size with the squares on the edges;

- Carefully spreading the edges with glue (you can use a brush), glue all the squares on all the edges.

After drying, the cube can be used for its intended purpose.

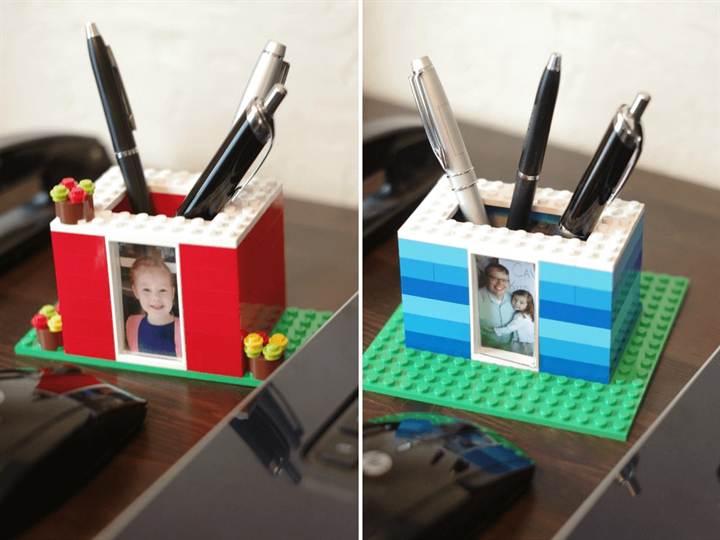
A father can receive a pen holder made from Lego from his son or daughter. The kids will practice assembling figures from the construction set, and dad will always remember whose gift it was.
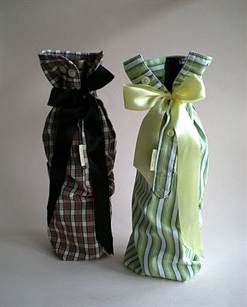
If you plan to give a bottle of alcohol as a gift, then you should take care of its design. For example, you can use sleeves from old shirts.

You can give your mother a case for an iPad or iPhone made of genuine or artificial leather. Such cases will not only protect equipment from damage and scratches, but will also emphasize the status of a business mother.
You can take leather from an old bag or briefcase. According to the size of the gadget, taking into account the allowances, cut a rectangular piece of material so that the gadget can be wrapped in it twice. All that remains is to make holes along the edges at equal distances with an awl or a stationery knife and sew the cover along them with lace or twine. To close the cover, sew a button with a drawstring loop on top. The gift is ready!

A beautiful floral card will complement the case. It can also be presented to other women, for example, as a gift to a friend or sister.
You need to prepare:
- double-sided colored paper;
- scissors (can be curly);
- skewer, toothpick or awl for quilling;
- PVA glue;
- base for the postcard (cardboard or thick paper);
- double sided tape;
- ribbons and beads.

Progress:
- Cut out circles of different sizes from colored paper;
- Starting from the edge and moving towards the center, cut out a spiral from each circle (you can make the edges wavy);
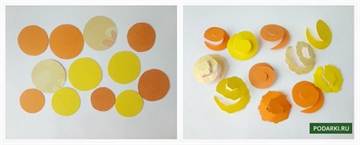
- Using an awl, toothpick or skewer, twist the resulting spirals into flower corollas;

- Cut out a trapezoid - a vase - from dark paper;
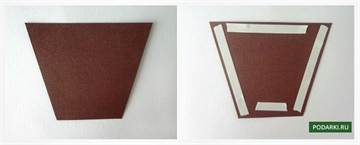
5. Glue a background to the card, and a vase and flowers on it;
- Decorate the card with beads, ribbon, and inscription.


Grandma will certainly love the box in which you can collect various little things. You can buy a blank and decorate it to your liking, or you can make the box yourself. For this you will need:
- thick cardboard or other base;
- toothpicks;
- yarn;
- PVA glue;
- heart-shaped template;
- glue gun;
- beads or other decorations.
Progress:
- Cut out the bottom of the box from cardboard according to the template;
- Stick toothpicks into the cardboard around the perimeter, use glue for better fastening;
- Start wrapping the toothpicks with yarn, alternately going around them from the outside and from the inside;
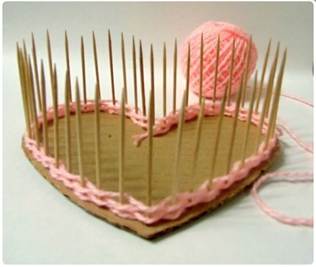
- Braid to the end, tie the end on the last toothpick and hide it inside;
- Place a small bead to match the yarn on the tip of each toothpick (to secure the weave);
- Decorate the box with beads.
The gift from my granddaughter is ready!
If desired, you can make a lid by also cutting it out of cardboard and wrapping it with thread.
Grandpa will likely appreciate practical items that he can use every day. A good idea is a glasses case made from an old tie or scarf. To do this you will need thread and a needle, Velcro, fabric glue, scissors and a tie. The main thing is to correctly determine the length of the case so that the glasses fit in it and at the same time it can be closed freely. The finished case can be decorated with buttons.

You can also give the older generation a general gift - a family tree on which photos of all family members will be placed. There are a lot of options for “family trees”. Various techniques will be useful here, including quilling, applique, and dot painting.


A great gift for tea lovers. “Tea connoisseurs don’t drink sawdust from tea bags!” - you say. But who’s stopping you from packaging good, expensive tea in envelopes?
You will need:
- a cone made of foam plastic or thick cardboard;
- round cardboard box and rice for stump;
- tea packed in small paper bags (the quantity depends on the height and diameter of the cone);
- glue gun;
- star, bows and other decorations of your choice.
Cover the cone with tea bags, applying glue to the top of them. Move from bottom to top in a checkerboard pattern. It is better to use bags of contrasting colors: the tree will look more elegant.


Glue the lid of the cardboard box to the bottom of the cone. Fill the box itself with rice to make the tree more stable, and then attach it to the lid. If you don’t have a ready-made box of the required diameter at hand, make it yourself. Take a tube from a roll of paper towels as a basis or glue it from cardboard according to this pattern.
Decorate the tree with bows, rhinestones and other decorative elements, and glue a star to the top of the head.
 Tara Aveilhe/Flickr.com
 Girls will highly appreciate such a gift. After all, this is an individual scent; no one in the city will have such a perfume.
Before you create, find out what smells the person you want to please prefers. For example, if a girl likes citrus scents, she will need lemon or orange. To add woody notes, you need sandalwood or cedar oils, powdery ones - roses or vanilla.
Ingredients:
- ½ cup almond butter;
- ½ cup grape oil;
- 100 g beeswax;
- 1 teaspoon vitamin E;
- 60 drops of lemon oil;
- 25 drops of eucalyptus oil;
- 20 drops of lavender oil;
- 20 drops rosemary oil.
Mix almond and grape oils with wax in a separate saucepan and place in a steam bath. When the wax is completely dissolved, let the liquid cool slightly and add essential oils and vitamin E. Pour the future perfume into molds. A bottle of old hygienic lipstick, a jar of Vaseline, etc. will do.


Once the wax has hardened, the perfume is ready to use. All that remains is to package them beautifully.

A great gift for freezing girls. A pair of warm, fairly sturdy socks that you don't wear can be turned into fingerless gloves.
Additional materials:
- needle with thread;
- heart cut out of felt.
Trim and sew the sock as shown in the photos. Be sure to hem the edge to prevent fraying, and make all seams from the inside out.

Sew a felt heart on top. You can use any other decorative means. For example, embroider the inscription “Happy New Year!” or embroider mitts with rhinestones.
Another DIY gift for those who are always cold is. By heating it for 1-3 minutes in the microwave, you will get a great heating pad that also smells nice.
 GA-Kayaker/Flickr.com
 Paracord is a cord made of nylon. Initially used as a material for parachute lines, but then paracord began to be used wherever a light and durable cable might be needed. For example, stylish men's bracelets are woven from it. In ordinary life it is just a decoration, in an extreme situation it is a life-saving rope.
There are various techniques for weaving paracord. Here is one of the most common.
You will need:
- 150 cm of paracord of one color and the same amount of another (it is desirable that the shades be contrasting);
- 75 cm of black paracord;
- scissors;
- ruler;
- needle and thread.
From paracord you can weave not only a bracelet, but also a keychain, or make a braid for a knife or a car steering wheel. You can easily find the diagrams on the Internet. It’s even easier - watch video tutorials on YouTube, there are many of them.
 Witandwhistle.com
 You can not only drink from such a mug. You can leave messages on it for your household or just draw.
Materials:
- white porcelain mug without relief;
- slate paint;
- masking tape;
- brush.
Chalkboard paint is most often used to renew the surfaces of school boards. Now there is a large selection of such paints. You need one that can work on ceramics. For example, like this one.
Choose an area of the mug that is comfortable to write on, but that will not come into contact with your lips when drinking. Cover the rest of the mug with masking tape.
Degrease the untaped area and apply paint to it in a thick layer. Remove the tape and leave the mug in a well-ventilated area for a day.
 Witandwhistle.com
 When the paint is dry, place the mug in an oven preheated to 150°C. After 30 minutes, turn off the stove, but remove the mug when it has cooled.
Now the mug can be washed in the dishwasher and put in the microwave.
 Heygorg.com
 If you are one of those who like to give experiences rather than material things, you will love this idea. After all, it’s not only a delicious warming drink, but also a reason to go or invite you to visit.
Take some pretty glass jars and fill them about a third full with hot chocolate or cocoa powder. Add a few candies or pieces of chocolate. Fill the remaining space with marshmallows.


Decorate the jars to your liking. For example, place a piece of fabric under the lid and attach a heart made from candy canes to the top. The label can serve as a postcard; write your wishes on it.
Another variation of this gift is a set for mulled wine. Take an orange, an apple, a clove and a cinnamon stick. Pack it all beautifully, make a label with your wishes and add a bottle of good red wine.

Candles are a traditional New Year's gift. But glamorous store-bought ones are one thing, a personalized candle or a candle with a phrase understandable only to the giver and recipient, or even with a photograph, is another.
Take:
- white candles with a diameter of 5–7 cm;
- A4 size printing paper;
- parchment paper;
- scissors;
- glue stick;
Trim the parchment paper so that it is 1-2 cm wider than the A4 sheet. Glue the parchment to the printing paper, turning the edges over to the other side. Insert the sheet into the printer with the glossy side, that is, the side where the parchment is. Print out the image you would like to place on the candle.


The drawing will appear on parchment paper. Now you need to transfer it to a candle. Cut out the image, attach it to the candle, tightly wrap it with another layer of parchment on top and direct a stream of hot air onto the resulting structure. If the picture becomes lighter, it means it was imprinted on the candle. Carefully remove the top layer of parchment and let the wax harden.
The gift is ready! If desired, you can decorate it with rhinestones or sparkles.

This cosmetic bag greatly simplifies the search for the necessary items, because any lock can be opened.
You will need:
- 10 zippers 15–20 cm long;
- safety pins;
- needle or sewing machine;
- threads
Sew the zippers to each other from the inside out; for convenience, you can first attach them with pins. Close the resulting fabric into a ring and sew. Also sew the zippers across in front of the dogs, and then turn the cosmetic bag inside out.


This is a gift for a person who cannot part with gadgets. Using the same principle, you can sew a phone case.
Materials:
- a piece of felt suitable for the size of the tablet;
- 2 buttons;
- sewn-in magnets;
- safety pins;
- dense thread in the color of the buttons;
- thread in the color of felt;
- needle;
- scissors.
Fold the fabric so that the bottom part is longer than the top: this is the future cover of the case. Sew along the edges and turn the product inside out.
Cut the lid into a wave or semicircle. Sew a button to the middle. Attach the second one below, to the case. Make a loop between them, as shown in the photo.
 Ohsolovelyvintage.blogspot.ru
 Sew a magnet to the base and lid of the case on the left and right. The fashionable case is ready!
You can also make a stylish organizer for headphones, flash drives, phones and other gadgets from an old book in a beautiful binding. Here's the detailed one.
 lePhotography/Flickr.com
 A gift that will delight not only children, but also adults with a sweet tooth. Making Santa Claus's sleigh is very simple.
You will need:
- glue gun;
- ribbons and other decor;
- sweets: chocolate, sweets, candy-shaped candies.
Here is a detailed video instruction.

A gift for a bosom friend or colleague. Beer can come in handy on January 1st, and brown bottles can easily be styled to resemble Rudolph and friends. (Rudolph is one of Santa's reindeer, distinguished by his red glowing nose.)
Materials:
- beer in dark glass bottles;
- decorative wire;
- toy eyes;
- red pom-poms;
- ribbon and bows;
- box;
- Super glue.
Remove labels from bottles. Make antlers from wire for future deer.

Glue them to the back of the bottle. Attach the eyes and nose to the front. Tie a ribbon (to prevent it from slipping, you can fix it with glue).
 Craftysisters-nc.blogspot.ru
 Decorate the rest of the bottles in the same way. Put them in a box and decorate it.

A gift for economical women and men who love to cook.
You will need:
- cotton fabric with a New Year's pattern;
- batting for lining;
- threads;
- scissors;
- needle.
If you have a sewing machine, the work will not take much time. Detailed video instructions - from pattern to thread cutting - are included.
Inside such a mitten you can put a spatula, a ladle and other little things useful for the kitchen.
A little more imagination, and your New Year's gift will become even more original. Attach a ring to the spatula and hang favorite family recipes printed on cards and laminated on it.
 Lilluna.com
 Glass snow... wine glass

Balloons with a miniature figure and artificial snow inside are very popular. Life hacker already shows how to make something similar from an ordinary glass jar. Today it's the turn of wine glasses.
Materials:
- transparent wine glass;
- thick cardboard;
- a figurine that can easily fit into a glass;
- artificial snow;
- bows and other decor;
- glue.
Cut a circle out of cardboard with the same diameter as the wine glass. Glue the figure to the cardboard. It could be a Christmas tree, fawns, or, for example, a car with a Christmas tree on the roof.

Place artificial snow, finely chopped white paper or foam plastic on the bottom of the glass. Glue the cardboard base to the edge of the wine glass and turn it over. Decorate the leg with a bow or ribbon.
 belchonock/Depositphotos.com
 Over the past year, very large knitted blankets have been incredibly popular. Finished products are quite expensive, so it is more profitable to make a blanket yourself.
Merino wool is best suited for this, but other thick threads can be used. Video tutorial is attached.
You can also knit a beautiful, warm scarf with your hands, without knitting needles or a hook. Life hacker has already seen how this is done.
 Ourbestbites.com
 This gift will help you remember the best moments of the past year. Just choose the best photos and print them. Get some clear glass jars and vases. Round and cylindrical vessels work best.


Many people have flaky skin in winter. If there are such people among your friends, prepare them a sugar-lemon scrub as a gift..

According to the Chinese calendar, the symbol of 2017 is the rooster. Therefore, gifts with the image of a rooster or in the shape of roosters and hens will be especially relevant. A universal option for such a gift is a Christmas tree toy.
You will need:
- cardboard blank in the shape of a rooster;
- thick fabric;
- filler for toys;
- twine and lace ribbon;
- white outline;
- scissors;
- needle and thread;
- glue gun
The manufacturing process is shown in the following video.
You can sweeten such a gift with sweet cockerels on a stick. Many people still have their uniform from Soviet times.
Ingredients:
- ½ cup granulated sugar;
- 2-3 tablespoons of water (just to moisten the sugar);
- 1 tablespoon of apple cider vinegar (in some recipes add regular tablespoon or a pinch of citric acid).
You need to boil syrup from sugar and pour it into a form generously greased with vegetable oil. Then stick the sticks in and wait until everything hardens.

If you know other original DIY solutions, share them in the comments.
A friend is someone who knows a part of your life and has fun when you are around. On her birthday, I would like to emphasize the peculiarity and importance of the attitude towards her. In this article we will look at how to make a gift for your friend’s birthday with your own hands.
You will need: pot, foam, skewers, artificial grass, glue gun, candy bars, chewing gum, gift cards, etc...
Master Class

The creative indoor flower is ready!
Coffee mug
You will need: mug, coffee beans, cotton pads, thick white thread, brown acrylic paint, super glue.
Master Class

Coffee heart
You will need: coffee beans, paper, wire, thread, glue, cardboard, jute thread, sponge, iron can, brown paint, ice cream sticks, decorative elements - flowers, ribbons...
Master Class
- Fold a piece of paper in half and draw half a heart, then cut it out.
- Trace the heart on cardboard and cut it out in 2 copies.
- Wrap 2 pieces of wire in paper and glue to one heart. Repeat this process for the second heart.
- Glue cotton pads in several layers between the hearts to make the design three-dimensional.

- Cover the entire heart with cotton pads and wrap with thick thread.
- Color the heart.
- Glue the coffee beans in 2 layers.

- Cover the jar with popsicle sticks.
- Wrap the wires with jute thread.

- Stick the coffee tree into the sponge, then place it in the pot.
- Decorate to your taste.
The coffee heart is ready!
Ship made of money
You will need: 7 sheets of A4 format with images of different banknotes (euro, dollars, hryvnia, rubles), white sheets of A4 format, silicate glue, scissors, glue gun, thick cotton threads, skewers 20-30 cm long, polystyrene foam, a flat box of half as wide as the bottom of the ship.
Master Class
- Fold a boat from a sheet of paper as shown in the photo.

- Carefully turn the boat inside out so as not to tear it.
- Fold and iron the boat.
- Trace the outline of the boat on another sheet, then draw a dividing line and cut out 2 parts.

- Coat them well with glue and glue them to the inside of the boat to make two-layer sides.
- Cut the money sheets into 1.5 cm wide strips.

- Cover the boat with money stripes.
- Carefully coat the entire boat with glue for strength and leave for 2 hours to dry completely.
- Place identical bills side by side and glue them together. Make 3 of these - from five, from three, and from four bills. These will be the sails.

- Carefully thread the sails onto skewers and secure the joints with glue so that they do not slip.
- Take the boat and glue 3 pieces of foam inside.
- Insert skewers into the foam for the front and back yard. The front yard should be 1/3 longer than the back. Make sure the lines are level, then secure with a glue gun.
- Insert skewers with sails, placing them at the same distance. It is worth noting that the deck should be smaller than the stern.

- Fold the threads in 2-3 layers along the length of the sail and additional centimeters for the ties.
- Tie the threads to the skewers as shown in the photo.
- Cut 2 bills diagonally and fold the edges 0.4 cm.
- Glue the bills (sails) to the raking threads.

- Make sails on the stern in this way: do not twist the bill into a tube too much, bend the edge, then glue it.
- Fold 3 bills in half, shape them into flags, then glue them.
- Cover the deck with bills.

- Make a stand for the ship from a flat box.
- Glue the desired background onto the box.
- Glue the ship.
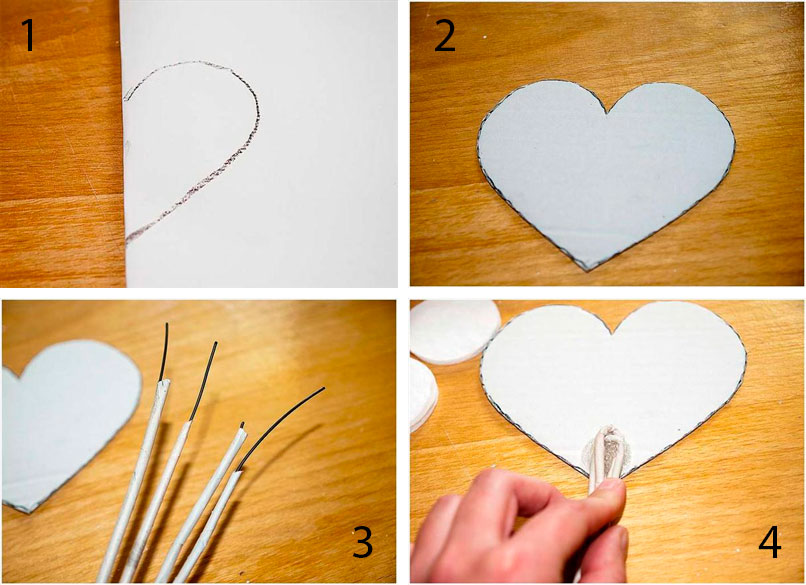
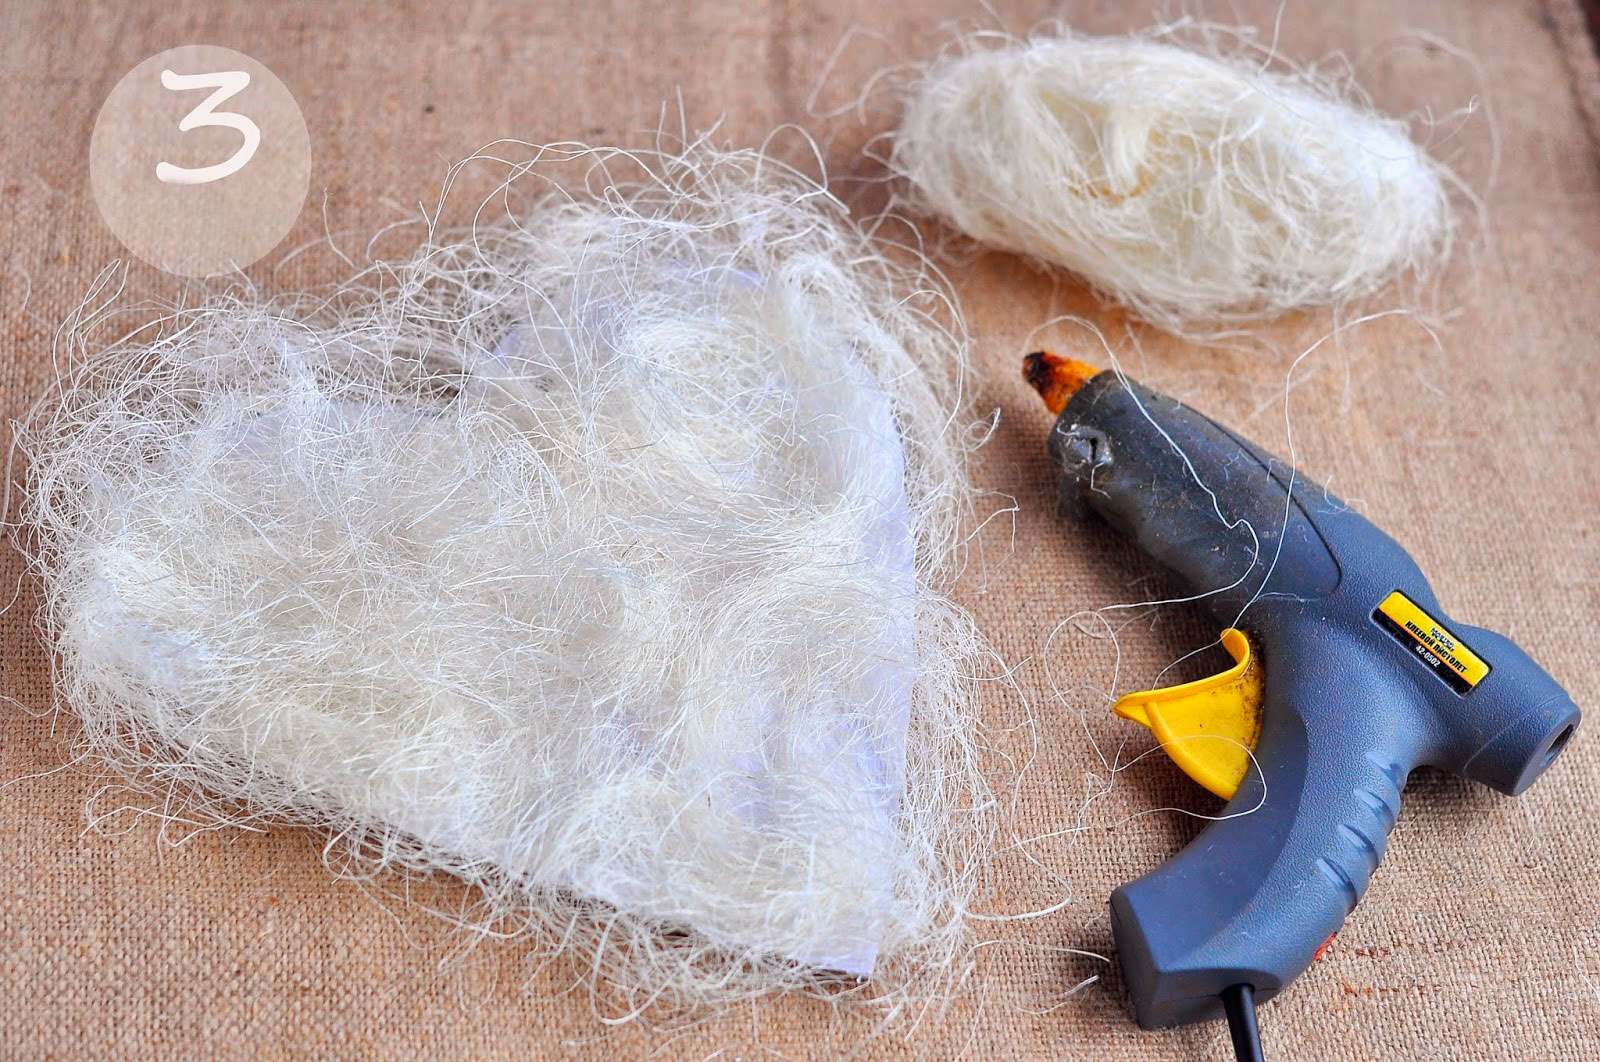
You will need: shells of the desired size, cardboard, scissors, glue gun, simple pencil, awl or hole punch, twine or rope, sesal, burlap, optional decorative elements - beads, seed beads, starfish...
Master Class
- Draw a heart on the cardboard.

- Cut it out.

- Make 2 holes for hanging using a hole punch or awl.
- Glue sesal to the front of the heart.

- Cut out a burlap heart 1 cm larger than the cardboard one.

- Stick it on the other side.

- Insert the rope into the holes.

- Tie double knots on the wrong side of the heart.

- Cover the side of the heart on which the sesal is located with shells.

- Glue a starfish in the center.

- Cover the contours of the heart with twine.
You will need: corrugated paper of your favorite colors for buds, green corrugated paper for leaves, Raffaello candies, double-sided thin tape, green tape, satin ribbon, packaging material for a bouquet, scissors, wire, pliers, a wooden stick, optionally transparent beads to create dew , glue gun, tweezers.
Master Class
- Prepare the wire by making the required number of stems of equal length.

- Cut long strips of corrugated paper, cut the long strip of corrugated paper into 2 pieces, then cut into 4 pieces. You should get 8 strips, 6 of them will be needed for the tulip bud.
- Turn each strip over the center, folding it so that the right sides of the strip are pointing in the same direction.

- Make 6 blanks in the same way.
- Attach double-sided tape to the tip of the wire.

- Attach the candy to the tip of the wire.
- Assemble a tulip bud in this way: take the first petal and attach it to tape. Place the second and third petals near the candy and, holding them with your fingers, secure with tape.

- Attach the remaining petals in the same way, forming a tulip bud and securing with tape.
- Trim the excess ends of the crepe paper at an angle at the base of the bud.
- Wrap the stem with tape.

- Cut a strip of green crepe paper.
- Cut into two almost equal parts.
- Fold each part 4 times and cut out the leaves.
- Pull each leaf out in a spiral using a wooden stick.

- Place a short leaf and a longer one below. Secure each leaf with tape. The tulip is ready! Make the required number of tulips of different colors.
- Assemble tulips into a bouquet in this way: connect 2 tulips and tie them with tape, then add one tulip at a time, placing the colors in a checkerboard pattern.

- Cut 20 leaves and place them around the perimeter of the bouquet, securing with tape.
- Wrap the bouquet in wrapping paper and tie with ribbon.

- Create dew drops on tulip buds by gluing clear beads using tweezers and hot glue.
Spectacular bracelet made of ribbon and beads
You will need: ribbon, beads, thread and needle.
Master Class

You will need: 18 hex nuts, rope.
Master Class

Head wreath made of foamiran
You will need: foamiran 0.5 cm thick (orange, yellow, cream, light green, dark green and red), scissors, toothpick, curly scissors, oil paint in autumn shades, sponge, sheet of paper, iron, floral wire, ruler, super glue, lighter, lilac clay (for blueberries) or beads, tape, foil, wire at least 2 mm thick and 60 cm long, ribbon or string, mold (leaf shape).
Master Class
- Print or draw leaf templates, then cut them out.

- Trace the templates onto foamiran with a toothpick, then cut them out.
- Make a sufficient number of multi-colored leaves, for example 60, remember, the more there are, the more magnificent and beautiful the wreath will look.

- Add realism to some of the leaves by trimming the edges with scissors.
- Scratch a small part of the leaves with a toothpick.
- Tint the leaves in this way: apply a little oil paint to the sponge, blot a sheet of foamiran, then remove the excess with a piece of paper.
- Combining colors: color the yellow foamiran leaf with light green and brown paint. Also, color some yellow leaves with orange, red and light green paint. Tint red leaves with brown, green leaves with burgundy, brown and dark green.

- Preheat the iron on the second setting, apply the sheet for 2 seconds, remove it and press it onto the mold to make an impression of the sheet. Repeat this process with all the leaves. Please note that this should be done quickly and very carefully, as foamiran is highly flammable. If you are new to this business, it is better to skip this point and proceed further.

- Cut the floral wire into 7 cm long pieces and make a loop at the end.
- Glue the floral wire to the front side of each leaf using super glue.

- Treat the edges of the leaf with fire using a lighter. The edges should be realistically curved. Repeat this process with all the leaves. Do this carefully, I remind you that foamiran is highly flammable.

- Roll a ball of purple clay the size of a blueberry. Make 15 berries, place each blueberry on a wire with a loop coated with super glue. Using the tips of a pair of scissors, score the tops of the blueberries and set aside to dry. Beads can be used as blueberries.

- Start assembling the wreath in this way: form small bouquets of leaves and berries, secure them with tape.
- Cut rose petals in the shape of a drop from red foamiran. One bud will require 10-15 petals. The number of buds depends on your desire; you can make from 3 to 7.

- Tint the edges of the petals with brown oil paint.
- Make the petals thinner in this way: heat the petal on the iron for 2 seconds, then fold it into an accordion and rub the petal with your fingers. Open the petal and create an indentation and curl the edge of the petal outward. Repeat this process with all the petals.

- Finish the edges of the petals using a lighter.
- Roll up a foil drop, make a loop on the wire, apply super glue and put on the foil drop.
- Glue 2 petals opposite each other and form a bud by gluing the petals in a checkerboard pattern, opening the flower slightly. Form the desired number of roses in the same way.
Everyone loves to receive gifts, but many people don’t know how to please a loved one.
Of course, it’s easier to go to a souvenir shop and buy another trinket.
But a thing made with your own hands, into which you have invested labor, effort and energy, will bring much more positive emotions.
In this article, we have collected 30+ of the best ideas on how to make a unique birthday gift for mom, dad, friend, grandfather or grandmother with your own hands.

How to make a birthday gift with your own hands from paper
As a rule, we are used to buying postcards in a store and often with ready-made template words.
To make a beautiful card as a gift for your grandparents or friend with your own hands, you will need some stationery and a little diligence. So let's get started.
 The easiest way to make a beautiful card
 To make a cute card, you need:
- 2 sheets of white cardboard
- Colored (in this case purple) pastel paper
- 3 types of paper for scrapbooking
- Transparent film or flower packaging
- Scissors
- Glue
- Pencil
- Ruler
- Hole puncher
- Compass
- Colored glitter paper
- Thin pink ribbon
Step 1:preparing the basis for the future postcard. To do this, fold a sheet of white cardboard in half.
 Step 1
 Step 2:Cut out a purple rectangle from pastel paper, the size of which is equal to the front part of the base.
 Step 2
 Step 3:glue the purple paper onto the card.
 Step 3
 Step 4:From the second sheet of cardboard we cut out a rectangle, the size of which is 2 cm smaller on all sides. We cut out three circles of different diameters from ordinary waste paper - these are templates for the future application.
 Step 4
 Step 5:We draw two circles on cardboard and cut out holes.
 Step 5
 Step 6:We cover the holes with transparent film to create windows.
 Step 6
 Step 7:Cut out another circle from pink paper.
 Step 7
 Step 8:cut out a square measuring 8x8 cm from scrapbooking paper.
 Step 8
 Step 9:Glue a square on the back of the bottom window so that there is a hole at the top. Sprinkle some sequins inside.
 Step 9
 Step 10:take paper of a different color and do the same with another circle.
 Step 10
 Step 11:From glitter paper we cut out numbers with the age of the birthday person and flowers. For this you may need a figured hole punch.
 Step 11
 Step 12:glue the third circle and our blanks onto the postcard, as shown in the photo below.
 Step 12
 Step 13:We make three bows from a pink satin ribbon and also glue them to the card.
 Step 13
 Step 14:glue the base onto the lilac part and let it dry. Now all that remains is to write beautiful wishes.
 Step 14
 As you can see, making an unusual card is as easy as shelling pears.
Below we have prepared a few more ideas on how to make a birthday gift for your grandfather or grandmother with your own hands from paper.
 Card for dad
 Such cute little things will definitely please your loved ones.
 Floral motifs for mom
  Fairytale cards
  Declaration of love
  Applications
  Letter for you
 Scrapbooking
Another interesting way to make a birthday gift with your own hands from paper.
 Scrapbooking technique is popular today
 Its main idea is to create unique albums, postcards and other souvenirs to preserve family history.
To make them, you will need special paper printed using various techniques, rings for photo albums and jewelry.
Paper flowers are especially popular - you can also make them yourself.
Buttons, beads, ribbons, scraps of fabric, sequins will come in handy - the field for imagination is huge.
You can also find special hole punches, paints and varnishes, and eyelets on sale.
 Romantic card in scrapbooking style
  Handmade book
  To make such beauty you will have to stock up on materials.
 At the end of the article, we have prepared an interesting video for our readers on how to make a book in scrapbooking style, if you are new to this business.
How to make a DIY gift for your friend’s 12th birthday - handmade jewelry
All girls love bright jewelry. But it’s especially nice when the gift is made personally.
Homemade soap making is a fascinating creative process and a great way to please loved ones with handmade gifts.
 This gift will definitely please your loved ones.
 In addition to soap, there are several other options for presenting natural homemade cosmetics on a special day.
Body Scrub
Your concern will definitely be appreciated, and you will find recipes for preparing effective natural remedies.
 Body Scrub
 Lip balm
Or several at once with different flavors.
 Homemade lip balm
 Or a whole set of body and face care products.
 A set of home cosmetics will please every representative of the fair sex
 How to make a DIY gift for your dad’s or loved one’s birthday - ideas for “men’s” gifts
"Mustachioed" mug
Who will you surprise with an ordinary white mug today? But a mug with a funny mustache, the main trend of recent years, will certainly become the favorite cup of a representative of the stronger half of humanity.
 “Mustachioed” mug
 To make it you will need:
- Plain white cup
- Marker for ceramics
- Scissors
- Sample
 Step 1
 Step 1:Wash the mug thoroughly and dry it. INWe cut out the mustache according to the template, apply it to the cup and carefully paint over it.
 Step 2
 Step 2: yours the fantasy cup is ready.
In the same way, any ordinary tableware can be turned into a real work of art. See for yourself.
 Using a marker you can create a real work of art
  Draw a pattern on the plate
  And create a whole composition
 Lamp made from old toys
Agree, this thing looks impressive and will decorate the desk of any man.
 Spectacular lamp
 To create beauty you will need:
- Old children's toys
- Base of an old table lamp
- Shade
- Wire
- Polyethylene
- Glue
- Latex gloves
- Spray paint
Step 1:We glue old toys in a chaotic order to the base of the table lamp, as shown in the pictures below.
 Step 1
  Step 1.2.
 Step 2:evenly distribute the coating from the can. In this case, be sure to use polyethylene for protection, otherwise the entire apartment will be covered in paint.
 Step 2
 Step 3:install the lampshade, connect the cord and plug, and the lamp is ready.
 Step 3
 with family photos
It will certainly delight the heart of a true family man.
 Family Rubik's Cube
 To make it you will need:
- The actual Rubik's cube
- Family photos
- Glue
- Scissors
Step 1:If possible, remove the coating from the sides of the cube.
 Step 1
 Step 2:Cut family photos into pieces of the required size.
 Step 2
 Step 3:Carefully glue each edge into place. The original sincere gift is ready.
 Step 3
 You can go beyond just the Rubik's cube and come up with a more original option for family photos. For example, such as the star below.
 Another way to present photos in an original way
 How to make a DIY birthday gift - 15+ gift ideas for everyone
Fantasy oven mitt
You can make it from any scraps of fabric.
 Kitchen oven mitt
 Mushroom pillow
Anyone can sew such beauty on their own, even without a sewing machine at hand.
 Pillows for him and her
 Felt toys and brooches
Representatives of the fair half of humanity especially adore it.
 Felt brooch
 Toys and dishes made of clay
We have already written above how easy it is to make jewelry from polymer clay. You don’t have to limit yourself solely to bracelets or earrings. Make cute handmade toys.
 Clay toys
 Or decorate the most ordinary cup with clay elements.
 Decorating a cup with polymer clay
 Unusual bouquet
Who said that flowers must be alive? A fabric bouquet will please the eye of its owner for years.
 Fabric bouquet
 The paper version looks no less impressive.
 Paper bouquet
 A flower vase can also be made at home. A wine bottle is perfect for this task.
 Wine bottle vase
 Coffee tree or cup
A classic among handmade gifts.
 A coffee tree
 Homemade baking and food
 Flower pots
 Thread painting
It is also fun for those who like to be creative and delight loved ones with memorable souvenirs.
 Thread painting
 Photo frame
A win-win option, especially since we never have enough time to print out the best moments of life.
 Intricate photo frames
 Shopping bag
It will not only please the birthday boy, but also take care of it.
 Shopping bag
 Candlesticks
 Handmade candlesticks
 And, actually, the candles themselves
 Handmade candles
 Night light
This cute table lamp is also easy to make with your own hands.
 Night light
 As you can see, there are dozens of inexpensive gift options. The main thing is to give free rein to your imagination and enjoy creating.
You will learn how to make an interesting birthday gift with your own hands in scrapbooking style from this video:


