DIY crafts from different cones. DIY crafts from pine cones and plasticine. Decor on the theme of autumn
If you like to make exclusive gifts and souvenirs from scrap materials, crafts from pine cones will help you expand your creative horizons. Fir, pine and cedar cones are great for making New Year's, children's and home crafts. The original shape of the cone allows for tinkering New Year's wreaths, candlesticks, garlands, various figurines of animals and elves and do-it-yourself angels.
 Cones are a very affordable, simple and, most importantly, environmentally friendly material. They are used to make toys and souvenirs for children, crafts for kindergarten and school. A craft made from an ordinary pine cone and plasticine will interest a child and make him want to create something new, interesting, and unusual. And then they expect you photos of stylish, original and simple crafts from cones for adults and children of any age.
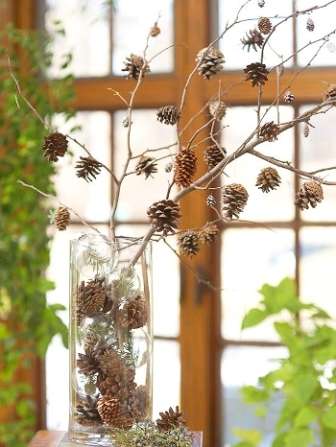
The beauty of pine cones is that they lie literally under our feet. When you go for a walk in the forest or to the nearest city park, look around - you will find materials for your future crafts.
 The bump itself already looks very beautiful. If paint several pine cones in different colors, sprinkle with sparkles or beads, you will get incredible decor for the New Year and other holidays.
 Photos with New Year's crafts made from ordinary pine cones look very unusual.
  And after the New Year holidays, the child will happily “recycle” everything that is left of the Christmas tree. This porcupine looks very creative, and making it is as easy as shelling pears.
 Christmas tree made of pine cones It looks very stylish in the interior, as do laconic decorations and pendants made of ribbons and burlap.
 Cones also produce beautiful flowers, paintings and decorative decorations for home.


Autumn crafts from pine cones
Autumn is not only the time of a generous harvest, but also the time to make crafts from pine cones with your own hands. In addition to cones, you can use other materials in your work: acorns, dry leaves, flowers, chestnuts, berries.

 From autumn leaves, flowers and fruits, modern craftsmen have learned to make amazing bright wreaths, bouquets and decorative compositions.

 Together with your child you can make a cute autumn bird from pine cones - cockerel or owl.


The autumn theme gives rise to new creative ideas for interior and decor.
If you want to try making something with your own hands right now, here are detailed instructions for making a wood elf. 
Prepare for work:
- fir cones;
- walnuts;
- dry leaves;
- glue;
- threads;
- ribbons;
- plasticine;
- markers;
- scissors.

Crafts from pine cones for school and kindergarten
In kindergarten or school, children often make crafts from natural materials, using creative techniques and a variety of decor. Cones are an ideal material in this regard. They are actively used in the manufacture of little animals, people, birds and incredible mythical creatures.


 If your child needs to do something interesting, creative and not very complicated, and you are not a big handicraft expert, we suggest take a master class on making birds from small pine cones.
Prepare everything you need:
- cones;
- corrugated cardboard;
- table tennis ball;
- toothpicks;
- brush;
- paint;
- glue;
- tinsel;
- wire.

 You can also make a whole composition, using not only cones, but also Ashnuts, acorns, dry herbs.
 Children's crafts made from pine cones look very bright and creative, especially if they are add “purchased” elements– eyes, colored feathers, plastic fruits, etc.
Cones, it would seem, are the most common natural material. Every person can make very interesting crafts from pine cones with their own hands. It is enough to have at least a little desire, imagination, and, of course, to find the bumps. And then you can decorate your home in a completely original way.
This business, of course, has its own tricks that you need to know before you start making crafts from pine cones:
- In a warm room, the cones can change slightly in shape, i.e. they open up. But the very form that it originally had can be fixed. To do this, dip it in a solution with wood glue for half a minute, then dry it.
- To ensure that the cone has initially changed its shape, you need to soak it in plain water. Next, you need to tie it with a rope and give it the desired shape, and then dry it.
Cones are an excellent material from which a wide variety of crafts are created. This is a great way to share activities and spend time with children. You can find cones on a walk in the park, and if you go out into the forest, you can stock up on this material for the whole winter! All that remains is to come up with an original idea for crafts made from pine cones with your own hands and turn it into reality.
"New Year's" Cones
Very often this material is used for many different decorations and decorations during the New Year holidays. The simplest way is to create gold cones to decorate your own home.
In addition, this material has many advantages. The main ones are:
- They are the purest material
- They have an incredibly pleasant pine aroma
- Making crafts from pine cones is not only very interesting and exciting, but also a wonderful way to spend time with your baby
- Very good savings on buying new home decorations.
The simplest options, which can be done very easily with just one cone and a satin ribbon. See photos of crafts made from pine cones.
A great way to work together with children. After all, you will not only make fakes together with them, but also decorate your Christmas tree, chandeliers, and other elements of your home interior!
It is customary to decorate the entrance or interior doors of a house or walls with a New Year's wreath of pine cones. In addition to the main material to create a wreath, you can also use dried flowers, ribbons, etc., thanks to which you will create the most unique masterpiece of art with your own hands.
You can make a very original decoration for chandeliers. To do this, see the photo of crafts made from pine cones.
This ball turns out to be quite large in size. It can be used as a New Year's decor for the home, as well as a regular decoration for any room. For example, you can put it on a vase, choosing its desired shape, or hang it from the ceiling using a ribbon. The only thing you need besides pine cones to create a decorative ball is patience.
The cone is very carefully disassembled into pieces (plates). A circle is cut out of cardboard to serve as the base. Its diameter should not be too large. Twice the diameter of the glass with a candle is enough. Next, cone plates are glued onto this circle, along the edge and in a checkerboard pattern. The second layer is also used to glue the plates, but into the gaps remaining in the first row. And so continue to glue row after row. The height should be the height of the candlestick you would like to achieve. After which the product dries out, and you can put a glass with a candle in the middle of it. Your homemade original decoration is ready!
Surely you have had to deal with the question of how to make DIY crafts from pine cones for kindergarten. The teddy bear shape will delight little ones.
To create it, prepare: 1 spruce cone and 4 half-opened and 1 completely open pine cone, which has a rounded top, black peas, acorn caps, alder cones, white birch bark, a wooden cut (the basis of the craft), a knife and awl, sandpaper , varnish and glue.
For the bear's body, an elongated cone is needed. When creating such a craft with your own hands from pine cones for kindergarten, the parts are attached to each other “under the scales”, with glue pre-applied to the necessary parts of the pine cones.

There are probably no people in the world who have not seen cones. But few people know that this natural gift makes fantastic DIY pine cone crafts. To create them you will need a little free time, a little desire, a little imagination and, of course, a little creativity. And then unique decorations will appear in the house.
Making roses from pine cones is not difficult, but the result will be amazing. For this craft you will need:
- Pine cones;
- even thin branches of any tree;
- corrugated or scrap paper;
- scissors, paints;
- brush with long bristles;
- Super glue.
The cones are washed and dried, then painted in different colors
Tree branches are trimmed, cut to the required length and painted green

Leaves are made from paper (felt) for each rose branch.
 We collect flowers. Glue a pine cone to the upper end of the branch, and leaves below

When the flowers are dry, they are placed in a vase. This is how we created this lovely craft from pine cones with our own hands!

Teddy bear and Christmas tree
To make a bear cub from fir cones you will need the following materials:
- medium sized lump;
- half-opened small cones – 4 pcs.;
- large open lump;
- peppercorns;
- acorns;
- alder cones;
- birch bark;
- wooden cut for the base;
- awl, knife, scissors, glue, varnish;
- sandpaper.
For the body, use a long cone. Other cones (bear's paws) will be attached to it using the “scale under scale” method. Before connecting the cones, they are moistened with glue. The bumps on the front legs should be smaller than the hind legs. For the head, use an open cone. Use acorns for the ears and nose. To shape the eyes and tip of the nose, you can use black peppercorns. To make the bear figurine stable, it is glued to a wooden cut.

A Christmas tree is made in a similar way. To make it resemble natural spruce, it is painted green. So our delightful DIY pine cone craft is ready!

Miracle Gnome
To make gnomes you will need:
- medium sized cones;
- two beads (wooden or plastic with a diameter of 2-3 cm with a hole);
- felt fabric;
- needle with thread;
- scissors and felt-tip pen.
For the gnome's hat you will need felt fabric; the height of the hat can be any - 6 cm or more. Cut a triangle from the fabric, fold it into a cone and sew it. You'll get a hat

Heart-shaped mittens are cut out of the same fabric and glued to the pine cone.
The gnome's legs can also be made from felt, or from plasticine for stability.

Draw eyes and a smile on the bead with a felt-tip pen. Glue a hat to it. And glue the bead itself to the top of the cone

Graceful swan
To make a swan from cones with feathers, you will need the following materials:
- pine cone;
- plasticine;
- feathers from any poultry (chickens, ducks);
- laser disc;
- stacks.
At the beginning of the work, plasticine is rolled out into a flagellum 11 cm long. One end of the flagellum is attached to the bottom of the cone and bent to the shape of the bird’s neck. The head is located at the second end of the flagellum

A swan's beak is formed from red plasticine and attached to the head

The bird's eyes are made of blue or black plasticine in the form of small balls

The swan's tail is made from white feathers. They are inserted between the scales of the cone and secured with plasticine.
Here we have our graceful, handsome man!

Turning a pine cone into a mouse
The mouse is one of the most beloved children's characters. Therefore, having pine cones and plasticine, let’s make a cute mouse.
So, we will need:
- one pine cone;
- plasticine (white);
- stacks;
- board for working with plasticine.
Instructions:
- Take a small piece of white plasticine. Using a cutting stick lying at hand, cut it into 3 pieces. The width of each should be about 1 cm. Each honor will be used for specific purposes. The first piece will be used to create the ears, the second - for the paws, the third - for the tail.

- Take the first strip and carefully roll it out into a sausage shape. It is advisable to roll out evenly. This is how we get a mouse tail

- The second strip should be divided into four pieces. We do this using the “rolling” method, after which we make four short sausages
 These will be our mouse paws.
 - Divide the third piece in half. As a result, we have two blanks for the mouse ears. Now we use the “rolling” method
 We get two identical balls.
 - Flatten them into a flat cake

- Using the “pinching” method, we press one side of our workpiece. We do this with both flatbreads. As a result, we get a blank for the ears

- Glue the ears to the pine cone. Using a stack, press the plasticine onto the bump. And to make the mouse even more attractive and very similar to the real one, we draw stripes inside the ears in a stack

- Then we attach the paws to our mouse

- Now we glue the tail

- Now it’s time to decorate the mouse with eyes and a nose. The eyes can be made with blue plasticine: for this we roll two small balls, the nose can be made red. To do this, roll a ball and glue it onto the sharp end of the cone.
 Hooray! The cute mouse is ready!
Turning a pine cone into a hedgehog
The mouse is not the only favorite character of kids. Children also love hedgehogs. So he will be our next hero.
So, we need:
- Pine cone;
- plasticine;
- stacks;
- board for working with plasticine.
Step-by-step instruction:

Miracle owl made of cones
Now let’s create another masterpiece – an owl from pine cones. The scales of the cones are very similar to the plumage of an owl, so the resemblance of the figurine to a real living bird will be obvious.
So, we need:
- a large pine cone (we use it for the body);
- a small pine cone (we’ll make a head out of it);
- plasticine;
- stack;
- pine branch.
Instructions:

Ball of fir cones
Such a ball can not only become a New Year's decoration, but also be a regular apartment decor. It can be mounted on a vase or hung from the ceiling.
To make the decoration you will need:
- white foam ball;
- flexible wire to match the color of the pine cones;
- satin ribbon;
- Super glue;
- scissors and pin.
To secure the cones to the foam, a wire is attached to their lower part, its ends are twisted into a spiral, lubricated with glue and inserted into the foam.
You need to glue a ribbon anywhere on the ball, which will allow you to hang the decoration.

A composition of several balloons will look beautiful in a large room.
Candlestick made of pine cone scales
What could be more beautiful than a burning candle wrapped in the scales of a fir cone? Therefore, we will discuss how to make such an excellent masterpiece with your own hands.
So, to make a candlestick you will need the following materials:
- large ripe cone;
- thick cardboard;
- a small glass glass for a candle;
- heated glue;
- scissors.
The cone is carefully disassembled into plates. For the base of the candlestick, a circle is cut out of cardboard. The size of the circle should be twice the size of the cup. For a very large circle, one cone is not enough. The first layer of plates is glued onto the circle.

The second layer is applied to the first in the gaps in a checkerboard pattern. This is done in several layers until the desired height of the candlestick is achieved. When finished, the decoration should dry, after which a glass with a candle is placed in its middle. Hooray! An excellent creation is ready!

Pine cone baskets
To make a miracle basket you will need:
- about 60 cones;
- the wire is thick and thin to match the color of the pine cones;
- hot melt adhesive.
To begin, use a thin wire to connect the first row of cones (12 pieces) in a circle. The wire is fixed to the first cone, and to subsequent ones it is attached using the wrapping method. The second ring of cones is made a little smaller (no more than 10 pieces).
Connect the rings together using hot glue. You will need about 10 pine cones per basket handle. The connection of elements is carried out similarly to rings. The bottom of the basket will be thick cardboard, to which the cones are glued to the inside of the basket (bottom up). So our basket with a handle is ready.

But you can make your work easier by not attaching a handle to the basket.

Explore the DIY cone crafts presented above, create cute decorations from fir cones, decorate your home and surprise your loved ones with your masterpieces!
More details about crafts made from pine cones in the video:
Many people go to the forest to pick mushrooms, and needlewomen go to the forest to pick up pine cones. It turns out that this natural material makes very original crafts. Children of different ages can work with cones, so teachers often use them in labor lessons in kindergartens. In this article we invite you to look ideas for crafts made from pine cones and use them for creativity.
Crafts from pine cones and plasticine

If you do not find acorns, then use wooden beads for the head. It is convenient to make clothes for your crafts from felt, since this material does not require additional processing. To fasten parts in crafts made from pine cones, it is not necessary to use plasticine; a glue gun is also ideal.

Hare made of cones and plasticine
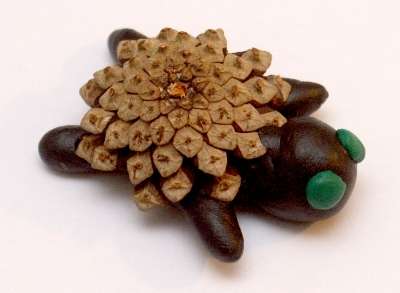
Turtle made of cones and plasticine

Swan made of cones

Crocodile made of cones and plasticine
DIY hedgehog made from pine cones
A pine cone hedgehog can be made in many ways, for example, using pine needles and cones. To do this, collect pine needles. It is advisable that they be dry. Form bundles of needles and secure them with plasticine. Insert the resulting needles into the cones and then trim. If the needles are left long, you will get a porcupine. Don't forget to form the hedgehog's face.


If you use a plastic bottle, the hedgehog may turn out to be of different sizes.
We invite you to see a photo selection of what else you can make from pine cones:

Cone flowers
New Year's holidays are approaching - time to give and receive gifts, decorate the Christmas tree and decorate the house. Perhaps we no longer believe in the good old man Santa Claus, we don’t expect gifts from him under the tree, but we definitely expect a miracle, especially on New Year’s Eve.
A miracle is of course good, but the realities of life dictate their own rules to us. Work, affairs, the end of the quarter and year - all this leaves its mark on the availability of free time, and therefore on preparation for the holiday. If there is very little time left, and you don’t want to give loved ones a soulless purchased gift, then it’s time to think about New Year’s crafts made from natural materials. In this article, we have collected for you the best master classes from all over the Internet on making New Year's crafts from pine cones.
Rules for working with cones
So, before you start making New Year's decorations from pine cones, you should familiarize yourself with the rules for their use, if you can call it that. There are several rules for preparing cones before using them as material for New Year's crafts, so that the finished product does not deform or deteriorate some time later.
Rule 1. Working with cones is a pleasure, but it is worth considering the fact that the air temperature outside is much lower than indoors, which means that the cones you bring will begin to open. Spruce trees will look like tousled hedgehogs, and pine trees will look like fluffy Christmas trees. If your craft involves the use of closed cones, then dip the cone in a container with wood glue for 30 seconds, then remove it and let it dry. Regardless of the temperature, the cone will always be “closed”.
 Rule 2. If you need open fluffy cones for a craft, but there is no time to wait, then in order to open them as quickly as possible, the cones need to be boiled for half an hour and then dried on a radiator. After drying, the cone will become fluffy and will no longer change its shape. Instead of cooking, you can use the oven, placing the pine cones there for two hours, pre-setting the temperature to 250⁰C.
 Rule 3. If the shape of the cone is not entirely satisfactory to you, it can be slightly adjusted. To do this, the natural material needs to be soaked in water and then tied with thread. After drying, the shape of the cone will be the same as you gave it with thread.
 Rule 4. The buds don't have to be brown. Still, the New Year is a holiday of miracles and an ordinary fir cone can turn from a simple brown one to white or even golden. In general, to bleach buds, you need to soak them in water with bleach (1:1), then rinse and dry. The result is impressive.
So, now that you have familiarized yourself with the rules for working with pine cones, it’s time to start creating New Year’s decorations from this natural material. What can you make from pine cones? Yes, anything! The main thing is to stock up on a festive mood and give free rein to your imagination. And our master classes will help you navigate a wide variety of options.
One of the main attributes of the New Year has always been and remains the New Year tree. It’s New Year’s because it doesn’t look like the one we saw in the forest, however, if we saw it. A Christmas tree can easily be made with your own hands from ordinary pine cones; fortunately, pine is an unpretentious plant, and therefore grows almost everywhere in our cities. To create such a New Year's craft with your own hands, you will need: thick paper, scissors, old newspapers, glue and, of course, pine cones.

See more Christmas tree ideas:
Cute Christmas tree decorations are made from ordinary pine cones and pieces of felt. You will also need scissors, glue, paint and plasticine or a wooden ball. Such birds will look great on a New Year's tree or they can be given as a souvenir to people close and dear to you.

Making New Year's crafts with kids is a pleasure. Firstly, the child is busy with an important task together with his parents, secondly, we are all pleased to create something new, and thirdly, such a craft may well become a New Year's souvenir for grandparents, and maybe even for Santa Claus himself. To make Santa's magical helpers you will need: pine cones, pieces of felt, scissors, glue, plasticine or a wooden ball for the head.

You can actually make a variety of forest creatures out of cones, and it doesn’t have to be a hedgehog. In this master class you will learn how to make chanterelles from pine cones and felt.

It would be strange if among our master classes on making animals from pine cones there was no hedgehog. The fluffy cone in its appearance exactly resembles a prickly forest eared animal. You will need: cones, felt, scissors, glue.

To make squirrels from cones with your own hands you will need: cones, felt, scissors and glue.

#7 Crafts from pine cones for the New Year: make a ball with your own hands. Scheme
You will need a foam ball, pinecones, ribbon, glue.

With the onset of cold weather, it becomes increasingly difficult for our smaller brothers to get food for themselves, so we should take care of them, especially given the cold weather in our area. A great idea for crafts made from pine cones would be a bird feeder. Take a pine cone, generously spread it with honey or condensed milk, and then dip it in a container of “bird treats.” Hang the feeder on a tree in the yard and watch the birds happily taste your treats.


See more ideas:
#17 Decorating the house with shiny pine cones: getting ready for the New Year's party

If you are planning a serious adult party, then you should not decorate the interior with fairy-tale elves and decorative owls. It's better to use sparkles and add sparkle and chic to New Year's Eve!

Any cone, both pine and spruce, is suitable for a hedgehog, but it must be fluffy. We told you how to do this at the very beginning of the article in the rules for working with cones.


Cones are a fairly universal material, and if you have already grown up from chanterelles, squirrels and hedgehogs, then you can decorate this natural material using ordinary paint. Looks very stylish.

What's a Christmas tree without pine cones? From a seemingly ordinary pine or fir cone you can make an incredibly cute Christmas tree toy that will fit perfectly into the overall decor. You will need: pine cone, glue, bead, ribbon and thread.

The eagle owl fits perfectly into the New Year's theme: it doesn't sleep at night, stays with us for the winter, and of course, this particular bird was Harry Potter's pet. Small eagle owls can be used to decorate an interior, a Christmas tree, or give to loved ones as a souvenir.

You may like:
#24 We continue to make birds from pine cones: DIY New Year’s craft “Owl”
Cones make excellent birds, including owls. On New Year's Eve there must be at least one owl on the tree - there must be someone who will definitely not fall asleep and will follow Santa Claus: exactly how he gets into the house and how he leaves gifts. Making a night guard is quite simple. You will need: a pine cone, glue, pieces of fabric, beads for the eyes.

Children, even the most restless ones, will happily take on the painstaking work of creating a New Year's penguin, but on one condition: parents must take part in the process. Spend a few hours together and end up with a cute New Year's craft - what could be better!

If you are not satisfied with the banal decoration of candles and vases with pine cones, then this original picture should suit your liking. You will need: cones, frame, ribbons, scissors and double-sided tape or glue.

Decorating the New Year tree is one of the main activities in preparing for the holiday. I want to decorate the forest beauty in a special way. The most special tree will be the one with hand-made toys in which the soul and warmth of the creator has been invested. Our step-by-step master class will help you make a simple Christmas tree decoration from ordinary pine cones with your own hands. If there are children in the house, be sure to involve them in the creative process.

A great idea for a New Year's theme would be a craft made from pine cones in the shape of a deer. It's quick and easy to do, and looks very cute. By the way, such a craft can be hung on a New Year tree as a hand-made toy.

A great idea for a New Year's craft made from pine cones would be a snowman. And not just an ordinary snowman, but an athlete snowman who prefers to spend the New Year holidays skiing. By the way, take note of this character’s idea and be sure to spend time with your whole family on a hill somewhere during the winter holidays!


With the help of pine cones, you can decorate the New Year's table, using this natural material as a stand for cards with a seating plan. Suitable not only for a party with a large number of guests, but also for a quiet get-together. The main thing is to create a New Year's atmosphere.


Even if you have a large Christmas tree, miniature trees made from pine cones will not be superfluous, because the tree is only in one room, and in others it is quite possible to create a festive atmosphere with miniature copies.

If you still decide to decorate your house with miniature Christmas trees made of pine cones, then here is another step-by-step master class.

If you like New Year's balls with snow that you can shake and create a real winter blizzard, then you will like this craft. The cone resembles a Christmas tree, so in a jar with snow it looks like a real forest beauty in miniature, which is waiting for a kind old man in the forest.


You may be interested in:
Another great option for a miniature Christmas tree for decoration or as a souvenir would be this craft made from pine cones.

If you don’t have the time or desire to tinker with a fluffy wreath, the master class for which you saw above, then you can make an incredibly simple wreath of pine cones, the production of which will take much less time, but it will look very cool!


Help us improve: if you notice an error, select a fragment and click Ctrl+Enter.


