Knitted socks on 2 knitting needles. Women's socks with two knitting needles. How to knit beautiful men's socks with knitting needles
Perhaps the simplest product that you can knit yourself is socks with knitting needles: diagrams and descriptions are simple and beautiful already on our page, create and be inspired!
Knitted socks in winter are a very important wardrobe item, simply irreplaceable. Warm, soft, cozy, you can knit these socks with your own hands; you just need to put in a little effort and buy good quality yarn. Warm socks are knitted from wool mixture to make them durable and soft, and synthetic thread is often added to the yarn to strengthen it. We previously wrote about what yarn to choose and. There we also talked about leg measurements and also demonstrated video with a detailed description of the knitting process. But step-by-step instructions for knitting socks on two knitting needles await you right now.
In order to knit socks, you need correctly calculate the size of the future product. The easiest way is to use the following formula: 42:3X2, where 42 is your shoe size. Thus, the foot size will be 28. If you are going to knit socks for children, use this formula or simply measure the child's foot.
Let's start the process of knitting socks on two knitting needles
You will need medium size knitting needles and two colors of yarn.
 Cast on 22 loops(we are knitting children's socks) and then knit a 4 cm 1X1 rib pattern (you will get approximately 14-15 rows).
 The next 4 cm are a stockinette stitch pattern. Thus, the back of the sock is ready.

Now we will tell you how to knit the heel of a sock on knitting needles. To do this, you need to gradually decrease by knitting the second and third, as well as the 2 penultimate loops together. Decrease loops necessary until we get 12 loops on the knitting needles. At the next stage we will expand the work to enlarge the canvas. We knit one knit stitch from the edge loop at a time, leaving the purl loops without adding. We add knit stitches until 22 stitches are formed on the needles again. The heel formation is complete.
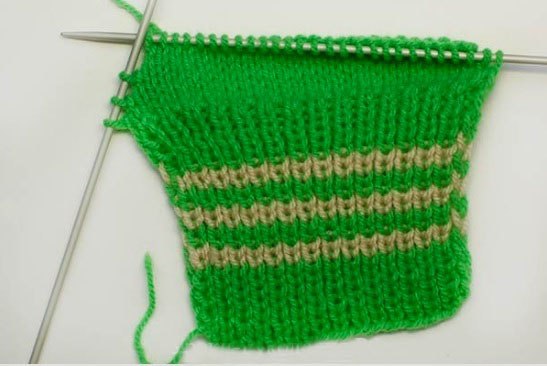
 Next, knitting socks moves on to the next stage - knitting the foot. To do this, you need to knit an 8 cm pattern in stockinette stitch, alternating colors (2 rows in yellow, 2 rows in green).
 By analogy with knitting the heel, we knit the toe. First we reduce the loops to the number of 12, and then we increase to 22.

For the top of the sock we knit 8 cm, while connecting the first and last loops with the edge loops in each front row. Thus, we connect the sole and the top of the sock, giving the product a complete look.

From the front side we knit the cuffs using stockinette stitch, connecting the front and back parts of the sock. To complete the work, knit 4 cm with an elastic band. Using a similar pattern, we knit the second sock.
So we knitted the socks on two knitting needles. If you want to knit openwork socks, we present you a couple of beautiful and fairly simple schemes.


How to knit beautiful men's socks with knitting needles?
Beautiful socks are not just for women's feet. Together with you, we will knit chic and warm men's socks: beautiful patterns and patterns are already waiting in this section. All diagrams are accompanied by a description where you will find detailed instructions on how to how to knit the heel and toe of a sock, how to knit socks without a seam and how to finish the work.
Men's socks can also have a beautiful pattern, which will be somewhat more discreet than on women's or children's socks.

 Drawings on men's socks are also welcome.
  And these 3 patterns will help you make socks not only for your man, but for the whole family. Introducing sockfamilylook: beautiful socks can be tried on by all family members: mom, dad and child.
How to knit the heel of a sock on knitting needles: step-by-step master class
We have already talked about the formation of the heel above, but I would like to spend more time on the process of knitting this important element.
One of the most popular ways to knit a heel is the boomerang.. To learn how to properly use this knitting technique, read the instructions in the photo.


 There are various options for knitting heels. Perhaps from such a rich list you can choose a method that suits your liking.

How to knit a straight heel: step-by-step instructions
This type of heel knitting is one of the simplest. The master class will tell you about all the main nuances.

- To work you will need 5 double needles, 4 of which form a square, and the fifth will act as a working one.
- After knitting the cuff, move on to the heel.
- For knitting the heel wall in stockinette stitch you should use needles No. 4 and No. 1. The number of rows should be 2 less than the number of stitches cast on.
- We knit the lower part of the heel like this: divide the total number of loops by 3, if the number is not divisible by three, there will be a larger number of loops on the middle part, and the same number of loops on the sides (for example, 11+12+11).
- We knit the middle part with satin stitch, the front side with knit stitches, and the back side with purl stitches.
- On the sides we gradually decrease the loops, knitting the outer loops together.
- We knit the lower part as follows: knit the first row, then in the middle part we knit the last loop together with the front one, which is crossed.
- We unfold the work and knit the second purl row, removing the outer loop as a purl stitch. We purl the middle, and also purl the outermost one from the next row.
- Turn the work around and we knit the 3rd row by analogy to the first.
- We knit according to the above pattern until the middle part of the knitting remains.
For a more detailed master class, we invite you to study the video lessons at the end of the section. There you will be able to examine the entire process in detail and correctly complete the work.


In this short instruction you will learn about knitting a heel in the round, you can calculate the size of the future product and study in detail how to knit heels. You will also learn general information about how to knit socks, which thread is best for the job, how to knit in a spiral and how to bind off stitches. In addition to knitting the heel, the craftswoman should also know about such a process as toe formation. Read, try, learn.
How to knit beautiful patterns with knitting needles for socks?
Socks with a beautiful knitted pattern can become a real work of art, for this you should consider several patterns and popular techniques for knitting socks.


I offer a master class on knitting socks, winter is coming, let's knit warm socks for our kids on two knitting needles and without sewing. This method is convenient not only because we use only 2 knitting needles, but it is also very convenient to repair such socks. The first thing that wears out is the sole or heel, and to replace them, you need to almost completely unravel an ordinary sock knitted on 5 knitting needles. It's very labor intensive. If you knitted the toe on 2 knitting needles, you can unravel only the heel or the heel with the sole, this takes much less time. You can also add a stronger or warmer thread to this section of the sock when knitting.
We cast on 16 loops and knit with a 1x1 elastic band for 16 rows, 2 rows of knits. loops, 8 rows in sock stitch (1 row - knit stitch, 1 row - purl loop). Next, we make a mark along the edges, insert paper clips (or pins, or threads - whatever is convenient) into the outer loops on both sides.
We continue to knit straight sock stitch to the tip of the little finger (measure along the child’s leg), knit 2 more rows of faces. loops.

We begin to knit the toe, knit with a boomerang.
Boomerang: knit to the end of the little finger and begin to decrease the loops, leaving 1 loop untied at the end of each row until there are 8 middle loops left on the knitting needle.
Detailed description of knitting the toe and heel “BOOMERANG”
There are 16 loops on the knitting needle, we start knitting the toe and decrease like this:
- on the front side we knit 15 knits, and leave the 16th on the knitting needle, do not knit it, turn the knitting
- P14, do not knit the 15th, turn the knitting
- K13, do not knit the 14th, turn the knitting
- P12, do not knit the 13th, turn the knitting
- K11, do not knit the 12th, turn the knitting
- P10, do not knit the 11th, turn the knitting
- K9, do not knit the 10th, turn the knitting
- 8 purl, do not knit the 9th, turn the knitting
We begin adding loops - at the end of each row, knitting one loop. You need to add loops until their number remains the same (in our case 16)
More details on how to add:
- we knit 9 faces on the front side, turn the knitting
- 10 p. turn knitting
- 11 persons. turn knitting
- 12 p. turn knitting
- 13 persons. turn knitting
- 14 p. turn knitting
- 15 persons. turn knitting
- 16 p. turn the knitting.
All toes are connected.

We knit 2 rows with facial loops/
Along the edge of the knitting on both sides we cast on the same number of loops to the staples (as shown in the previous photo).
Knitting the sole
The principle of knitting, how to knit the heel of the toe - at the end of each row we knit the last and cast-on loops together, i.e. 15 loops knitted 16 and 17 together, turned the knitting and again knitted 15 loops, 16 and 17 together, turn the knitting and so we knit until staples until there are 16 medium stitches left on the needle.

So we tied the sole to the staples. You can try it on to make sure it's the right size.
We begin to knit the heel with a Boomerang. First we make decreases, .

Then additions (). That's it, the heel is ready.

Along the edges on both sides from the paper clips to the elastic, cast on loops (in this case, 4 loops) and continue knitting to the elastic as we knitted the sole - knit 15 knits, 16 and 17 loops together, and so on until the cast-on loops run out and 16 remain medium loops.

Knit 2 rows with knit stitches.
Just a little left! We knitted it to the elastic band, the paper clips can be removed, we cast on 8 loops on the edges on both sides of the elastic band and knit it with an elastic band 1*1, as we knitted the sole, at the end of each row we knit 2 loops together. And so we continue to knit until the cast-on loops run out and there are 16 middle loops left. Close the loops.

Our sock is ready. We knit the second one in the same way.
Knowing how to knit socks can help you out in many situations. Knit original gifts for your loved ones for the holiday, surprise your friends with a stylish new thing - you never know the reasons! Even if you have very little experience as a knitter, don’t despair. We will tell you step by step how to knit socks on two knitting needles in a simple way.
We knit socks on two knitting needles without a seam
Size: 39, for foot length 25cm.
We will need:
- yarn of any composition (in our case - 100% acrylic, density 50g per 200m) - only 100g (we have two colors - light green and sand);
- knitting needles from the sock set No. 2.5 - 2 pieces.
What patterns will we knit:
- elastic band 1 knit x 1 purl;
- persons satin stitch - when knitting in straight rows, all the loops are knit, in purl rows - purl. Before starting work, you must knit a sample and use it to calculate the knitting density and the required number of loops.
Density on faces. Ch.: 30p.=10cm.
Description
1st: dial 30p. light green threads.

2p.: 1 cr., elastic to the end of the row. We will knit this further, alternating color stripes.

From the 3rd to the 8th p.m. – continue the elastic band with light green color.
9th and 10th r. – change the color of the thread to sand.

11th and 12th rows: light green;
13th and 14th rows: sand;
15th and 16th rows: light green;
17th and 18th rows: sand;
From the 19th to the 26th: green.

29r.: 1p. remove, 28l., 1p. on the sp., we do not knit it.

30r.: 1p. filmed in previous r., 1p. remove, p27, 1p. on the sp., we do not knit it.

This should look like this:

31r.: 1 p. left, 1 dc., 26 p., 2 p. left;
32r: 2 p. left, 1 dc, 25 p., 2 p. left;
33r.: 3 p. left., 1dc., 24l., 3p. left;
34r.: 3 sts left, 1dc. p., 23l., 3p. left;
35 rubles: 3 sts left, 1 dc. p., 22l., 4p. left;
36r.: 4 p. left, 1 dc. p., 21l., 4p. left;
37r.: 4 sts left, 1dc. p., 20l., 5p. left;
38r.: 5 sts left, 1dc. p., 19l., 5p. left;
39r.: 5 sts left, 1 dc. p., 18l., 6p. left;
40 rubles: 6 p. left, 1 dc, 17 l., 6 p. left;
41r.: 6 p. left, 1 sn.p., 16l., 7p. left;
42r.: 7 p. left 1 st.p., 15l., 7p. left;
43r.: 7 p. left 1 st.p., 14l., 8p. left;
44r.: 8 p. ost-ykh, 1 sn.p., 13l., 8p. ost-yh;
45r.: 8 sts., 1 st.p., 12l., 9p. abandoned;
46r.: 9 p. ost-ykh, 1 sn.p., 11l., 9p. abandoned;

From the next R. we increase the number of knitted stitches due to the previously left ones. They will need to be knitted at the end of the r. 1 p.
47.: 1p. dn., 12 l., 8 p. left;
48r.: 8p. ost-ykh, 1p. sn., 13 p., 8 p. ost-yh;
49r.: 8p. ost-ykh, 1p. sc., purl 14, 7 p. ost-nyh;
50r.: 7p. abandoned, 1p. sc., purl 15, 7 p. abandoned;
51r.: 7p. abandoned, 1p. sn., 16 p., 6 p. abandoned;
52r.: 6p. abandoned, 1p. sc., purl 17, 6p. abandoned;
53r.: 6p. abandoned, 1p. sc., purl 18, 5 p. abandoned;
54 rubles: 5 p. remaining, 1 p. sn., purl 19, 5p. the rest.;
55r.: 5p. the rest, 1p. sc., 20 p., 4 p. the rest;
56r.: 4p. the rest, 1p. sc., purl 21, 4 p. the rest;
57r.: 4p. the rest, 1p. sc., purl 22, p. 3. the rest;
58r.: 3p. the rest, 1p. sn., 23p., 2p. rest;
59 rubles: 3 p. left, 1 p. sc., purl 24, 2 p. rest;
60 rub.: 2p.rest., 1p. sc., purl 25, 2p. rest;
61r.: 2p.rest., 1p. sc., purl 26, 1 p. rest;
62r.: 1p.rest., 1p. sn., purl 27, 1p. rest;
63r.: 1p.rest., 1p. sn., purl 28;
64r.: 1. p.s., 29 p.
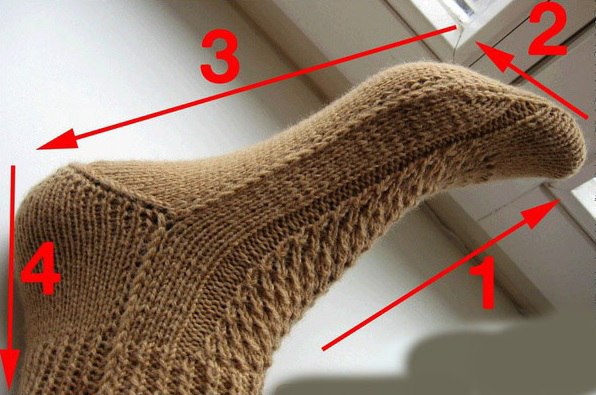
The heel is ready.

View from the other side.

Its depth is 5cm, the toe needs to be knitted to the same depth – 5cm. The calculated depth of the flat surface area: 25cm-5cm-5cm=15cm.
From the 65th to the 120th ruble: exactly green.

From the 125th to the 160th row: knit the toe, repeating from the 29th to the 64th row.

161r.: knitting the instep. Again we alternate the color stripes every two rows. At the same time we will connect the upper and lower parts. The method for this is very simple, accessible for beginners: we knit the outer loops of 2 parts together.
Raise the outermost st with the right knitting needle.

Then on it - remove the 1st stitch from the left sp.

Knit 29 knits.
162 rub.: raise 1 p. on the foot.

Remove from the left sp. on the right 1st st.

Knit 28 knits, two outer ones - in 1 p.

From 163 to 220 rubles: Remove 1 p. bottom, 1p. from above, 28p. - according to the pattern, 2p. in 1p.

221 rub. and 222 rub.: chul. Ch. light green yarn.
From 223r. for 228 rub.: light green color. an elastic band. Don't forget to connect both parts of the sock without a seam.
229 rub. and 230 rub.: sand;
231 rub. and 232 rub.: light green;
233 rub. and 234 rubles: sand;
235 rub. and 236 rub.: light green;
237 rub. and 238 rub.: sand;
from 239 rub. RUR 245 each: salads.

We close the row. We use the usual method. For beginner knitters - see explanation and photo:
Knit 2p. in 1p.

Return this st to left sp.

Again 2p. knit in 1 p.

Repeat again - return st to left sp. Repeat the procedure up to 1 step.

Break the thread, fasten it, and carefully tuck the end in.

Knit the second sock without a seam using the same method.
A simple way to knit socks from the toe: video tutorial
Knitting socks with two knitting needles: the easiest way

Even a schoolgirl can knit socks on two knitting needles using this method without any problems. First you need to take measurements: ankle volume, instep length (for part a), foot length (for part b), heel height (for part c). After selecting the yarn and number of knitting needles, knit a sample and count the required number of stitches from it.
Description
For clarity, the direction of knitting - see photo.

We start knitting socks from part “a”. We cast on the required number of loops - half the volume of the ankle and knit the elastic band. Determine its height for yourself, on average it is 8-10 cm. After that, we switch to stocking stitch. If you want to knit not just warm, but also very beautiful socks, then choose any pattern you like for this area of work. The main thing is that it fits proportionally to the dimensions you need.
We knit part “a” to a height that covers the little finger. Now we make 1 stitch decreases on both sides. until there are 6-10 loops left on the working needle. And then – the reverse process – mirror increases. Returning to the original number of loops, we proceed to the sole - section “b”. Let's knit it equal to the length of the foot. You can try it on to be sure.
To design the heel, we repeat the decrease and increase according to the previous description. To strengthen the heel in the area of increase, you can add another thread to the work, preferably synthetic - this way the socks will last longer. When knitting section “c”, pay attention that the elastic band should be the same length and width as in section “a”.
Assembly
First sew the heel: parts “b” and “c”; then them - with part “a”.
The undoubted advantages of this method include the possibility of easy restoration of the worn heel of the sock: the seams are trimmed and the heel is bandaged.
Seamless socks

Very easy to knit. The only drawback is that the heel wears out quickly. But if you choose the right yarn, then this problem ceases to be such a problem. The calculation is made for foot size 40-41.
To knit socks without a seam, we will need for work:
- mixed yarn (100g per 260m) - about 110g;
- knitting needles No. 2.5.
What patterns will we knit:
- elastic band 2 knits x 2 purls;
- braid of 6 loops - see diagram:

Description

We dial 50p. and knit according to the pattern. Odd rows - according to the picture.
Having knitted 38p, we dial another 20p. Rotate the work. Knit according to the pattern, then dial on 20 stitches. In total there are 90p in work. They are distributed over 40p. elastic bands, 10 p. – braid with 2 – purl. p. on each side, 40 p. elastic. We knit the pattern in the center unchanged, and we make decreases along the edges: we knit 1 p. along with the edge. We continue until there are 10p left in the work.

Dial alternately on sp. additional dialed p. 39 r. We get 20p.+10p.+20p=50p.


For a free sleep cast on edge stitches from 1st to 37th p. - only 18p. Use it to knit 10 stitches. drawing. 


It's very simple technique for knitting socks on two knitting needles for beginners needlewomen The cold season is coming, many grandmothers and mothers take up their knitting needles to impose warm socks on their loved ones. Many people will like it because the sequence of knitting the sock parts is very simple and does not require stitching. First, knit the back of the sock from the cuff to the heel, after knitting the heel, knit the sole to the toe, after knitting the toe, knit the upper part to the cuff, and during the knitting process it is connected to the sole.
Cast on half the stitches for knitting the sock cuff on one needle. The number of loops is calculated from the knitting density, which depends on the thickness of the thread and the number of knitting needles, as well as from the measurements taken for the desired sock size.
Knit the cuff rib 1x1 (1 knit stitch, 1 purl stitch) to a height of 7 cm. Then knit stitch for another 8 cm. The knitted part is the back of the sock from the cuff to the tip of the heel.

For knitting the heel continue to decrease in each knit row, knitting 2 stitches together after the first edge stitch and before the last stitch in the row.

When the number of stitches on the knitting needle is halved, start making additions. To do this, at the end of each row, pick up a loop from the edge of the resulting heel bevel. Insert the knitting needle behind the outer loop of the fabric, grab the working thread and pull a new loop onto the knitting needle.

When the knitting needle has the same number of stitches as at the beginning, stop casting on stitches. The knitted heel looks like a wedge.


The toe of the sock is knitted just like the heel. Decrease on each knit row by knitting 2 stitches together after the 1st edge stitch and before the last stitch in the row. When the number of loops is halved, begin adding loops, picking up 1 loop from the edge of the resulting bevel at the end of each row.


Once you have the same number of stitches on your knitting needle as at the beginning, continue knitting the top of the sock, picking up stitches at the end of each row from the edge of the sole. But at the same time, turning the work at the beginning of each new row, knit the first two loops together according to the pattern - knit or purl, so that you have the same number of loops left on your knitting needles.
Warm wool socks are an indispensable part of any person's wardrobe. In addition, this is a great way for beginner needlewomen to practice and improve their knitting skills. You will learn from our article how to knit socks on two knitting needles; a knitting pattern with a description will help you with this.
Detailed master class
Many of us are accustomed to seeing our grandmother busy knitting socks. However, she does this on 5 knitting needles, which for beginners seems like a skill beyond reality. There is also knitting socks on two knitting needles.
For a pair of socks size 40-42 you will need the following:
- Warm wool yarn, about 200 g
- Knitting needles No. 5 or No. 5.5
Instructions on how to knit socks on two knitting needles will be described step by step.
Stage 1. Rubber. We cast on 39 loops. We begin to knit with an elastic band, that is, alternating the front and back loops. The last one (before the edge) should be knitted face-on. So we perform about 28 rows. Then the number of loops is mentally divided by 3, 13 in each part. We begin to knit the middle: 34 rows of knit stitches in the center.
Stage 2. Sock. 2 loops connected together and knitted as one will be called combined from now on. We continue to work with the central 13 loops.
In the first row:“combined” knit, 9 loops “face”, “combined” knit.
Second row: 13 knit stitches.
Third row:“combined” facial, 7 “face”, “combined” facial.
Fourth row: 9 knit stitches
Fifth row: combined facial, 5 facial, again “combined”.
Stage 3. Foot. In the first row, 19 additional loops are cast on the left, along the “tongue”, they are knitted “face down”. Next, another 13 knit stitches on the left side along the shin. In the second row, we add 7 loops to the upper side of the “tongue”, 19 from the right side and 13 loops along the shin. We knit everything face to face. Having completed these two rows, count the loops, you should get 71. We knit them with facial stitches for 10 rows.

Stage 4. Sole.
First row:“combined” knit, 28 knit, “combined”, 3 “face”, “combined”, 3 knit, again “combined”, 27 “face”, “combined.”
Second row: the remaining 66 stitches are knitted.
Third row:“combined”, 26 “face”, “combined”, 2 knit, again “combined”, 2 “face”, “combined”, 26 knit, again “combined”.
Fourth row: 61 knit stitches.
Fifth row:“combined”, 24 knit, “combined, 1 “knit”, “combined”, knit loop, “combined”, 25 knit and again “combined”.
Sixth row: 56 "face"
Seventh row: “combined”, 22 knits, 3 “combined” in a row, 24 knits, “combined”.
Eighth row: 51 knit stitches.
Repeat decreasing the loops, starting from row 1, until their number is reduced to 26. We finish the work, close the loops. The foot, heel and shin are sewn together with a crochet hook or just a needle.
The result is these socks on 2 knitting needles:

The scheme of this work is extremely simple: it mainly involves only facial loops (and even “combined” ones are knitted “face”).
Video on the topic of the article
“Simplified” knitted socks:
Socks on two knitting needles:
Socks with two knitting needles without seam:
"Invisible seam":
Toe socks:


