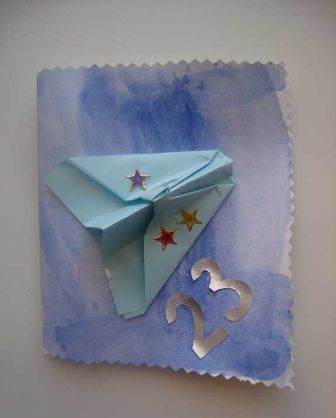
Drawn postcard for February 23rd for grandfather
Today in stores you can find a huge selection of the most incredible “Happy Defender of the Fatherland Day” cards. But you must admit, such a thing is more interesting if you make it yourself. After all, she conceals within herself all the warmth of a loving heart. We also suggest you learn how to make a postcard for February 23rd with your own hands, with photo and video instructions that will help you make a masterpiece.
The best postcard ideas for Defender of the Fatherland Day
Now we will present 8 original ideas for do-it-yourself postcards, which can be made quickly from scrap materials: colored paper, fabric, beads, so it will be interesting, and as usual, we’ll leave you with cool photo ideas for your own unique postcard.
Postcard "Military equipment"

For the product you will need:
- thick colored paper;
- ruler;
- scissors;
- glue;
- yellow foil;
- pencil.
Manufacturing process:
Take a white thick sheet of paper and fold it correctly. First - double. You will get a “little book”. Then each half also needs to be folded in half, only in different directions. Something resembling an accordion will come out. After this, you need to cut three strips of paper: red, green and blue. On one side we glue the red and blue stripes so that we get a combination of the colors of the Russian flag.
The green one needs to be glued to the other side. It is on this that the figures will be placed. After this, you need to draw military equipment on multi-colored paper. That is, a tank, plane, ship, etc. and cut. The images should not be large, because they will need to be placed in the resulting blank. And, most importantly, each drawing should have a “leg”. It is this part that needs to be smeared with glue and fixed on the green field of the postcard.
After this, you need to cut out two, three and several stars of different sizes from gold foil. Arrange this glittery decor however you wish.
Postcard "Air"
For the product you will need:
- very thick white cardboard;
- multi-colored candy sticks;
- good glue;
- scissors;
- pencils;
- colored paper.
Manufacturing process:
From thick cardboard you need to cut a rectangle of the desired size. This is a blank for a future postcard. Then glue multi-colored sticks around the perimeter of the product. They must be placed in such a way that the product looks bright. That is, alternating at will. You will get a “frame”.
Postcard “Military Shirt”

To create you will need:
- white sheet of paper;
- paints;
- scissors.
Manufacturing process:
To begin, take a sheet of paper and fold it in half. The sides need to be folded inward so that four folds are obtained. We make sleeves from the upper edges. To do this, they need to be bent like the wings of an airplane. After this, the sheet must be turned over to the other side and the bottom edge folded. Turn it over again and bend the upper corners towards the center of the workpiece. The result is the collar of our “shirt”.
After this, you need to bend the bottom edge of the card and tuck it under the “collar”. Additionally, you can make a tie, bow tie, pocket or buttons. Use paint to decorate the “shirt” in military style. On the back side, stick a piece of paper according to the size of the product and write a beautiful congratulation. It can be decorated with yellow foil stars.
Postcard "Marine"

We will need:
- thick paper of different colors;
- scissors;
- glue;
- pencil.
Manufacturing process:
Draw waves and clouds on blue paper and cut them out. From the white sails of the ship. From brown - the basis for it. From yellow - the sun. Next, take light blue cardboard and glue all the blanks to it, placing them in the right places. The result is a postcard with an applique on a marine theme.
On the reverse side, write an original congratulation and decorate with pencils or markers.
Postcard "Order"

For the product you will need:
- white cardboard;
- scissors;
- colored paper;
- pencil.
Manufacturing process:
A sheet of cardboard needs to be folded in half. If the “book” is too large, you can trim off the excess. On a sheet of red paper you need to draw a star and cut it out. Glue the star onto the front side of the workpiece. Its size can be varied at your discretion. You can cut it out the size of the entire page, or you can make a small star and glue it in the corner.
After this, you need to cut out a circle from yellow paper, the diameter of which will harmoniously fit into the size of the star. And glue such a blank in its center. On the mug with a marker or felt-tip pen you need to draw a two and a three. The presence of foil or other shiny paper will be a good reason to make additional decoration in the form of stars or small stripes. Ready! All that remains is to write a warm greeting on the reverse side.
Postcard "Star"
To work you will need:
- colored paper;
- scissors;
- glue;
- cardboard;
- pencil;
- ruler.
Manufacturing method:
On red paper you need to draw a star with additional stripes - allowances. We cut out the blank along the contour. We bend the allowances and fix them inside the star. Draw the ray lines. You need to bend the product well along them. The star will be voluminous.
After this, we cut out a similar blank from cardboard according to the size of the volumetric star. Glue a red star to it. The three-dimensional postcard is ready. You can decorate it with sequins along the contour, and place a nice congratulation on the back side.
Postcard “Unusual”
To work you need:
- red and white cardboard;
- beads;
- decorative tape;
- pencil;
- scissors;
- beads.
Manufacturing process:
You need to cut out three stars of different sizes from red cardboard. You need to fix a bead in the center of each. Fold white cardboard in half. We glue strips of decorative tape at the corners. We place stars in the center. Ready! You can write a greeting in the middle of the card. Stars for such a card can be made not only from ordinary paper. Fabric and leather are also suitable for this.
Postcard "Original"
You will need:
- thick white cardboard;
- glue;
- scissors;
- matches.
Manufacturing process:
We cut out the cardboard in the shape of a large star. The workpiece must be well lubricated with glue. Then we glue matches over the entire area of the star. This must be done quickly before the glue dries. We place the matches tightly so that there is no free space between them.
Next, let's move on to the decor. You probably have some pictures with an army theme or images dedicated to Defender of the Fatherland Day. Cut out this picture. And after the workpiece is completely dry and the matches are firmly fixed, glue them on them. If you don’t have such drawings, you can make them yourself. Cut it out of multi-colored paper or draw it with pencils, and then fix it with matches. On the reverse side you can write a few kind words.


Click Class
Tell VK
Initially, February 23 was still considered a holiday for those men who are associated with the military sphere. Now, this is a holiday for all males, so everyone needs to be congratulated: grandfathers, fathers, brothers. And, most importantly, put a piece of your soul into this congratulation, so I want to come up with something original and solemn.
Of course, more often such cards are made by children; mothers only supervise the progress of the work. But you can turn it into a masterpiece if you use different techniques and call on the entire reserve of your accuracy. By the way, there is one for this holiday.
I want to inspire you with different ideas so that you can put your business aside and get creative.
In our kindergarten, children are not yet given homework; they try to make themed greetings themselves, but sometimes the child himself asks on the weekend to make an applique or a postcard. Then you also have to look for ideas that are not difficult to repeat, but also show the child how aesthetically pleasing the result looks.

Of course, most often children remember that they need to make a postcard when they go to bed, and it needs to be submitted tomorrow. So let's look at a few easy ideas that will take no more than half an hour of your time together to implement.
For example, create a greeting with a three-dimensional Russian flag. I know that at this age kids still cannot cut straight along the lines, so you will have to prepare the blanks in advance.

Use scissors with jagged edges.
The cardboard is folded in half and a backing is glued to the front side.
A black strip is glued diagonally, which will serve as the basis for the flag.
Three stripes of the same size (about 4 cm) in the colors of the Russian flag are cut separately: white, blue, red.
These strips are glued only at the ends, creating a small arch.
If it is difficult for a child to explain how to make such a flag, then use a simplified version.

Take red paper and toothpicks.
Cut a small strip of paper measuring 3*1 cm and fold it in half.
Make two cuts near the edge that did not become folded and glue this flag to the toothpick.
It's very easy to replicate the following idea.

You will need two strips of cardboard of the same width, but different lengths. A number is cut out from one edge. Next, glue both halves at the beginning.
I also liked one idea. The execution results in a very mature and strict design. But it is also done quickly.

We roll up the cardboard - the base.
We take smaller paper and cut out a star and a slot in the middle for the inscription.
Before gluing the two sides, write text in the place where the slot is.
You can mark this place with a pencil.
How to make voluminous cards for school with your own hands
Volumetric congratulations always look more original than the usual flat ones. But it also takes more time to create them. They have more details, so these options are more suitable for schoolchildren.
For example, the idea with a boat and an anchor looks very nice.

To do this, you can print a template, cut out the ship, waves and anchor according to the internal diagrams.

Transfer the drawing to colored paper and carefully use a stationery knife to repeat the inner lines of the drawing.

Then you need to bend the cardboard in color and place it with the fold up.
Glue paper with a cut out ship onto the front side of the cardboard. You can use contrasting cardboard.

Paste a white sheet of paper inside on which you can write a congratulation.
Interesting options include three-dimensional images of balloons and ships.
For example, on this postcard a boat is made using the origami technique. And on the basis of it the entire composition is created.

Here is a detailed diagram of the order in which you need to fold the sheet.

Or such an interesting option with a 3D ship.

I would also like to show you a sweet version of a three-dimensional congratulation.

I think that our defenders will definitely appreciate this!
Beautiful congratulations from paper for dad on February 23
I would also like to congratulate dad in a very unusual way. For example, giving a card that requires very painstaking work.

To create it, you need to take a sheet of cardboard and bend it in half.
Then draw 3 squares, measuring 2.5*2.5 cm. Inside which you can draw thematic objects: an anchor, a steering wheel, a balloon, an airplane, a ship, a clock or a star. You can draw it yourself, but I’ll give you a template.
Then carefully cut along the contour with a sharp blade or stationery knife.

Paste a congratulation printed on a white sheet of paper inside.
You can make a card in the form of a shirt and tie.
They are different, for example, those with a drawn tie.

Or with a jacket.

You will see a template for such a postcard just below in the corresponding section.

Let's create such an orange, bright postcard ourselves.

For this we need double-sided cardboard and one sheet of colored paper.
Fold the sheet in half. On the front side, at the fold, we make a cut at a distance of 3 cm from the edge.
From the back side of the sheet we completely cut off a line 3 cm wide. This way the collar of the shirt will protrude above the postcard.
Now we also retreat 3 cm from the sides and make horizontal cuts 3 cm long. We bend their ends inward.

It's time for the tie.
We need a square of double-sided colored paper, measuring 15*15 cm.
We fold it diagonally.

Then we turn the ends to the resulting fold.


Turn the tip up.

Now we turn the end inward, as in the photo.

We bend the edges towards ourselves and push them inside with our finger.

Now we reduce the width of the free edge of the tie by tucking the sides.

We glue the resulting part onto the postcard.

Contrasting colors look very nice: black and white.
Also, to achieve greater similarity, use a sheet of velvet paper as a basis.
DIY greeting cards using scrapbooking technique
Congratulations created using the scrapbooking technique are very rich and unusual.

When many different parts with different textures are used. Anything will do here: wallpaper, twine, buttons, wood. Of course, it is better to choose a color scheme that combines well with different colors.

You can even sew on some decoration elements using a sewing machine.

I also like the option of wooden cards. But due to the fact that not everyone knows how to cut from it and does not have a special milling machine, let’s take this design as a basis. And we will replace the wood with thick cardboard, which is sold in stores for handicrafts and creativity.

Or such a cool idea.

Because this card looks very noble and expensive.
Schemes and templates for postcards for February 23
I have prepared several templates with congratulatory inscriptions. Which you can print and use in your creativity.
Template for creating a star for this greeting.

Take a sheet of paper and stick two strips on it for the St. George ribbon.

Then cut out the star according to the template.

You tuck its edges using your finger and a ruler. Then, using the same ruler, we bend each ray of the star in half.
You need to start along a line from top to bottom. As in the photo. This will make 5 lines from each end.

Now we make these lines more visible with our fingers and begin to glue the star to the blank with St. George ribbons.

All that remains is to cut out only one star and find the right place for it in the overall picture.
Now I want to show the inscription options.

This template can be printed on colored paper.

Another idea for congratulations.

Set of fonts.


Also a diagram for cutting out an airplane.

Template for unusual cards. Figures in squares need to be cut out.

Scheme of a small postcard.

Template for a postcard - a jacket. 
Take note of ready-made solutions.
Original applications for Defender of the Fatherland Day
Nowadays, applications with congratulations using the origami technique are very popular.
Here is a diagram for creating a greeting in the form of a shirt.

Here is another very cute idea for an applique in the shape of hands.

We will need two sheets of cardboard.
Trace your left arm and cut it out.

And we fold it in half, then in half again, to make a small accordion. We tuck the ends because we will glue them to our palms.

Now you need to decorate the front side of the applique.

Glue the edge of the accordion to one palm, the other edge to the other palm.

The applique is not at all complicated, but it will be very interesting for children to make.
There are a lot of options for original postcards for men, the main thing is to choose the one that best suits the character of your men.
For example, our dad perceives this holiday purely in the colors of camouflage and vest, so we choose the color background of the cards accordingly.
If you do not want to focus on the military past of the holiday, then you can create such interesting options with stylized features of a man: a hat, monocle, mustache or cane.

I would like to know your opinion on the entire selection of ideas. Bookmark the article to repeat your favorite illustration with children.
Tweet
Tell VK
In every family there is someone who serves in the army, has long given tribute to the country, or is just about to join the ranks of defenders. It is these family members, friends and colleagues that we congratulate every year on the traditionally male holiday - Defender of the Fatherland Day. We give pleasant gifts to our dear grandfathers, men, boys and boys, dedicate poems in postcards, send beautiful congratulatory pictures with funny wishes and loud slogans about valor and courage. And, of course, this year will be no exception. Original pictures for February 23, 2018 will continue to be popular among children in kindergarten and school (for creating coloring books and school wall newspapers), and among adults (for free downloading in SMS, social networks and on the desktop).
Children prepare with the greatest zeal for Defender of the Fatherland Day. Under the strict guidance of teachers, they make bright cards and draw funny pictures to thank dads and grandfathers for their support, protection and care. We provide our selection of simple pictures for February 23, so that children in kindergarten can use additional materials in their works. Beautiful thematic images can be printed and cut out for postcards, they can be easily transferred through carbon paper to create an entertaining coloring book, they can easily be used to decorate a group and cover a board to further familiarize the children with the history of the celebration. You can always download funny and simple pictures for February 23rd for children in kindergarten on our website for free at any convenient time.
A selection of simple pictures for children in kindergarten for the holiday of February 23


Beautiful pictures for school on February 23 (Defender of the Fatherland Day)
Unlike kindergarteners, older children at school will benefit from more meaningful, but no less beautiful pictures for February 23 - Defender of the Fatherland Day. Children aged 7-13 are already familiar with the subtext of the holiday, but their knowledge is not too strong and deep. Using high-quality illustrations, the teacher can explain to schoolchildren interesting historical facts that led to the emergence of the celebration. But first you will have to free up some time to download for free on our website and print beautiful pictures for February 23 (Defender of the Fatherland Day) for school.
A collection of beautiful pictures for Defender of the Fatherland Day for children at school


Funny pictures for the wall newspaper on February 23, 2018
Just like decades ago, today, in schools all over the country, children prepare bright congratulatory posters with congratulations and funny pictures for the holiday of February 23. On thematic wall newspapers, the children draw colorful headlines, write loud congratulatory words, paste up photographs of their heroic relatives, drawings of military equipment and brave soldiers. And in order for the poster to radiate the spirit of heroism and fully correspond to the theme of the celebration, it is supplemented with printed and carefully cut out images. Funny pictures for the wall newspaper for February 23 can be downloaded from popular Internet sites or selected in our next section.
A selection of suitable pictures for the school wall newspaper for February 23


Cool coloring pictures for schoolchildren on February 23
For schoolchildren who want to congratulate their fathers and grandfathers with handmade gifts, we have selected a whole collection of cool coloring pictures for February 23rd. Such images can be colored on a computer in a special program or live with paints and pencils, and then signed and presented to the hero of the occasion. Cool coloring pictures for schoolchildren on February 23 are very diverse, so any little artist will choose the most suitable image for himself. And mom will always help you download and print the finished version!
Gallery of children's coloring pictures for schoolchildren for Defender of the Fatherland Day


Original pictures for February 23rd for dad
February 23, as an official holiday - Red Army Day, has been celebrated since 1922. A little later in the USSR, the date was solemnly renamed into a single Day of the Soviet Army and Navy. And only after the collapse of the Union the holiday received its last and currently valid name - Defender of the Fatherland Day. Every year on February 23, everyone congratulates dads, grandfathers, brothers, male colleagues, friends and neighbors with postcards and original pictures, wishes all military personnel, those liable for military service and defenders “in reserve” all the best and future achievements, organizes a small event at home and has fun with their men. Don’t forget to download in advance the original pictures for February 23rd for your dad, brother, grandfather, in order to thank your dear defenders in time for the peace in the house and peace in the country.
A selection of original pictures for dads on February 23rd


Festive pictures for men and grandfathers with congratulations on February 23
On the solemn Defender of the Fatherland Day, we can wish all men and boys bulletproof health, armor-piercing success, homing luck, beautiful girlfriends and loyal friends, a considerable monetary trophy and valiant victories in all daily endeavors. But are wishes alone enough? We offer to support them with festive pictures for men and grandfathers with congratulations on February 23. Such signs of attention are completely free and available for download at any time, but at the same time they are very pleasant for both young guys and elderly grandfathers. Unlike paper cards, you don’t need to go to a store or market to get bright holiday greeting cards for men and grandfathers; they can be downloaded from our website right on the eve of February 23rd.
A collection of greeting pictures for men and grandfathers on Defender of the Fatherland Day


Funny congratulatory pictures on February 23 (Defender of the Fatherland Day) for men
As you know, Defender of the Fatherland Day is a serious male celebration, which means congratulations should be fully consistent with the brave and warlike spirit of the holiday. But there is an exception to every rule. Funny greeting pictures for February 23 (Defender of the Fatherland Day) are no less popular among men than brutal and official cards with loud slogans. They lightly ridicule the typical traits of military personnel, which lifts the mood. Download some interesting pictures with jokes for your man and send him to his mobile phone on the holiday morning of February 23rd.
A variant of funny pictures with congratulations on February 23 to men and grandfathers


Beautiful pictures for February 23rd for your desktop
The ancient pictures collected in the last section were used to congratulate our grandfathers and fathers on February 23, and today they are already used as screensavers for the PC desktop. Using these characteristic images, which accurately reflect the culture of Soviet-era countries, it is easy to create the right atmosphere for Defender of the Fatherland Day. Also, beautiful pictures for February 23rd for your desktop are good as a screensaver for a mobile phone or tablet, in the format of a postcard for friends or relatives, or in printed form for various thematic events.
A selection of pictures on the theme "Defender of the Fatherland Day" for free download to your screensaver or desktop


Beautiful pictures for February 23, 2018 - universal and practical. Using thematic images with wishes, you can congratulate fathers and grandfathers on Defender of the Fatherland Day, create a school wall newspaper or funny coloring books for children in kindergarten. Cool pictures can be downloaded for free to your mobile phone and sent to all the men you know. Or you can simply print it on a color printer and decorate your home for the occasion.
Crafts for February 23. DIY gift for dad and grandpa
Summary: DIY crafts for February 23rd. Children's crafts for February 23 in the garden. Holiday February 23 in kindergarten. DIY gift for dad and grandpa.

The easiest option is to make a boat out of paper. Read how to fold a paper boat on our website using the link.

You can attach flags to the finished paper boat. The mast will be replaced by a regular toothpick.

An interesting craft for February 23rd that any dad will love is a paper boat filled with sweets.

If you make waves from strips of paper, you will get not just a paper boat, but a paper boat on the waves. This is a great gift for any dad or grandfather on February 23rd.

On our website you will find detailed instructions on how to fold a paper steamer. See link.


If you make a seascape from colored paper and cardboard, you will get a wonderful DIY craft for February 23rd.
Dad or grandpa will definitely love this homemade airplane. In this article we want to offer you three simple options for making this craft for February 23rd.

Matchbox airplane
From a regular clothespin and wooden ice cream sticks (or medical spatulas) you can make a craft airplane by February 23rd. When making this craft, we recommend using acrylic paints and a glue gun.

If you make a lot of these airplanes, you can actually make a whole suspended mobile. Please note that the photo below shows that the tail of the plane can be made from cardboard.


Cardboard airplane

Airplane made from a plastic bottle
There is a special article on our website dedicated to crafts made from plastic bottles. See link. In it you will find instructions on how to make an airplane from a plastic bottle using the papier mache technique.

Here is another suitable DIY craft for February 23rd - a tank made from matchboxes. To make it you will need: a piece of wallpaper (or a notebook cover), matchboxes (3 pieces), magazine paper, corrugated cardboard, a plastic bottle cap. When preparing with your children for February 23 in kindergarten, you can make such a cute tank as a gift for dad or grandfather. For a detailed master class on making this craft from matchboxes, see the link.

Another version of a matchbox tank. This tank's cannon barrel is made of a cotton swab, its tracks are made of corrugated cardboard, and its rollers are made of buttons.

From corrugated cardboard you can make not only tracks for a tank, but the entire tank. Look what an unusual craft we made for February 23rd!

A small child will also be happy to give a gift to dad on February 23rd. Children cannot make complex crafts, so we are specially publishing here a very simple DIY craft for February 23rd - a cardboard car. You will need a cardboard toilet paper roll, cardboard, paints, glue. See instructions.

Very beautiful, but at the same time complex paper crafts are offered on the Creative Park website from Canon. Here you will find paper ships, airplanes, helicopters, all kinds of paper car models, as well as architectural buildings. Making such a craft on February 23 will be interesting for schoolchildren and adults.

You will find paper crafts for February 23rd from the Creative Park website using the links:
From the topic of transport we move on to robots. You can make cute robots from cans, plastic bottle caps, cogs, nuts, screws, dishwashing sponges and other things. Making such a gift for dad with your own hands is not at all difficult, especially if you have a glue gun (so-called “liquid nails”) on hand.


But what scope opens up for the flight of children’s imagination and the development of creative thinking and imagination! Rest assured, dads will appreciate such a gift!

You can make a pencil holder in the shape of a robot.

Here is another interesting option for a stand for pencils and pens, made by yourself. How to make such a gift for grandfather or father on February 23rd, see.


An original pencil holder can be made from Lego Duplo.

If you want to make a pencil holder decorated with a photograph, then to make this craft by February 23 you will need such a designer part as a transparent door. The photo is inserted into the free space between the wall and the door.

Do you want to surprise your dad or grandfather with an original gift for February 23?


Then make these beautiful cups for them. For this craft for February 23, you will need: cardboard, pasta of various shapes, gold spray paint in a can, glue (glue gun), as well as all kinds of jewelry. Cut out a cup from cardboard and make a stand for it. Now glue different shapes of pasta onto the cardboard. The most convenient way to do this is with a glue gun. When the glue is dry, paint the craft with gold spray paint. Finally, decorate the cup with family photo clippings and jewelry. For detailed instructions on how to make this craft for February 23rd with your own hands, see and read the link.

By the way, it would be appropriate to give such a cup to your dad or grandfather not only on February 23, but also on his birthday. Don't forget to write: "To the best dad from loving children" or "To the best grandfather from loving grandchildren."

Make a mobile made of paper airplanes for your dad as a gift for Defender of the Fatherland Day. Such a gift for February 23 will help create a festive mood. To make this craft on February 23rd with your own hands, you need to fold a lot of airplanes from colored paper or special paper for scrapbooking. And then hang them on strings from the chandelier. Read how to fold a paper airplane on our website using the link.

Concluding our article on children's crafts for February 23, we will tell you about one interesting craft made from waste material - a deer head made from a plastic bottle and plastic bottle caps. If your dad or grandfather is interested in hunting, then such a craft will be especially relevant for him.

Material prepared by: Anna Ponomarenko
Other publications on the topic of this article:
For the holiday of Defenders of the Fatherland Day, kindergartens and schools begin to prepare in advance: educators and teachers need to come up with what their students will give to their beloved fathers and grandfathers, and children need to bring all these ideas to life under the strict guidance of adults.
We offer to congratulate a man on Defenders of the Fatherland Day with the most expensive gift - a postcard or drawing made by a child. What can kids do for their dads and grandfathers? Read in the article material.
How to draw a card for February 23rd with a pencil and paints for children?
In kindergarten, children learn to draw their first schematic drawings. Step-by-step lessons will help educators prepare gifts for fathers and grandfathers on February 23, because it is in preschool that children learn about the holiday and its meaning, and why men are congratulated on this day.
Let's start with the drawing. We will need:
- protractor (we will use it to draw a star)
- a compass or other device that can be used to draw a circle
Let's move on to drawing:
- Draw a circle and draw two lines in it that will divide it into 4 equal sections.
- We measure 72 degrees on a protractor and draw a line inside along two opposite sections.

 We measure 72 degrees on a protractor and draw a line
 - Again we measure 72 degrees from the already drawn line and draw a second straight line, and then a third.

 We repeat
 - In order not to get confused, we mark with dots what we are measuring and from what. How to draw the lines correctly can be seen in the photo.


- We should have 10 identical sections. Let's draw a dash in the middle of each line (through one straight line). Draw a star and slightly round the corners.
- Use an eraser to erase the circle and additional lines inside the star. Draw an outline around the star.

 Draw a line along the entire contour
 - Now let's draw a St. George's ribbon with edges curved down. Let's continue the edges of the ribbon on both sides of the star.

 Drawing a ribbon
 - We draw three parallel black lines on each part of the tape. We turn the schematic drawing into a postcard by decorating the star and ribbon, and adding the inscription “Happy Defender of the Fatherland Day.”

 We bring the ends of the tape to the edges of the sheet
 Drawing stripes on tape
 Video: Simple drawings. Soldier
An excellent drawing on the theme of Defender of the Fatherland Day - a valiant soldier at his post. Such a drawing will decorate both a postcard and a school wall newspaper prepared for the holiday.
For the drawing you will need:
- blank sheet of paper
- simple pencil
- colour pencils
- ruler


- Divide the sheet into two halves by drawing a vertical line down the center. The left side should be slightly narrower than the right. Draw an oval in the upper third. This will be the head. Below it we draw the outline of the future collar.
- Focusing on the preliminary markings, we draw in detail the soldier’s head, which is wearing a hat with earflaps. Add the neck and shoulders. The soldier will be wearing a pea coat, so let's outline his outline.


- We draw a face and hands. We finish drawing the small details of the clothes.
- Don't forget to draw our defender the machine gun he is holding in his hands. First we’ll sketch out the lines, and then we’ll draw in more detail. The photo shows what needs to be depicted.


- Now you need to draw the protective colors of the uniform and the outline of the banner in the background.

- We write on the left side of the sheet the inscription “Happy Defender of the Fatherland Day” and specify the background.
- After that, all that remains is to decorate the drawing.


If the previous drawing is difficult to draw, then the child can cope with the schematic image of the tank presented in the step-by-step lesson below without the help of adults.
- For the drawing you will need pencils and a sheet of paper. It is better to use a checkered notebook sheet. This will make it easier for the child to navigate and draw all the lines correctly.
- Let's draw the barrel of the tank: in the center of the sheet we will draw a line 4-5 cm long, and above it, at a distance of about 1 cm, another parallel one.


- Let's connect the lines on the left side, and draw the beginning of the barrel with an oval on the right side.
- Let's start drawing the tank turret. To do this, step back down 1 cm and at a distance of about 1/3 from the length of the barrel, draw an elongated rectangle 10-12 cm long. Step back from the edge of the base by about 0.5 cm, put dots and connect them in a semicircle.


- Below we draw the base of the tank caterpillar. How to do this is shown in the photo. Inside the base we draw 5 circles and sketch them with a black pencil.

 Drawing a tank caterpillar track
  Paint the 5 circles at the base of the tracks with black.
 - Let's draw a star in the center of the tower and a flying flag on a long pole. We paint the tank green, the star red and add an inscription.


Video: Simple drawings. Children's tank
Video: Postcard to Dad for February 23, Military Airplane
A schoolchild can easily complete the “Warship” drawing, which will be a good gift for dad or grandfather if tanks and planes have already been given to the heroes of the holiday.


Since Defender of the Fatherland Day once had the name “Day of the Soviet Army and Navy,” it is celebrated by all military personnel: both on land and at sea.
This is what we will draw:

First, let's prepare everything you need:
- blank sheet of paper
- a simple pencil and a black felt-tip pen
- colored pencils or available paints

- Divide the sheet into two halves by drawing a horizontal line. Do not forget that we draw all the preliminary contours without pressing the pencil, so that later there will be no trace of the erased lines.
- We will draw the ship in the lower half. First, let's draw a wavy line that will represent the surface of the water. Let's draw the stern with all the necessary protrusions.
- On the left side of the stern we will draw a cannon. In the central part of the stern we will add the following elements: the captain's cabin and the radar. They are not difficult to draw if you exactly repeat all the lines, as in the photo.


- At the bottom of the captain's cabin we will draw a battery of torpedoes and add a row of portholes.

- We draw a flying flag and, to make the picture more realistic, add a couple of birds flying in the distance.
- You can stop here and move on to coloring. But this is not enough for a greeting card: you will also have to add an inscription.
- You need to color the drawing like this: a warship - blue-gray, water - blue, draw a red stripe at the bottom of the ship and select the right colors to depict the national flag.


Video: How to draw a cool picture for February 23rd?
Ideas and templates of cards for February 23rd in kindergarten
- The issue of preparing for the holiday on February 23 begins to worry kindergarten teachers and school teachers long before its onset. It is only at first glance that it seems that there is nothing difficult in choosing the appropriate option for a gift.
- But this is not at all true, since the process of creating a craft or a postcard with your own hands, which children will then give to their dearest people - dads and grandfathers, should captivate them, and therefore they should immediately abandon complex elements or multi-tiered paper structures.
- A simple but original postcard or craft will appeal much more to both the little “creators” of the masterpiece and adults. What gifts can you prepare for the holiday on February 23 with children in kindergarten - see the photo selection below.


 Cover for postcard


Ideas and templates for postcards for February 23rd to school
Children at school already know a lot, and therefore a simple picture of a tank or an airplane will not bring as much pleasure as creating a postcard with your own hands with a surprise, retractable parts, special appliqué, etc.
See the photo selection below of gifts for the holiday on February 23rd, made by schoolchildren, and get inspired!


- Cut out a star from red colored paper. To make it voluminous, you need to bend the “ears” that will be glued to the postcard. The star is bent along the lines with the outer edges outward and the inner edges inward.
- Glue the star on the wrong side of the card (spread).


- We will decorate with stripes cut from golden colored paper. Let's also make the little star golden.
- Glue 3 golden stripes vertically and horizontally onto the front side of the card, as shown in the photo. Glue a gold star next to it. To ensure that the strips stick evenly, it is better to first mark with a dotted line the places where they should be.


 How to fold a star correctly
 - A voluminous card can also be made using the quilling technique. To make a postcard, in addition to paper (colored and white), you will need toothpicks, glue and scissors.
- Fold the sheet so that one part is slightly longer. We write large numbers of the holiday date on it. The two should be on the front of the card. After the two is drawn, we add a three on the second page of the postcard. Cut out the numbers along the outer edge.
- We prepare “curls” from strips of colored paper. To make them, you need to “stick” a strip of colored paper onto a toothpick and twist it. How to paste the resulting curls onto a postcard can be seen in the photo.
- We apply each spiral with the glued side to the numbers, trying not to leave large gaps between the curls. Add an asterisk between the numbers and sign the card.
- Draw a boat or print a ready-made template on double-sided cardboard.
- Cut out some areas in the picture.
- Fold the card along the fold line.
- Using a felt-tip pen, draw a dotted line along the edges of the postcard and the image of the boat.
What card should I make for my brother for February 23?
You can surprise your brother with an original “Ship” postcard.

 Postcard "Ship"
 This beauty can be made in half an hour. So let's get started!


For a brother who has not yet served in the army, you can make a shirt card.
Video: DO IT YOURSELF / Postcard - SHIRT /Gift for FEBRUARY 23


