String art technique: master classes for beginners. String art: master classes for beginners String art balloon diagram
Currently, a large number of types of needlework are known. Unlike the usual knitting or embroidery, string art is something new. Few would have thought that connecting nails and threads could result in the creation of a picture of amazing beauty. The technique is simple and anyone can master it if desired.
What is string art?
Isothread is a type of needlework in which pictures are created using ordinary nails and threads. Literally translated from English, the name means string art. Indeed, if you look closely, the threads really resemble stretched strings. Using this technique, you can get both a small and simple and complex design.
Although string-art paintings use straight lines, this is not a problem for obtaining a three-dimensional image as a result. Some may think that this technique is simply crossing threads, although in fact it is an art direction that requires care and preliminary calculations before starting work on creating a painting.
String art - history
This type of needlework was invented by English weavers almost four centuries ago. Then they pulled the threads in a certain sequence onto nails driven into the board and as a result they received a panel with which they decorated the walls. At the end of the 19th century, the English researcher and mathematician Mary Boole improved the technique and began to teach children mathematics with its help, depicting various geometric figures.
Modern string art is an art form in the history of which the American John Eichinger, the chief designer of the Open Door Company, was the first to write his name. Using this technique, he began to create mandalas that were distinguished by their grace and unique optical illusions. Then the designer gained followers who proved that amazing pictures can be made.

String art techniques
Currently, paintings from nails and threads are created using the following techniques:
- Corner. In this case, the thread moves in such a way that there is a right angle between the vertical and horizontal lines.
- Circle. The technique consists of connecting nails located on the opposite side. Visually divide the circle into two parts, in one - the movement is carried out to the left, and in the other - to the right.
- Arc. Filled in the same way as a circle. They start from the edge, then move at a right angle, and then continue moving to the side.
What do you need for string art?
The main accessories for obtaining the desired pattern are nails and threads. In addition, isothread paintings are created using:
- wooden plank or thick cardboard;
- paints;
- hammer;
- pencil;
- pliers;
- scissors;
- drawing template.
Basis for string art
The subject and size of the image determines what the work will be done on. Paintings using the string art technique are made on bases from:
- wood;
- plywood;
- cardboard;
- polystyrene foam
If necessary, the base can be painted in any color or a sheet of colored paper can be glued onto it. For beginners, it is recommended to start with cardboard or foam board as they are much easier to insert nails into, which is important for getting started, especially with children. In addition, no one forbids experimenting with bases; for example, you can use cork.
Nails for string art
To create paintings using isothread technique, the quality of these components is of great importance. Nails with heads are chosen especially carefully; their length should be within 1-2 cm. It is important that they are all made of durable material and look the same, this is the only way to get a clear image that will delight you with its beauty for a long time.

Threads for string art
To create a picture, you can use any available threads. The pattern is created by gradually wrapping them around pre-driven nails. The tension force should be medium; if you overdo it, the nails may begin to bend and the threads may break. If the tension is weak, the threads will get tangled, making the pattern unclear. The string art technique is created using the following threads:
- sewing;
- polyamide;
- knitting;
- embroidery;
- darning;
- film;
- combined.
String art – ideas
This type of popular creativity is unique because it combines things that are incompatible at first glance: the lightness of threads and the stiffness of nails. String art paintings can bring a huge number of ideas to life. Popular options include the following images:

In most cases, beginners begin their acquaintance with the technique by creating a string art heart. Even a child can cope with such a task, however, if one of the adults drives the nails into the base. Such a craft can not only decorate the interior, but also become an excellent gift. You can gradually complicate your drawings by adding other techniques and creating paintings of varying levels of complexity.
How to make string art?
Having become acquainted with this type of needlework, it is important to understand the technique and understand where to start. You need to decide on the idea you want to bring to life. It is recommended to start learning with easy options, gradually complicating the drawings. The DIY string art technique consists of the following steps:
- The base is sanded with sandpaper and painted in the desired color.
- The diagram is printed or drawn on paper.
- They are secured to the base with tape, and something is placed underneath the plywood so that the nails do not damage the table covering.
- The nails begin to be driven in gradually along the edge of the template. They should be located at the same distance from each other.
- Once all the nails are driven in, the paper template is removed.
- The threads are selected depending on the idea of the string art.
- The end is secured under the cap and the thread begins to be pulled, following the pattern. When the thread runs out, the ends are tied and the excess is cut off.
Today it is very popular to have at least several hobbies. Our world is developing rapidly and sometimes you want to take your time. Therefore, most begin to master needlework. In this article we want to talk about a new type of hobby of the younger generation. From the title you can already understand what we are going to talk about, namely string art for beginners with diagrams so that you can create beautiful paintings and more.
By the way, this type of hobby is very exciting and not only young people engage in it.
What kind of animal is it and what is it eaten with?
As many sources say, no specific place of origin has been found. Some refer to English roots, and others to African ones. However, this craft is considered not so ancient, since its popularity began to grow only in the last century. Who would have thought that thanks to a math teacher, this technique would become popular. The story goes that the teacher was trying to get kids interested in algebra and geometry. Nails were hammered onto the board, and the desired shapes were created using thread. American designer John Eichenger became interested in this technique. He became the man who was able to turn geometric shapes into art. His first work was directed towards oriental art, which is why we can often find paintings in the form of a mandala.

From the English word “string” is translated as rope or string. Accordingly, literally “string art” sounds like rope art. Agree, this is a strange combination of words. Although in reality it looks very attractive. Surely you have already come across pictures with nails and threads stretched between them.

Let's move on to preparation
Since the technique is simple, we can create drawings, paintings or decorate a room. Typically, haircut art uses straight lines that are layered on top of each other. This creates a lot of work. So, to start creating, we need:
- choose a scheme to create (do not take complex options yet);
- working tools (hammer, nails);
- skein of thread (any kind will do);
- base (can also be any: paper, wood, concrete, and so on).

How to make a beautiful picture? First of all, we need to select a drawing. We are thinking about what size it will be and in what color scheme. You can also use templates from the Internet.

The next stage is preparing the base. For starters, you can consider cardboard or foam.

We print out the diagram of the selected image and attach it to our base. Then we take a needle or an awl and make holes along the contour. We nail nails in the places where the holes were made.


On a note! The nails should be at the same distance; there is no need to drive them deep.
Creating a masterpiece
This is the most enjoyable moment in creating a drawing. We begin to play with the threads and mix them up as we please. But remember about straight lines.

Let's give a couple more tips:
- do not pull the threads too tightly, otherwise the nails will bend under pressure and it will not look very nice;
- You also shouldn’t pull it loosely, as the pattern will become unclear and the threads will begin to tangle;
- combine colors, this is a creative process;
- For richer lines, wind more layers of thread.
An example of a simple string art
You've learned the basics, and maybe you've already tried yourself as an artist. However, below we will look at a master class for beginners.
The first thing we did was choose the size and pattern of the product.

As mentioned earlier, we select and prepare the base. Then we attach our diagram in the center, as in the photo below.

Mark an equal distance with a pencil. If the pattern you have chosen is more complex, then make marks with an awl or a needle (if the base is soft). Next we drive nails along the contour.


We remove the template, we won't need it anymore.

There's just a little bit left to do. We fasten the beginning of the thread and tie the carnations the way you like best. In our example, the outline is first tied, and then the empty space is filled.


The end result is this cute heart:

It would seem like a simple picture, but it looks so beautiful in the interior. It’s even more admirable when you create such things yourself. Many creatives started from the basics. Now some of them are organizing exhibitions in their galleries. Some people create panels to order, while others keep it as a hobby.
Video on the topic of the article
For those who are interested in viewing more options for creating drawings, we have prepared a selection of videos.
Today, various handmade areas have become widespread. Unlike the usual knitting, embroidery or sewing, string art is an unusual and interesting type of needlework. When used skillfully, simple nails and threads turn into luxurious three-dimensional paintings. The string art technique is quite simple, so anyone can master it.
String art (isothread) is a type of art in which various images, simple or complex, are created from threads and nails.
The pictures consist only of straight lines, but despite this, three-dimensional drawings are obtained. At first glance, it seems that the main feature of the string art technique is the usual intersection of threads stretched over nails. In fact, to get beautiful patterns you need to be careful. This is painstaking work that requires preliminary calculations.
The history of this needlework began about 4 centuries ago. It was invented by English weavers who, in a certain sequence, pulled threads onto nails driven into boards. As a result of the work, panels were obtained to decorate the premises. At the end of the 19th century, Mary Boole, a mathematician and researcher, became interested in the technique, improved it and used it to teach children, depicting a variety of geometric designs.
Modern string art gained popularity thanks to American designer John Eichinger. The mandalas he made amaze the imagination with the grace of their lines and unique optical illusions. At the moment, the popularity of unusual paintings made using the string art method is only growing.
Works of art using the string art technique fit organically into modern interior design, especially in modern, high-tech and classic styles. Original decor in the form of names, silhouettes, logos, flags, patterns, animals looks fresh and bright.
Main directions
There are many string art techniques that allow you to create original paintings from threads and nails. The most popular methods include:
- Letter design. A well-known trend developed in the West. Various words look interesting in the interior. Despite the use of sharp nails, pictures made using the string art technique can look delicate. Such decorations are suitable for use in the hallway or living room.
- Animalism. Often craftsmen make silhouettes of various animals and birds. This direction of string art is more relevant today than ever. Images of graceful deer, noble horses, spectacular zebras, and majestic elephants are popular.
- Portraits. People who do string art professionally create stunning large canvases in which facial features, for example, of celebrities, can be easily discerned.
- For children. It is useful to practice string art with your child. Kids will be able to develop perseverance, attention to detail, and develop fine motor skills. In this case, polystyrene foam is used as a base. Popular children's patterns using string art technique: cats, fish, dolphins, hearts and others.
- Additional decor. When creating compositions, various types of jewelry are used: different colors, identical patterns with a contrasting shade of nails, rhinestones, beads, rivets.
To make an original key holder, just take a small board, attach several hooks to it and decorate it using the string art technique. The composition will be decorated with a key or a tree, various inscriptions.
 Letter design
  Animalism
  Portraits
  For children
  Additional decor
 Materials and tools
To perform weaving using the string art technique, you need to prepare tools and materials. First of all, the base is selected. This could be a small board made of plywood, fiberboard or cork. Such substrates are optimal for working with the string art method, since their surface is convenient to cover with tinting, coloring compounds, varnish or film.
A good option for working in the string art technique would be a foam base, which is suitable for applying acrylic paints. But in this case it is necessary to replace the carnations with pins.
The number of nails should be sufficient to create a painting using the string art method. It is worth giving preference to furniture, decorative and carpentry varieties. Their main advantage is the small size of the products and hats themselves. As for the threads, the following knitting threads are ideal for working with the string art technique: floss, twisted, thin iris. Silk yarn constantly slips out, so it causes inconvenience when weaving.
If you are using the string art technique for the first time, you should not take on complex images. It's better to start with the simplest options. The ideal solution would be templates with numbers, where each movement of the thread and type of connection are marked with special arrows. To work on a composition in the string art style, you will need other tools:
- pliers;
- hammer;
- scissors;
- buttons;
- clothespin for fixing nails.
Experienced craftsmen advise using the body of a ballpoint pen for this unique drawing. The rod is removed and a thread is inserted in its place. This method ensures uniform tension and ease of working process. 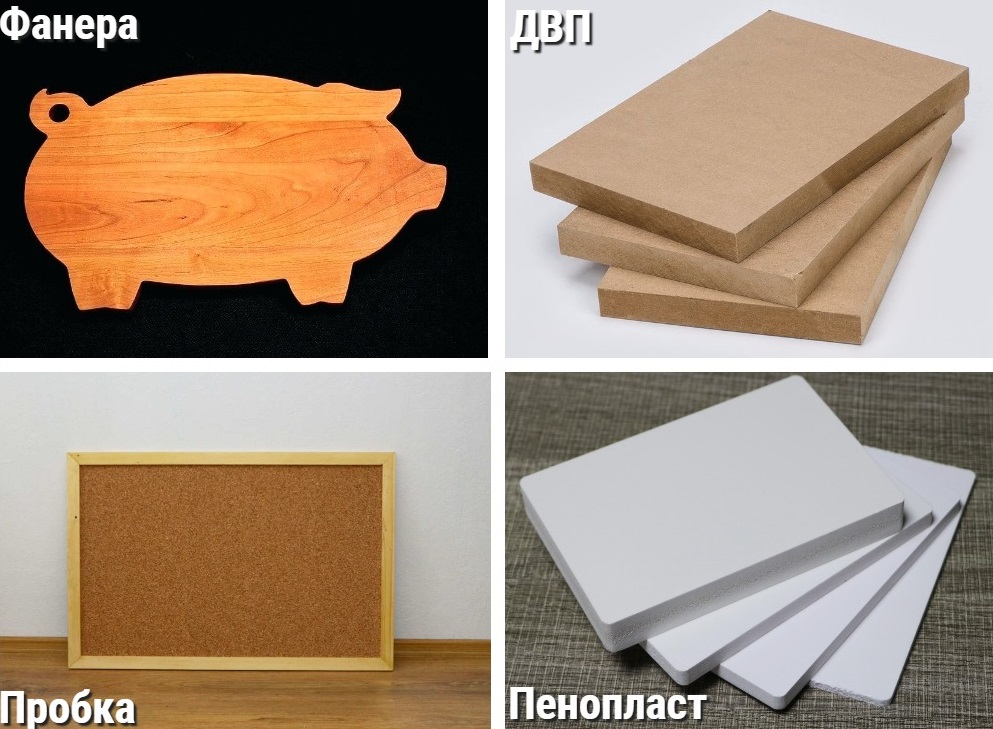 The basis
 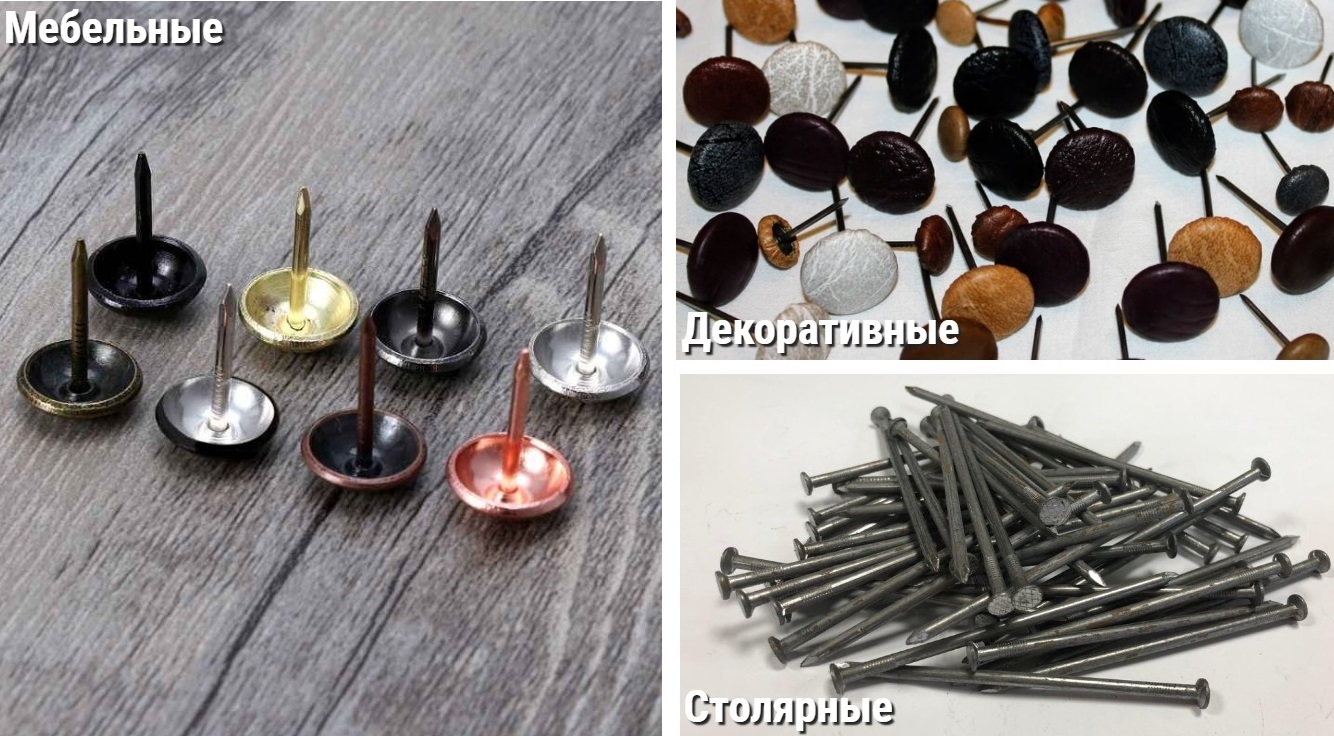 Nails
Nails  Threads
  Templates
  Additional tools
Stages of work
To create an attractive composition in the sting art style, you need to choose a suitable design, think about its size and color. Actions are carried out in stages, in compliance with the recommendations of specialists. It is important for beginners not to rush while working in order to avoid mistakes.
Applying a drawing to the base
After preparing the materials, you can begin to work. In order to apply the selected pattern to the base, follow the instructions:
- Create your own template or print a ready-made one.
- The diagram is applied to the prepared substrate.
- If the base is soft, the contours are marked with a needle; if it is hard, nails are driven in.
- The sample is deleted and will no longer be needed.
If necessary, you can secure the template with masking tape. Then during further work it will not move out. This is especially convenient when practicing string art with children.  Prepare the substrate
  Print the template and attach it to the base
  Drive nails according to the pattern, remove the sample
Driving nails
To work using the string art technique, you will need a small hammer. The actions are performed step by step:
- Nails are carefully driven in around the perimeter; you can start from any area.
- To protect your fingers from damage, hold the product with pliers or a regular clothespin.
The nails are driven in at a distance of 1 cm. You should leave a length that will be convenient for winding threads. The more voluminous and multi-layered the template, the higher the driven nails should stick out.  Start driving nails from any area
  Use a clothespin to protect your fingers from damage
Filling space with threads
The same sketches using string art technique can look different. After placing the nails, the threads fill the drawing itself or the surrounding space, the background. This is done as follows:
- The first thread is tied to a nail, and the creative process begins.
- When it is necessary to change the color, a knot is tied to fix the pattern.
- Upon completion of the work, all excess ends are cut off.
If the thread breaks, you need to carefully tie it and continue creating. When creating complex multi-layer compositions using the string art technique, it is important to adhere to a certain sequence, due to which a three-dimensional effect is achieved. In other cases, chaos is welcome.  Tie a thread to a nail to create a pattern
  Finally, trim off the excess ends.
Edging the picture
Finished figures filled with threads are often decorated with edging. The color can match or contrast with the main elements. Finishing is done along the contour of the picture, to delineate the boundaries, giving the picture a neat appearance. Blue letters, for example, will be perfectly decorated with yellow edging.
Basic techniques for beginners
For the first acquaintance with the interesting technique of string art, you should not immediately take on complex compositions. It’s better to start with the simplest techniques, using one color. When choosing, you should pay attention to special stencils, in which each number indicates the order of actions and the type of connection.
Corner
With them, basic movements are practiced, allowing you to move to a new level of skill. Beginners are recommended to fill in corners and circles; other shapes are derivatives, so they are much easier to master.
- To work using the string art technique, you will need a ruler. Further, all manipulations are performed according to the instructions:
- An angle, obtuse, straight or acute, is drawn on the substrate.
- The figure is divided into equal zones where paired holes are created. The top remains free.
The thread is threaded from the wrong side, according to the chosen pattern.
Arc
Filling a corner cannot be done in such a way that opposite points that are located at the same distance from the vertex are connected.
- This pattern using the string art technique is used for floral designs. It's not difficult to make. All you have to do is follow the instructions:
- Part of the circle is drawn.
- The holes are connected with a thread in such a way that there is less distance between them compared to half the arc.
Equal spaces are left between the holes.
Drawing using the string art method is done strictly in one direction.
Circle
- To complete the work you will need a compass and an awl. A similar element of string art for beginners is made according to the instructions:
- A circle of the required size is drawn. Small diameter is preferred.
- The holes are located in the same way as the numbers on a watch dial; there are 12 of them in total. The holes are numbered.
- A thread is threaded through hole No. 1 and pulled to hole No. 5.
Holes No. 2 and No. 6 are connected, then No. 3 and No. 7, and then by analogy.
Circle
You can connect other points in accordance with the selected patterns. The only rule that cannot be broken in string art is that the distance between the holes should not exceed the diameter of the circle.
- This technique will be required to create beautiful flowers using the string art technique. The figure is performed as follows:
- An arc in the shape of a fan and a small segment are drawn.
- The marks are located at equal distances from each other.
The holes on the arc and the segment are connected.
The string art method allows you to make flower petals, leaves, and buds. The result is a real floral arrangement that can decorate any room.
The art of string art sometimes causes difficulties for beginners. Step-by-step instructions will help you avoid them. The simplest figures to make using the string art technique are: a car, a letter design and a fox.
Car
First of all, the base is selected. A small board measuring 15 x 20 cm will do; the corners can be rounded. The surface is sanded and covered with varnish or stain. Prepare threads, hammer, scissors, pliers, masking tape. All actions are performed step by step:
- A machine is drawn on a blank sheet of paper, or a ready-made stencil for string art is printed.
- In the picture, dots are placed at equal distances in the locations of the studs.
- The sheet is attached to the substrate with masking tape, and nails are nailed. After this, the picture is deleted.
- A thread is tied on the upper central nail, the tip is pulled diagonally, clings to the next element and further by analogy.
- When all the carnations have been processed, the thread is tied and cut.
In the same way you can make a heart, maple leaves, snowflakes and other pictures. By following the instructions exactly, you can achieve excellent results.
 Print a stencil and place dots at the locations of the nails
  Attach the picture to the base, drive in nails, remove the template
  Tie a thread on the central nail to create a pattern
  When finished, tie and cut the thread
 Letters
To work, you will need a standard set of tools and materials. The master class will help you make an original composition using the string art technique:
- The base is sanded and painted in the chosen color. A suitable word, catchphrase or logo is selected.
- Letters are printed or applied to paper.
- The template is attached to the central part of the substrate. Nails are driven in along the contour at equal distances from each other.
- The paper is removed. The thread is secured under the head of the stud and passed to another. This must be done until the elements are completely filled.
- The work is completed by fixing the thread and cutting off the ends.
Letters can be used as decor for photo shoots, themed wedding ceremonies or living spaces. When driving nails, it is recommended to place something under the base. This will protect the surface of furniture and floors from damage.
Fox
This cute fairy-tale animal, which is associated with cunning and ingenuity, will be an excellent decoration for your home interior. To make it using the string art method, you need to perform several manipulations:
- A board or piece of plywood of a suitable size is sanded and coated with paint and varnish.
- A drawing is selected. This can be a full fairy fox, its head or a geometric picture.
- The image is applied to the substrate and nailed along the contour with nails. The paper is removed.
- The space between the nails is filled with threads; several colors can be used.
The red fox will be an ideal decoration for a living room or children's room. You can make such a decorative element using the sting art method together with your children.
Paintings made using the string art technique look luxurious. They are suitable for decorating modern interiors and can be an ideal gift for loved ones. The work is useful for children, since string art develops fine motor skills, abstract thinking and a sense of beauty.
Fill the space with threads
Video


Photo
String Art is certainly an interesting direction in needlework. The work uses decorative nails, a hammer, threads and produces very beautiful and unusual patterns, paintings or inscriptions. In this type of needlework, it is very important to pay attention to the color scheme of the threads. Both monochromatic paintings on a laconic background, the classic combination of black and white, and bright color paintings look equally good and interesting. A panel in this technique depicting dishes or products is perfect as a decor for the kitchen, the hallway can be decorated with a painting depicting shoes, keys or an umbrella, in a children's room images of cartoon characters would be good, for a bedroom a panel depicting doves, hearts or silhouettes of a man and a woman. In today's master class we will look at the String Art technique, which is perfect for beginners, because it comes with diagrams.
String Art is creativity at the peak of popularity, as it allows you to combine the incongruous - the rigidity and brutality of nails and the lightness and fragility of threads.
Learning the String Art technique for beginners with diagrams
String Art, as a type of art, comes from England. There are two versions of the origin of this needlework method: the first - the ancestor of String Art is a woman mathematician who taught and explained geometry in this way, the second - this is how weavers decorated their homes.
A panel using the String Art technique can be an excellent gift for a loved one on Valentine's Day or Women's Day. Let's consider the idea of creating a heart-shaped panel: what materials will be needed and directly how to make it. The process is not that complicated, and the result will be stunningly beautiful.
- For work you will need the following materials:
- Hammer;
- Plywood (small size);
- Cotton threads;
- Drawing template on paper;
- Sandpaper.
Let's prepare the basis for the future product; for this, the plywood needs to be sanded with sandpaper.
In order to choose a heart to your taste, we offer several schemes - templates to choose from.

Once the heart template is drawn or printed, cut it out of paper. Its size should correspond to the size of the plywood. An important step is to position the template strictly in the center on a plywood base, or in another position, but the evenness of the lines still needs to be maintained.
Next, along the entire contour of the heart template, at equal distances, we mark segments with a simple pencil. Now it's time for decorative nails. We nail them on the marked notches very carefully so that the height of all nails is the same. This is a painstaking task, but there is no way to do without it, so we gather all our will into a fist and hammer in the nails.
When all the nails are driven into the plywood, the heart stencil can be removed. Now we prepare the threads for work. First of all, you need to wrap the heart along the contour, and then proceed to parallel winding of the threads. You should try to wind the threads with the same intensity and adhere to strict lines. The winding must be tight to avoid sagging threads, as this can significantly spoil the appearance of the future product. 
When the entire area of the heart is filled with parallel lines of threads, choose a different direction and continue winding. Depending on the density of the threads, you should independently adjust the number of winding layers; in our case, there were four layers of threads in different directions.
The result of painstaking work is presented in the photo.

The discount done and the resulting result will, without a doubt, delight your eyes for a long time. This idea of a panel fascinates with its rigor and transparency at the same time. It contains metal in the form of nails, wood, threads - unusual, isn’t it?
Depending on the colors of the threads, the base, the size and texture of the nails, the appearance of paintings in the String Art style can be completely different. To give the integrity of the picture, the heads of the studs can be tinted.
For a detailed study of this technique, we suggest watching several interesting videos in which experienced needlewomen will reveal the secrets of the work and give advice to beginners. You will also be able to see different ideas for creating a heart using the String Art technique. Enjoy watching and good luck in your creativity!
Video on the topic of the article
Among the many ways to decorate an interior, string art is becoming increasingly popular. This trend came from America and has an interesting history. It is simple to create, and the resulting products will easily fit into any modern interior.

"String" translated from English means "rope". And the string art movement promotes the creation of decorative things with the help of nails driven into the base and threads stretched on them in a unique way.

The history of string art began in the middle of the 19th century, when a teacher from an English school found an original way to demonstrate geometric shapes to her students. This Englishwoman's name was Marie Everest Boole. For classes, she used a small board with nails nailed on it, on which various figures were modeled using a rope. This greatly facilitated the process of studying this complex science. Marie Boule even published the book “Entertaining and Wise Algebra” in 1909 (original “Philosophy & Fun of Algebra”).

The beginnings of the geometry and algebra teacher were continued by the American designer John Eichenger. He became interested in interesting technology and began creating his own original paintings. In his work, John turned to the oriental art of the mandala (a sacred symbolic and schematic image among Buddhists), noting that lines of threads stretched over nails can form symbolic patterns.
The first work of the Californian designer was called “string mandala”, i.e. "mandala of threads" The mandalas created by Eichenger were distinguished by the elegance of their constructed patterns, unique optical illusions and strict geometric figures constructed according to mathematical principles.

To create an object of string art you will need very few items:
- The base board, which must first be prepared (painted, varnished, sanded, etc.);
- Nails of the same size or round head pins (the number depends on the design);
- Colored nylon threads;
- A stencil made of paper.

A stencil is applied to the base and nails are driven along its contour. After this, the stencil is removed and the threads are further stretched. The process of tensioning threads is creative and depends on the imagination of the author. But for those who do not know how to do this at all, the rules for filling an angle and a circle from the iso-thread technique will come to the rescue. By the way, these techniques are very similar, with the only difference being that isothread is used to create chamber works.

If you don’t want to make paintings yourself using the string art technique, you can purchase them. But then it will be useful to learn a few tips that will help you make the right choice.
- Pay attention to the base board. Its surface should be uniform, the paint layer should be streak-free, and there should be no unevenness or roughness.
- If you buy, then buy a base made of natural wood, which has an interesting texture and adds some uniqueness to the decor.
- Nails should organically complement the overall decor. There should be no crooked, bent nails or sloppy appearance of the product.
- The threads must be high-quality natural, carefully stretched without sagging or twisting.

String art today is a current trend in design. A product using the string art technique, purchased or made yourself, will always bring positive emotions and delight.


