Sew a festive dress for a girl with a boat collar. Dress with a straight boat neckline. A-line dress style for plus size people
Electronic pattern for a white boat dress.
Sizes: 42-52 and 52-62 (the buyer receives a choice of one of the gradations of sizes).
Electronic dress pattern file format:
PDF in full size and without seam allowances.
- PDF file A4, adapted for printing patterns on sheets of A4 paper in any program on any device, including mobile phones.
- Multi-format PDF file for printing on sheets of any format from A0 to A4 on a printer or plotter using Adobe Reader.
All rights to the pattern belong to Vera Olkhovskaya.
Sewing difficulty level: simple - dress pattern for beginner tailors who have mastered skirt sewing.
This model, like other dresses with a sun skirt and a sheath bodice, suits most body shapes and can effectively hide imperfections. The silhouette is adjacent. It is also recommended for girls and ladies with different sizes of bust and hips.
The set of patterns includes bodice patterns and recess patterns for the “sun” skirt (Fig. 1).
Almost any fabric in the dress range is suitable for sewing, except for highly stretchable stretch, chiffon and cambric. It is not advisable to use a staple - it wrinkles a lot and the skirt will be deformed during wear and after washing. Chintz, thin denim, thin dress linen and poplin are ideal. If you are sewing a dress for special occasions, then jacquard and velvet on a stable basis will be appropriate.
Consumption depends on the length of the skirt. This dress can use from 2 to 5 meters of fabric. Consumption calculations for different cutting options are described below.
 How to buy an electronic pattern
We finish processing the bodice (until the zipper is attached), including sewing the edges and ironing.
And we connect the bodice with the skirt. When joining, it is important to remember that the side seams of the bodice and skirt must match, despite the fact that the halves of the skirt are the same, and the front of the bodice is wider than the back. That is, the back half of the skirt should be slightly seated.
By connecting the bodice to the skirt, you can sew on a zipper.
(See the video master class on sewing for beginners “The hidden zipper in a dress”)
Processing the bottom of the skirt can be very simple - hem with an open cut.
Or with trim and regilin - see video tutorial on sewing
That's all! Stay tuned!
We have many more dress patterns for beginners and other women's patterns that can be downloaded almost free of charge.
Several video tutorials on sewing and cutting are already being filmed using the new models. Do not miss!
And don’t skimp on fabric, because sewing is free for you.
Download this PDF pattern:
White boat dress pattern
Price:
$1.50
(108 rub., 43.5 UAH.)
— Categories
— Search by diary
— Subscription by email
— Interests
— Regular readers
— Broadcasts
— Statistics
Electronic pattern for a “white boat” dress
Sizes: 42-52 and 52-62
File format: PDF
Price for other countries: 1 $
Sewing difficulty level: simple - dress pattern for beginner tailors who have mastered skirt sewing.
This model, like other dresses with a sun skirt and a sheath bodice, suits most body shapes and can effectively hide imperfections. The silhouette is adjacent. It is also recommended for girls and ladies with different sizes of bust and hips.
The set of patterns includes bodice patterns and recess patterns for the “sun” skirt (Fig. 1).
Almost any fabric in the dress range is suitable for sewing, except for highly stretchable stretch, chiffon and cambric. It is not advisable to use a staple - it wrinkles a lot and the skirt will be deformed during wear and after washing. Chintz, thin denim, thin dress linen and poplin are ideal. If you are sewing a dress for special occasions, then jacquard and velvet on a stable basis will be appropriate.
Consumption depends on the length of the skirt. This dress can use from 2 to 5 meters of fabric. Consumption calculations for different cutting options are described below.
Children's clothing patterns to download for free (see dresses for girls in this section)
How to cut white boat dress
When the patterns are printed, the desired size is selected (based on the size of your favorite dress) and the patterns are made, you can start cutting.
We start by cutting out the facings for the necks and armholes from double fabric folded in half (Fig. 2). To do this, we outline a fragment of the back and a fragment of the shelf pattern. Trace and cut WITHOUT seam allowances.
As mentioned above, the cost of a dress with a sun skirt will be quite large. If you want and need to save money, this dress can also be cut with a “tatyanka” (Fig. 3) - this is the most economical and simplest cutting option. Fabric consumption is:
Bodice length + Skirt length + 20 cm for processing and allowances
Now, how to cut a sun skirt.
Option one: the skirt extends across the width of the fabric (Fig. 4), that is, its length is within the range of 52 - 58 cm.
We fold the fabric in half face to face, match the edges and place the fold of the fabric parallel to the edge of the table where the couturier is standing.
We measure Du along the fold, apply the pattern of the recess of the required size and measure Du again. Having pressed or pinned the recess pattern, we trace it and from the tracing line we set off the length of the “sun” skirt in different directions. Draw the bottom line smoothly.
Then, lay out the bodice patterns, add allowances and cut them out.
Allowances: 1 – 1.5 cm for the middle seam of the back, side, shoulder and relief; 3.5 - 4 cm at the bottom and without allowances there are cuts of the neckline and armholes.
We glue the dubbing details of the facings onto the remaining fabric. It is desirable that the fractional direction be the same for mirror parts. Glue it and cut it out. Attention! when cutting, add 1 cm allowances to the shoulder, side and middle sections. The remaining cuts are WITHOUT seam allowances.
Well, if your skirt does not fit the same width of the fabric, this is option two; you will have to cut it in a spread (Fig. 5).
We lay out the fabric in one layer with the wrong side up, the edge towards the edge of the table and cut out half of the “sun”. One. Then we place this same half of the “sun” at the other edge to cut out the second half.
We lay out the bodice patterns on the remaining fabric, and you can fold the remainder in half by folding along the grain, that is, parallel to the edge.
After the bodice, we glue the dubbing parts on the lunges, observing the same proportional direction in the mirror patterns.
Yes, and don’t forget to cut the edges of the skirt diagonally (Fig. 6).
How to sew this dress
All new look dresses have similar sewing technology.
First, we “assemble” the bodice, leaving one side seam stitched only at the top.
Then, we do a fitting, where we specify the degree of fit and the position of the line of connection between the bodice and the skirt.
We process the neckline and armholes - the shoulder seams are not connected.
(See also the video tutorial on sewing a new look dress “How to trim the neckline with a facing”)
We finish processing the bodice (until the zipper is attached), including sewing the edges and ironing.
And we connect the bodice with the skirt. When joining, it is important to remember that the side seams of the bodice and skirt must match, despite the fact that the halves of the skirt are the same, and the front of the bodice is wider than the back. That is, the back half of the skirt should be slightly seated.
By connecting the bodice to the skirt, you can sew on a zipper.
(See the video master class on sewing for beginners “The hidden zipper in a dress”)
Processing the bottom of the skirt can be very simple - hem with an open cut.
Or with trim and regilin - see video tutorial on sewing
That's all! Stay tuned!
We have many more dress patterns for beginners and other women's patterns that can be downloaded almost free of charge.
Several video tutorials on sewing and cutting are already being filmed using the new models. Do not miss!
And don’t skimp on fabric, because sewing is free for you.
Cited 87 times
Liked: 10 users

Summer dress with boat neck
The pattern of a summer dress with a boat neck and a side slit is a simple model. Sewing is very simple, the dress is without a zipper, which we hope will especially appeal to novice dressmakers.
Cutting details of a dress with a boat neck
The dress has six parts: two backs, one front, three inner yokes of the corresponding parts. The yokes are marked on the pattern with lines on the main parts; they should be cut out yourself. Add 1 cm to all cuts for seam processing.
Dress sewing technique
Overcast the side, shoulder and middle sections of the back and press with an iron.
Place the back pieces right sides together and stitch. Iron the seam.
Fold the back and front right sides together and sew the shoulder and side seams, leaving an open area for cutting in the left side seam.
Repeat all operations for the inner yoke.
Overcast the bottom edges of the dress and the yoke.
Place the inner yoke into the dress with the right sides facing in, stitch along the boat neckline, press the seam, turn the dress inside out, iron the bodice allowances and stitch the seam allowances onto the inner yokes.
Baste and iron the armhole and bottom allowances of the one-piece sleeve to the wrong side, secure along the fold with a fixing finishing stitch. Remove the basting line.
Iron the side seam allowances for the slit and the bottom of the dress inside out and stitch with a finishing stitch the width of the sewing machine foot.

Dress with a boat neckline - sew it yourself
Surely, in the wardrobe of many modern women there are dresses or blouses with a beautiful, always relevant, boat neckline. It is also used in summer clothing models made from flowing chiffon or silk, for dresses and blouses that can be worn regardless of the season.
To sew a light, beautiful, flowy dress for the spring season or to appear at the office in a formal dress with an original neckline, use dress pattern with an intelligent neckline boat. Sewing it does not require any special skill, so even a novice seamstress can handle it.
To wear a dress all year round, as well as to wear it “on special occasions”, it is better if the dress has long sleeves, but use some light fabric for it, for example, chiffon with lining, which comes in a wide variety of colors, so each a woman will choose the most suitable one for herself. To add novelty and lightness to the look, the skirt should be flared, and the sleeves should be wide, but gathered at the cuff. For a business-style dress, knitwear, satin and even cotton fabric are suitable.
You can learn how to build a pattern from a step-by-step video on the Internet. As a rule, video tutorials are constructed competently and accessible, so they do not cause any difficulties and help you sew beautiful and unique things, as well as significantly save your family budget. The main thing is to follow all stages of work and take measurements correctly. The result largely depends on them, even in cases where you trust professionals and sew clothes in an atelier or from a seamstress you know.
As a rule, to create a pattern for a dress with a boat neck, they use a drawing of the base of a straight, semi-adjacent silhouette, however, you can use other bases that you have on hand. The pattern for the base of the dress is basic, so it is worth having if you are seriously planning to sew clothes yourself for yourself or to order. It will definitely come in handy in the future when you have to model clothes of different types and styles.
Dress pattern with a neckline a boat will be needed for those who can boast of a beautiful curve of the neck and straight posture, but even if you do not think that you have an impeccable figure, you should not deny yourself the pleasure of sewing a new thing and going on an experiment, the results of which you will definitely be satisfied with.

Do it yourself
Popular publications
We sew simple dresses. Patterns, master classes, reminders
Have you decided to sew a dress, but don't know where to start? Let's try to help. We won’t say that this matter is very simple, but it’s not that complicated! Our advice will definitely help you deal with it. It’s not the Gods who burn the pots. So, let's begin.
HOW TO SEW A DRESS: WHERE TO START.
Model selection. For the first time, choose a simple dress model.
Fewer connecting and decorative seams and details. Stop your gaze on laconic things. Beauty is in simplicity. Don't forget about bright and stylish accessories, they will complement the look.
Choice of fabric. The fabric must match the purpose of the dress and pay attention! easy to work with. That is, it does not cause additional difficulties when processing seams or ironing. Textured fabrics, pile fabrics, chiffon, natural silk... they are all very beautiful, but they will create a lot of unnecessary problems with the risk of throwing the failed masterpiece into the far corner. Let it be, for the first time, without a pattern that requires alignment at the seams.
Butt. It refers to all the additional materials that are required to sew your dress. These are adhesive (non-woven fabric, dublerin), edging, zippers (for the first time we advise you to choose models, preferably without it, because not every beginner can handle a zipper beautifully and correctly, and even more so a hidden one. Well , or practice on an unnecessary piece of fabric.), lining, accessories, threads, etc.
Pattern. How to sew a dress without a pattern? For a beginner, the task is difficult. Even if the dress consists of a rectangle, it is not some abstract rectangle. It is tied to a specific figure with the help of measurements, and to the dress model - with proportions and details. Therefore, a pattern is still needed!
Simple dress patterns:
For these simple dresses, the pattern is based on a rectangle, and is based on measurements taken from the figure. The dress is quite voluminous, oversize, the sizes shown in the figure correspond to 42-50 rubles.
Look how original the dress is! Here the fabric print comes to the fore. The dress pattern is extremely simple. There is a rule of good taste - the brighter and more decorative the material, the simpler the style should be.
For those who like a non-trivial approach to creating clothes, this solution will be interesting. The dress is a tunic made of rectangles sewn together. This simple dress looks very stylish if it is made of thin suede or suede-like material.
READY DRESS PATTERNS.
If you have a ready-made dress pattern, then consider that you have already done half the work. A good pattern increases your chances of getting something new significantly! On our website we have clear patterns for easy to sew dress models for beginners and for those who have experience in sewing clothes.
Pay attention not only to the photo of the dress, but also to the technical drawing. It will help you more clearly understand how you can use a ready-made pattern, adapting it to your own look. It’s no secret that dresses made from the same pattern, but from different fabrics, look different.
For example, this - absolutely wonderful dress.
The photo shows a model wearing an off-the-shoulder dress from Fendi. Fendi is a world famous Italian brand founded in 1925. He is considered the personification of taste and style. The brand's clothing is popular on the catwalk, in everyday life and on the set. At different times, the company's designers developed costumes for such famous films as La Traviata, Once Upon a Time in America, The Godfather and many others. We suggest sewing a similar jacket and trying on a Fendi look!
You can buy a ready-made off-shoulder dress pattern here. You can print it in full size on a regular printer. Available sizes for the pattern are from 40 to 52.
Sewing a dress using a ready-made pattern and, especially, with a detailed description of the technology will not cause much difficulty even for a beginner. The main thing here is accuracy, accuracy and attentiveness. The result will not disappoint you, because this model is very relevant not only in summer, it can be sewn from elegant fabric, resulting in a beautiful evening dress.
The level of complexity of this model is suitable for a beginner.
Cut details:
From the main material:
1. Front – 1 piece
2. Back - 1 piece
3. Lower back - 1 piece
4. Lower part of the front - 1 piece
5. Sleeve – 2 parts
6. Frill at the bottom of the sleeve – 2 parts
7. Burlap pocket - 4 parts
8. Neck frill - 1 piece
When cutting, you need to add a 1.5 cm seam allowance to the parts.
The average fabric consumption for such a dress is 2.5 m (with a width of 140 cm).
Recommended Fabrics— summer, easily draped light fabrics made of cotton, viscose, silk and their combinations (it is advisable to decate natural fabrics (wet them in water) before cutting, as the dimensions may change).
Layout example:
You will also need approximately 2.0-2.5 m of elastic band.
1. Fold the back parts with the shelf with the right sides inward and, aligning the cuts, stitch along the side seams. Overcast the seam allowances and iron them towards the front part.
2. Also stitch the side sections of the sleeves. Iron and overcast seam allowances.
3. Fold the sleeves with the front and back along the armhole lines. Pre-baste and then stitch. Cut seam allowances to 1cm and overcast.
4. Sew the ruffle details of the bottom of the sleeves and neckline into a ring, iron the allowances. Iron the pieces in half.
5. “Place” the finished part of the neck frill onto the neck of the dress and, aligning the sections, sew with a 1.5 cm seam (Fig. 1, line 1). Sew seam allowances together and iron onto frill piece. Then stitch the seam allowance onto the frill piece, 1.2 cm away from the seam (Fig. 1, line 2). Between the line and the seam you get a drawstring for the elastic. Do not close the stitch into the ring, leave a distance of 2.5 - 3 cm long to insert the elastic.
6. Measure the circumference of the shoulders (each individual), subtract 4-5 cm for the elasticity of the elastic. Thread it through the drawstring and close the stitching into a ring.
7. Sew a frill on the sleeves according to the principle of the neckline.
Picture 1
8. Place the pocket burlap pieces face down on the front side of the front panel and the front side of the back panel, align the cuts and stitch them with a 1 cm wide seam (Fig. 2, lines 1 and 1`) so that the pocket lining overlaps the line limiting the length of the entrance to the pocket, the width of the seam of the burlap pocket. The seams are overcast and pressed onto the pocket burlap.
Figure 2
The lower section of the skirt is processed with a narrow (0.7 - 1.2 cm) hem seam. Iron the seam.
9. Fold the shelf and back parts with the right sides inward, aligning the cuts, and connect along the shoulder seams.
10. Sew the side seams of the skirt with a seam 1.5 cm wide, while simultaneously sewing the burlap pockets with tacks at the beginning and end of the pocket (Fig. 2, line 2). The sections are overcast and the pocket is ironed.
11. Sew the bodice with the skirt (Fig. 3, line 1). Cut seam allowance to 1cm and overcast.
12. Cut the elastic, measuring around the waist. Sew into a ring with a 1.5-2cm overlay seam. Sew on the seam reserve (Figure 3, line 2).
Figure 3
Look at the dress Olga Belugina made using this pattern >>>
Tailored knitted dress with drapery Surprisingly easy to sew and looks very stylish. Here you need to make the right choice with the choice of fabric. Let the knitwear not be too liquid, but still softly draping and of good quality, so that pilling does not form when worn (the base should be natural threads).
2 IN 1: PATTERN OF A DRESS AND TOP WITH A SWING NECKLINE (SIZE 40-60)
You can buy the finished swing neckline dress and top pattern here. The pattern will be available in pdf format. You can print it in full size on a regular printer. Available sizes for the pattern are from 40 to 60. Each size is available for 3 or 4 heights, for a better fit.
When ordering a pattern, you receive a pdf file containing 1 A4 sheet with instructions for printing patterns and symbols, as well as 1 sheet of patterns, which, depending on the size, can be printed on several A4 sheets, after gluing which you will receive one large sheet with outlines of patterns:
Details of the cut of the dress (A) and top (B):
Shelf – 1 piece
Back – 1 piece (with fold)
When cutting, add seam allowances of 0.7 cm, along the neckline and armholes - 1.2 cm, along the hem line - 2 cm.
The average fabric consumption is 1.5 m for a dress, 0.85 m for a top (with a width of 140 cm).
Layout example:
An example layout for a dress is shown on the left, for a top - on the right
Sewing sequence:
1. Place double lines on the front along the side seam between control marks A and B, C and D, E and F (for a top - only between marks E and F) at a distance of 0.5 cm from each other, the first line along the allowances side seam, and the second along the shelf, so that they are located on both sides of the side seam line of the finished product. Pull these stitches with threads to the lengths indicated on the pattern, tie the ends of the threads.
*** If desired, you can place small folds along the side seam instead of gathering
2. Place double lines on the front along the shoulder seams from the neckline to the G marks at a distance of 0.5 cm from each other, the first line along the shoulder seam allowances, and the second along the front, so that they are located on both sides of the shoulder line seam of the finished product. Pull these stitches together with threads to a length equal to the length of the shoulder sections of the back between the G marks and the neckline, tie the ends of the threads.
***If desired, you can place small folds along the shoulder seam instead of gathering
3. Align the front and back along the shoulder seams, folding right sides together. Join with a stitch-overlock stitch (or simply machine stitch and then overcast). Stitching is done from the back. Remove the auxiliary stitches that tightened the assembly. Press the seam allowance to the back.
4. Process the armholes of the product. To do this, fold the seam allowances in the armhole area (between the control marks), and then sew with a hem seam with an open or closed cut (in the first case, pre-overcast).
5. Fold the front and back with right sides together, aligning along the left side seam (no gathers). Baste and then join with a seam-overlock stitch (or sew by machine, then overcast). Press the seam allowance.
6. Fold the shelf and back with right sides together, aligning along the right side seam (with gathers), observing the alignment of the control marks on the shelf and back. Baste and then join with a seam-overlock stitch (or sew by machine, then overcast). The stitching is done from the back side. The gathering should be located at the bottom, otherwise, when stitching, the foot may displace the fabric, which may interfere with the uniformity of the gathering. Remove the auxiliary stitches that tightened the assembly. Press the seam allowance.
7. Fold the neckline of the product and finish it with a hem seam with a closed cut.
8. Fold the bottom of the product and sew it with a hem seam with an open or closed cut (in the first case, pre-overcast).
HOW TO SEW A DRESS WITHOUT HAVING A READY PATTERN.
If you want to go the whole way of creating the chosen dress yourself, then this is also possible.
For example, let’s take a dress model like the one worn by the inimitable Italian and Street Style trendsetter Giovanna Battaglia. It really is very stylish.
Making a pattern for it is not difficult even for a beginner. Let's take a closer look.
For modeling you will need a base pattern of a semi-adjacent silhouette. You can create it using any pattern-making method. Of course, this will take up a lot of your time, but if you plan to continue sewing for yourself in the future, then you need such a foundation; you simply cannot do without it. By the way, it is also recommended to sew a base sampler from an unnecessary piece of fabric, after trying it on, take into account all the errors in the construction by adjusting the base pattern.
The styling is shown based on a semi-fitted silhouette specifically to preserve the bust dart.
- the side seams must be straightened,
— we move the chest dart from the shoulder line to the side seam line, under the armhole. To do this, cut along the intended line from the side seam to the top of the dart, not reaching a couple of mm, close the dart at the shoulder and it will open under the armhole. Read more about transferring darts here. You need to stitch the dart 2 cm short of the center of the chest, reducing it to nothing. Those. reduce the length of the dart by 2 cm.
If your figure allows you to make a dress with a more flattened silhouette, then you can use a base pattern with a straight silhouette, then modeling will not be needed at all.
This dress is not difficult to sew, but finishing will require time and perseverance. You can make the braid ala Chanel, which adds a special chic to the look, with your own hands. Look at the photo. The work is certainly painstaking, but creative. And what is the result!
By the way, having a basic pattern, you can also sew yourself a basic dress, which, as you know, is necessary in any woman’s wardrobe. By slightly changing the neckline or armholes, making the dress cut at the waist, adding a sleeve, you will get a model to your liking.
Now let's change the pattern a little. For example, let’s create raised lines, deepen and widen the neckline, as in the first photo.
— 1 step. Let's move the chest and shoulder darts into the armhole. To do this, we will outline the relief lines running from the armhole lines, through the waist darts to the bottom of the dress. Let's cut and open the darts in the armholes of the back and front. Read more about the translation of darts in this article.
— Step 2. Let's adjust the relief lines more smoothly. Let's lengthen and narrow the dress along the side seams. Let's add a slot. Slot width 4 cm.
— Step 3. All that remains is to deepen and widen the neckline according to the model.
Modeling a pattern, as you can see, is not at all difficult. You can also make the neck a boat, as in the second photo, or a V-shape.
The neckline can be adjusted directly during fitting, without changing the position of the line on the pattern itself. And the processing details (facing, lining) are cut using the top parts, i.e. main details of the dress.
REMINDER: HOW TO SEW A DRESS.
To obtain success and quality in the manufacture of a product, always adhere to certain rules of sewing technology
- before cutting, iron the fabric (iron it through a damp iron), fold it in half, edge to edge, with the front part inside. Place it on a flat surface, a table, with the fold facing away from you.
— lay out the prepared pattern parts on the fabric, trace along the contour with chalk or soap, add seam allowances, which you mark parallel to the sections of the parts. Check if everything is correct. Cut along the seam allowance lines.
- baste darts, shoulder seams, side seams. Try it on. If there are changes, adjust them. Proceed directly to sewing.
— product assembly is always carried out after preliminary preparation of smaller parts. Those. First, the collar is prepared, the pockets are turned and ironed, the sleeves are processed, the cuffs are sewn to the sleeve, the sleeve head is assembled, preparing it for threading into the armhole.
- prepare the back - process darts, yokes, folds, iron everything. The shelf - darts, gathers, yokes, pockets are sewn... everything is ironed. In general, after sewing by machine, each seam must be ironed. This is a very important rule; if you follow it, you are guaranteed to get a better quality item than the one you get only at the end of sewing. Checked!
- and only after that we begin assembly. Sew shoulder seams and iron.
- grind the side ones - iron them. Don't forget about cutting cuts.
— we sew in the collar and sleeves. We hem the bottom.
To summarize the lesson material, I want to say - if you decide to sew a dress, you should definitely sew, but try to make the sewing process as easy and accessible as possible. Keep it simple! With the help of basic or ready-made patterns, as well as patterns that require minor changes, according to your style, this can be done much faster and better than starting from scratch. This is why projects like ours exist. We try to make the sewing process as convenient and enjoyable as possible.
Now, you know the answer to the question - how to sew a dress? Still, the main step on the path to creating a new thing will be to start and not be afraid, but to believe in your strength! We, as always, will try to help you with this. Good luck!
Did you like our site? Join or subscribe (you will receive notifications about new topics by email) to our channel in MirTesen!

A-line dress is ideal for a woman's wardrobe: patterns and sewing instructions
A-line dress or sundress is the ideal solution for any body type! Modern models of women's dresses amaze with their diversity. But how to choose your ideal style, which will not only hide the flaws of the figure, but also emphasize its advantages? A-line dresses and sundresses are a unique solution for women of any age and body type.
What is a trapezoid style?
The name of the style speaks for itself. After all, its pattern is made in the shape of a trapezoid, the narrow part of which is directed upward. This design solution allows you to visually correct your figure, giving it feminine contours. Today you can find various variations of styles on the trapezoid theme. These can be either classic styles or casual styles. But they are all united by practicality and ease of wear. Therefore, if you don’t yet have a sundress or a-line dress in your collection, it’s time to buy one. After all, in it you will always look fashionable and modern.
A-line dresses and sundresses are also loved by pregnant women. After all, its loose cut does not restrict movement and adds elegance to the image. And this is exactly what is needed while expecting a child.
Sewing material
This fashionable style can be made from almost any fabric. However, the most popular models of world designers are made from linen, thick knitwear, cotton or staple. The choice of material depends not only on the time of year, but also on the entire image as a whole. It’s good if your collection includes sundresses and trapeze dresses, made from different fabrics and intended for different occasions. After all, once you try on this wardrobe item, you will no longer be able to refuse it.
What to combine with a fashionable a-line dress or sundress?
The choice of accessories for this model will depend not only on the situation, but also on the material from which it is made. Thus, linen sundresses and trapeze dresses go well with jewelry made of wood or natural stones. At the same time, shoes with both flat soles and wedges are welcome.
Dresses, trapeze sundresses made of thick drape or knitwear, which are usually worn in the demi-season, are usually worn with high boots or ankle boots. For outerwear, you can give preference to a raincoat or a long fur coat. If you purchased a summer dress made of staple or thin cotton, you can safely combine it with sandals and bright jewelry. The main thing is that the whole outfit looks harmonious in color and style.
Today, lace a-line dresses, which are lined with light fabric, are very popular. By wearing this model, you will get a very gentle and romantic look. In this case, you should give preference to pastel and any light colors. After all, this season, calm colors have gained the most popularity.
A-line dress styles for slender girls
Owners of ideal proportions, it would seem, have no need to choose a trapezoid style. However, you should not immediately write off this model. After all, with the help of a flared dress you can perfectly diversify your wardrobe and impress others. A-line dress with sleeves or sleeveless for slender girls can be either short or mid-knee length. At the same time, it is worth focusing on the details. For example, choose bright high-heeled shoes that highlight slender legs. Wide-brimmed hats and massive jewelry go well with an a-line dress. But remember that only girls with a thin physique can try on such accessories.
A-line dress style for plus size people
The pear-shaped style will be an excellent choice for overweight ladies. After all, a sundress or a-line dress hides figure flaws and makes you visually slimmer. In this case, you should pay attention to solid-color models and large prints. If you cannot boast of ideal leg proportions, then choose a mid-knee length model. However, in this case, high-heeled shoes will be a mandatory component. You can also try on long a-line dresses. But don't choose a cut that's too wide. The hem of such a dress should be no more than shoulder width. Otherwise, you will get the image of a very obese lady.
Sundress, trapeze dress: do-it-yourself pattern
Today, many people sew clothes with their own hands. The trapezoid style, the pattern of which is very simple, can be created at home. To do this, you will need a piece of fabric equal to the length of the future product. Of all the measurements, you only need chest circumference. According to the diagram presented below, you should make markings on your piece of fabric.
Modeling a trapezoid dress pattern.
You can independently adjust the width of the dress, as indicated in the diagram. But don't forget about the darts in the bust area. After all, they are the ones who make the style of the dress feminine, and not like an ordinary bag. If you are interested in the pattern of an a-line dress with sleeves, then you can take measurements from any T-shirt that fits you well. This method is well suited for beginners in the field of sewing.
If you are using knitted fabric, then your sewing machine should have a special foot for stretchy material.
The seam should be processed along the shoulder line and along the entire length of the product. If the fabric frays too much when cut, it needs to be processed using an overlocker. As you can see, the sundress and trapeze dress pattern is very simple and can be created in just half an hour. At the same time, you will receive a unique product that cannot be found in any designer collection in the world! You can decorate the dress with a brooch or other accessories, depending on your look.
More interesting models of dresses with a-line silhouette and patterns for them:
Video: How to sew an a-line dress without a pattern

Boat collar
A boat neck is a wide neckline that runs horizontally across the collarbone from one shoulder seam to the other.
Traditionally used in marine casual clothing and uniforms. In modern fashion, the boat collar is popular in knitwear and elegant cocktail dresses.
In international fashion terminology, the names of the cutout “bateau”, “boat” and “Sabrina” are synonymous.
Marine uniform
The laconic horizontal neckline was historically used exclusively in sailor clothing. In conditions of unfavorable sea weather, a long-sleeved straight-fit T-shirt made of cotton knit fabric turned out to be very comfortable. The wide neck of the boat is comfortable to wear and allows you to quickly remove the product. A thin cotton jumper with blue and white uniform stripes, known as the “marinière” or “Breton striped shirt”, was adopted as the official uniform of the French Breton navy in 1858. The French name for the cutout “bateau”, like many textile terms, has passed into international terminology.
Coco Chanel and world stars
Fortunately, the distinctive striped pattern did not remain just a uniform. Designer Coco Chanel was first inspired by the sea jumper of fishermen and sailors. Chanel embodied her own version of the knitted jersey jumper model, which she saw on the beaches of Brittany, in her 1917 collection. She effortlessly paired striped modified uniforms with wide-leg trousers and espadrille sandals in the women's collection.
Since then, variations of the striped wide-neck jumper have become an iconic wardrobe item. Brigitte Bardot, Picasso, Audrey Hepburn, Andy Warhol happily wore a striped T-shirt with such a neck, cementing the popularity of this model in Europe and the USA.
Meanwhile, North American designers Ralph Lauren and LL Bean continued their expansion of the nautical jumper and the horizontal slit neckline. In the second half of the 20th century, this clothing became the epitome of elegant style wherever it was worn, be it yachting or evening wear.
In addition, the horizontal cutout goes harmoniously with a strip of fabric or knitted fabric. In products with a characteristic pattern, he does not cut it, allowing the designer’s idea to be fully realized.
One of the modifications of the neckline, which is actively used in evening, cocktail and wedding dresses, is named after the heroine Sabrina from the film of the same name. The 1954 film made Audrey Hepburn the highest paid actress in the world at the time. The horizontal neckline of the dress, created by the couturier Givenchy, was so in harmony with the image and physique of the actress that it went down in the history of costume under the name of the heroine. The heroine of the film wore two dresses with a horizontal neckline. Both models have become iconic in the history of costume.
After the release of the film, the boat neckline became popular in decorating evening dresses, and not just everyday dresses. The closed bodice creates a laconic look that does not distract from the silhouette, fabric or drapery.
Designers especially love bateau necklines in wedding dresses that require rigor and clean lines. A closed neckline does not focus attention on the chest area, allowing the quality of the fabric and the cut of the formal dress to come to the fore. The closed bodice shifts the accents of the decor and demonstrates the elegance and appropriateness of the image.
Despite the fact that the horizontal line visually shortens the neck, such a neckline is beautiful for presenting jewelry, which is especially important in evening dresses.

Dress patterns
Long sleeve tunic - pattern
Dress patterns
Long sleeve tunic, size 50-56.
50-100-80-106
52-104-84-110
54-108-88-114
56-112-92-118
Instructions on how to sew: yes.
Elegant short dress
Dress patterns
Elegant short dress for plus size women, size 50-56.
50-100-80-106
52-104-84-110
54-108-88-114
56-112-92-118
Instructions on how to sew: yes.
Dress patterns
Slightly flared sleeveless dress, size 50-56.
50-100-80-106
52-104-84-110
54-108-88-114
56-112-92-118
Instructions on how to sew: yes.
Loose dress with original neckline
Loose dress with original neck, size 50-56.
50-100-80-106
52-104-84-110
54-108-88-114
56-112-92-118
Instructions on how to sew: yes.
Simple dress with straps
Simple dress with straps, size 50-56.
50-100-80-106
52-104-84-110
54-108-88-114
56-112-92-118
Instructions on how to sew: There is
Fitted dress with wide straps
Elegant fitted dress with wide straps, size 44-50.
44-88-68-94
46-92-72-98
48-96-76-102
50-100-80-106
Instructions on how to sew: yes
Dress patterns
Dress with pleated skirt.
40-80-60-86
42-84-64-90
44-88-68-94
46-92-72-98
Instructions on how to sew: yes
Summer dress with bottom layer
Dress patterns
Summer dress with a bottom layer, size 42-48.
42-84-64-90
44-88-68-94
46-92-72-98
48-96-76-102
Instructions on how to sew: yes
1 Piece Frill Neck Dress
Dress patterns
Dress with a one-piece frill neckline, sizes 40-46.
40-80-60-86
42-84-64-90
44-88-68-94
46-92-72-98
Instructions on how to sew: yes
Dress with bias skirt
Dress patterns
Dress cut at the waist with a skirt cut on the bias, sizes 42-48.
42-84-64-90
44-88-68-94
46-92-72-98
48-96-76-102
Instructions on how to sew: yes
Dress with thin straps and slanted pleated neckline
Dress patterns
Dress with thin straps with slanted pleated neckline
44-88-68-94
46-92-72-98
48-96-76-102
50-100-80-106
Instructions on how to sew: yes
Dress patterns
Fitted dress with thin straps
44-88-68-94
46-92-72-98
48-96-76-102
50-100-80-106
Instructions on how to sew: yes
V-neck tunic
Dress patterns
V-neck tunic.
44-88-68-94
46-92-72-98
48-96-76-102
50-100-80-106
Instructions on how to sew: yes
Dress patterns
Dress with boat neck and side slit.
40-80-60-86
42-84-64-90
44-88-68-94
46-92-72-98
Instructions on how to sew: yes
Dress patterns
Fitted dress with side slit and straps.
42-84-64-90
44-88-68-94
46-92-72-98
48-96-76-102
Instructions on how to sew: yes
Sleeveless dress with cut-off cups and straps
Dress patterns
Sleeveless dress with cut-off cups and straps.
42-84-64-90
44-88-68-94
46-92-72-98
48-96-76-102
Instructions on how to sew: yes
Sleeveless dress with scoop neckline
Dress patterns
Sleeveless dress with a shaped neckline.
44-87-66-92
46-92-71-97
48-97-76-102
50-102-81-107
Instructions on how to sew: yes
Short sleeve dress with cuffs
Short sleeve dress with cuffs.
44-87-66-92
46-92-71-97
48-97-76-102
50-102-81-107
Instructions on how to sew: yes
Sleeveless dress with belt
Sleeveless dress with belt.
44-87-66-92
46-92-71-97
48-97-76-102
50-102-81-107
Instructions on how to sew: yes
Long sleeveless dress
Long sleeveless dress with frill neckline, size 44-52.
44-87-67-92
46-92-71-97
48-97-76-102
50-102-81-107
52-107-87-112
Instructions on how to sew: yes
Long
Size 44-52.
Size - bust - waist - hips
44-87-67-92
46-92-71-97
48-97-76-102
50-102-81-107
52-107-87-112
Instructions on how to sew: yes.
Long, size 44-52.
Size - bust - waist - hips
44-87-67-92
46-92-71-97
48-97-76-102
50-102-81-107
52-107-87-112
Instructions on how to sew: yes
Sleeveless dress with ruffle neck, size 44-52.
Size - bust - waist - hips
44-87-67-92
46-92-71-97
48-97-76-102
50-102-81-107
52-107-87-112
Instructions on how to sew: yes
Wide sleeve dress with cuff
Wide sleeve dress with cuff
size 44-52
Size - bust - waist - hips
44-87-67-92
46-92-71-97
48-97-76-102
50-102-81-107
52-107-87-112
Instructions on how to sew: yes.
Dress with puff sleeves and trim neckline
Dress with puff sleeves and trim neckline
Admin 2015-06-03 at 3:52 am
This new article is devoted to the design features of collars of various types and cuts, methods of their processing and connection with the neck. And with this post I’m opening a new section on my blog: 100 collars. I will fill it until I describe exactly 100 collars.
I don’t know if I’ll get that much in my memory - well, there’s the Internet - I’ll look there. And you, dear reader, will help, if anything. So send in your designs - I love understanding clothing designs.
Today I will describe the first collar - like this:
And I’ll tell you how I used perforated glasses for the first time today to improve my vision.
So, how many designs of collars are there, their shapes, sizes, processing methods and the number of included parts?

Studying the varieties of collars from fashion magazines, catalogs and simply samples of finished products, I always pay attention to what the shape of the collar depends on:
First, I look at the shape of the collar.
Second, I decide how it connects to the neckline (set-in or seamless).
Third - how the collar fits to the neck - tightly, at some distance or even flat on the bodice.
And fourth - how the collar is connected to the clasp - whether there is one at all, whether the clasp is up to the top or to the bend of the lapel.
Structurally, the collar most often consists of an upper and lower collar part, as well as a gasket part.
In total, there are several varieties of collar cut: flat with different stand-up heights, set-in stand-ups (vertical and inclined), solid stand-ups with front and back details, shirt collars, collar-clips, turn-down collars with a stand-up in the middle, and collars for products with an open fastener: jacket type collars, shawl collars, apache type collars.
A lot, right? We will slowly consider all these designs in the following articles of this new column of mine.
Now let’s start with the simplest collars to design, these are:
Turn-down flat collars:
This is a collar that completely follows the shape of the neck and shoulder area of the product - turn-down, flat-lying.
A distinctive feature of this collar is the absence of a stand. That is, the collar lies flat on the figure.
The pattern of such a collar is based on the basic basis of the front and back of the product.
The shape of such a collar varies depending on the shape of the neck.
The line of stitching the collar into the neck completely follows the contour of the neck of the product. The detachable part of the collar can have a different shape - rounded or pointed edges, different collar widths.

The clasp in products with such collars can be either on the shelf or on the back. There may also be no clasp at all.

Let's consider the most common model of such a collar - round or, as it is now called "Peter Pan".

The pattern of such a collar is simpler than all others - directly based on the neck of the product.
In the drawing of the shelves, set aside 6 cm along the contour of the neck in order to outline the contours of the collar. The contour of the collar's departure is rounded to the center of the neck in front of a smooth line. The width of the collar is usually the same along the entire contour and varies depending on the model. In a child's dress 4 - 5 cm, in a woman's dress or blouse 5 - 6 cm, in a coat 7 - 10 cm or more.
On the back, along the contour of the neck, you also need to set aside the width of the collar, in this case 6 cm. If there is no fastener on the back, then the collar can have a seam located in the center of the back. If there is a fastener, then the collar along the back is not sewn, but is decorated with rounded lines. And thus, two parts of the collar are formed - left and right.
The design of the collar lines on the back should be done with a closed shoulder dart. This dart can be temporarily closed and transferred to the armhole, or it can be conditionally considered closed by extending the shoulder seam in a straight line from the neckline point towards the shoulder.
There should, of course, be no seam along the shoulder line on the collar.
The contour lines of the collar are copied onto a separate sheet of paper, combined along the shoulder seam line and a collar pattern is obtained.
For the collection, I offer slightly different neckline shapes, suitable for a flat-shaped turn-down collar, without a stand:
The algorithm for constructing a pattern for such collars is simple - we change the neckline according to the model, then draw the lines of the collar.
Using the example of an open neckline, I note once again that the key changes in the neckline are its width and depth. And also the shape of the neckline on the chest - round or U-shaped:

The neckline of the next dress is formed similarly to the previous model, but there is also a Y-shaped neckline on the back. The shape of the ends of the collar is also different - they are not round, but sharp. The width of the collar is figured and gradually narrows closer to the shoulder.

Detachable collar - decorated with beads and rhinestones.


The neckline is designed in a boat shape, the right collar piece is overlapped with the left one, and then sewn into the neckline as one piece.

Let's continue the topic of collars in the next article -.
My reader and training group participant Tatyana sent me an interesting letter. Quote:
“Ellen, I see you are wearing plus glasses. My mother, who is over 70, restored her near vision in three months. Her eyesight has been good throughout her life. So, she is a “non-believing Thomas,” and until she checks it herself, she won’t believe it.
I bought her glasses with perforations, like “holes.” During this time, she read for an hour a day, looked at something on the Internet, and suddenly, once again, she puts on strong glasses, and they blur everything. She went and wiped them, but there was no result.
I put on other glasses, weak ones, which I hadn’t worn for a hundred years - and then I immediately began to see! Well, we moved on. This is already the second little man who, in my presence, began to see well close up - “far-sighted.” And the first grandmother, she is 80 years old, and she has restored her vision and reads small letters calmly. The witness herself is where it all started. But I’m myopic and I can easily watch movies in them. So if you are interested, as they say, this is the result first-hand.”
My vision really began to deteriorate - I can’t see well at close range. Without glasses I can’t even see the phone button.
Thanks to Tatyana - I bought these glasses today - they have perforations - these are small holes on... I wanted to say, on the glasses. But these are plastic “Glass”. In general, here is a photo of what these glasses look like:
And now I’m reporting on my impressions: (I bought it, by the way, at an optician. They cost 890 rubles.) I ask the seller - “How do they work?” She - “You will read the instructions.” And asks to put on these perforation glasses and read. I say: “I won’t see such small letters.” She - “put on your glasses then.”
Well, I put it on - I look and see! Small letters. I see! You can read directly through the perforation and letters and objects become sharper. But it’s unusual, really - the image seems to split into two and you have to somehow align it.
Right now I’m writing these lines with new glasses. And what’s interesting is that when I was reading these instructions for the glasses, I tried to bring the text very close to my eyes - almost end-to-end - 5 cm distance - and it was still visible.
Today I spent about an hour in them in total. Then I took it off - and when reading my mail, I could see the text - although it was blurry, but I could read it without glasses at all. Marvelous! Are your eyes rested in these glasses? In general, I am a Thomas believer, so I will continue to study them.
I’ll write about the results if you’re interested. So, no don't miss it. And that’s all I have for today.
Boat neck
To create a pattern for a bodice with a boat neck, we will use a drawing of the base of a dress with a semi-fitting silhouette. And you build on the basis that you will use when cutting.
You can, for example, build this neckline on the basis of a bodice with a one-piece sleeve. Or make a template for the neck of a boat, which will always be at hand.
If you have not yet created a pattern for the base of the dress, you will need this drawing in the future when mastering the modeling of various types and styles of clothing.
Let's copy the back and front of the bodice of the dress onto a blank sheet of paper. There is no need to transfer all letters and auxiliary lines. Copy only those letters and lines that will participate in the construction. Look at our picture below and the situation will become clearer.
For further construction we will need a separate back and shelf.
Shelf
Let's start with the shelf.
During construction, we will close the chest dart and open it into a dart at the waist line.
To do this, we connect the tops of the darts (points G7 and 4) with a straight line and cut the shelf along this line. We close the chest dart by combining points B9 and B7, thereby increasing the opening of the dart at the waist line. See the picture below.

Rice. 2
From point P5 to the right along the shoulder seam, set aside 5 cm and place point P51.
We connect point P51 with a smooth curve to point B4 and get a new line neck front called "boat".

Rice. 3
As for the chest dart, it must be returned to its original position if the style of your product requires this. But you must remember that this dart can be placed anywhere on the shelf, adhering to the main rule: the top of the chest dart should always remain in place (this is point G7).
You can see how to correctly move a chest dart in our section, where, as an example, we demonstrated several options for moving it.
In our example, we will open the dart into the armhole. To do this, we put point K on the armhole line, the location of which determines the style of our product, and connect this point with the top of the dart, point G7.
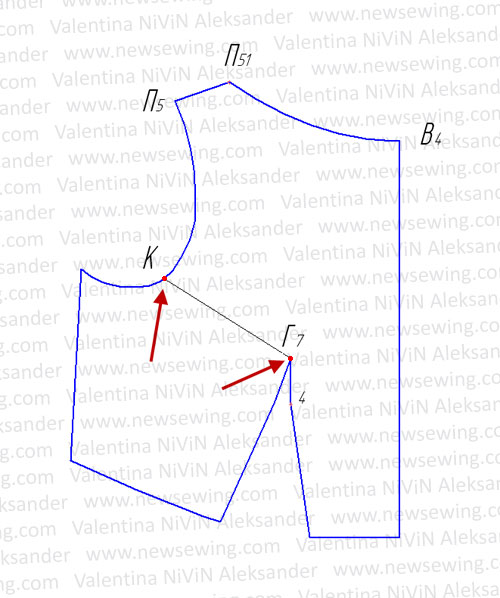
Rice. 4
We cut the shelf along the marked line and move it apart, returning the lower part of the bodice to its original position, aligning the sides of the segment from point G7 to point 4. See the figure below.

Rice. 5
Do not forget to shorten the resulting dart by 2 - 3 cm to achieve smoothness when processing the bulge in the chest area.
To do this, we shift the top of the dart from the center by 2 - 3 cm and connect this top with straight lines to the ends of the dart.

Rice. 6
Back
Here, too, everything is extremely simple. Take a drawing of the back.

Rice. 7
Just like on the shelf, during construction we will close the shoulder dart and move it to the dart at the waist line.
Note
:
During construction, you can move the dart to another place, for example, to the armhole or to the mid-back line.
The option we demonstrate for moving the dart is just an example. You can always proceed from your own considerations.
We connect the tops of the darts with a straight line, these are points O1 and 1. We cut the back along this line and spread it apart, aligning the sides of the shoulder dart. See the picture below.

Rice. 8
From point P1 to the left along the shoulder seam, set aside 5 cm and place point P10.
From point A we put 1cm down and put point A10.
We connect points A10 and P10 with a smooth curve and get a new line neck back called "boat".

Rice. 9
Return the dart to its original position.

Rice. 10
This completes the construction.
Note:
You can adjust the depth of the boat neckline yourself, based on your needs.
Given as an example, 5 cm, which we set aside from the edge of the shoulder, is not a constant value, you can change it at your discretion.
The shape of the neckline varies. We will return to this topic in future articles.

Rice. eleven
You will succeed!
Download in one file | Turbobit | | |
The rights to this article belong exclusively to the author. Full or partial use of the materials of this article in electronic publications on the Internet is possible only if the following conditions are met:
Information about the author must be preserved. In the title or at the end of the published reprint the source must be indicated: www.site, the Internet resource "Sewing Crafts Master" with a direct, active, visible to the user, not blocked from indexing by search engines hyperlink to this article.
Republication of texts in newspapers, magazines or other replication outside the Internet is possible only with the written consent of the author.
A boat neck is a wide neckline that runs horizontally across the collarbone from one shoulder seam to the other.
Traditionally used in marine casual clothing and uniforms. In modern fashion, the boat collar is popular in knitwear and elegant cocktail dresses.
In international fashion terminology, the names of the cutout “bateau”, “boat” and “Sabrina” are synonymous.
lystit.com
Marine uniform
The laconic horizontal neckline was historically used exclusively in sailor clothing. In conditions of unfavorable sea weather, a long-sleeved straight-fit T-shirt made of cotton knit fabric turned out to be very comfortable. The wide neck of the boat is comfortable to wear and allows you to quickly remove the product. A thin cotton jumper with blue and white uniform stripes, known as the “marinière” or “Breton striped shirt”, was adopted as the official uniform of the French Breton navy in 1858. The French name for the cutout “bateau”, like many textile terms, has passed into international terminology.

lystit.com
Coco Chanel and world stars
Fortunately, the distinctive striped pattern did not remain just a uniform. Designer Coco Chanel was first inspired by the sea jumper of fishermen and sailors. Chanel embodied her own version of the knitted jersey jumper model, which she saw on the beaches of Brittany, in her 1917 collection. She effortlessly paired striped modified uniforms with wide-leg trousers and espadrille sandals in the women's collection.

wordpress.com
Since then, variations of the striped wide-neck jumper have become an iconic wardrobe item. Brigitte Bardot, Picasso, Audrey Hepburn, Andy Warhol happily wore a striped T-shirt with such a neck, cementing the popularity of this model in Europe and the USA.
Meanwhile, North American designers Ralph Lauren and LL Bean continued their expansion of the nautical jumper and the horizontal slit neckline. In the second half of the 20th century, this clothing became the epitome of elegant style wherever it was worn, be it yachting or evening wear.

lystit.com
In addition, the horizontal cutout goes harmoniously with a strip of fabric or knitted fabric. In products with a characteristic pattern, he does not cut it, allowing the designer’s idea to be fully realized.
Sabrina
One of the modifications of the neckline, which is actively used in evening, cocktail and wedding dresses, is named after the heroine Sabrina from the film of the same name. The 1954 film made Audrey Hepburn the highest paid actress in the world at the time. The horizontal neckline of the dress, created by the couturier Givenchy, was so in harmony with the image and physique of the actress that it went down in the history of costume under the name of the heroine. The heroine of the film wore two dresses with a horizontal neckline. Both models have become iconic in the history of costume.

nocookie.net
After the release of the film, the boat neckline became popular in decorating evening dresses, and not just everyday dresses. The closed bodice creates a laconic look that does not distract from the silhouette, fabric or drapery.
Designers especially love bateau necklines in wedding dresses that require rigor and clean lines. A closed neckline does not focus attention on the chest area, allowing the quality of the fabric and the cut of the formal dress to come to the fore. The closed bodice shifts the accents of the decor and demonstrates the elegance and appropriateness of the image.

pension-wild.eu
Despite the fact that the horizontal line visually shortens the neck, such a neckline is beautiful for presenting jewelry, which is especially important in evening dresses.
")


