Applications from colors. Paper appliqués - step-by-step instructions for beginners with photos and tips! Required materials and tools
Hello, dear friends! Today I will tell and show how to make a three-dimensional paper applique for children.
Children of any age enjoy making interesting crafts and making appliqués from different materials. Joint creative activities bring parents closer to their children and are very useful for their development.
Volumetric paper applications for children
Volume applique "Pear"
For work we will need:
1. A sheet of cardboard, white or colored.
2. Colored paper
4. Scissors, a simple pencil.
Sequence of work:
♦ First, let's make pear and leaf templates. You can draw it yourself on a sheet of cardboard, or you can easily find it on the Internet, download it and cut it out.
♦Take yellow paper and trace the template with a simple pencil. To make two pears, we need to circle 6 times, 3 times for each, and cut them out.
♦ For the leaves, take green paper and do the same.

♦ Fold each paper blank of pear and leaf in half vertically. If the colored paper is one-sided, then you need to fold the colored side inward and the light side outward.


♦ Let’s also cut out a twig from brown paper. We draw it arbitrarily, as you like.

♦Assemble the entire composition on a sheet of cardboard and sequentially glue the twig, pears and leaves.

♦ The result is such a voluminous applique made from colored paper.
Volumetric applique "Cherry"
We do it according to the same principle as the previous one.
Execution sequence with photo
♦We make templates. For cherries, we outline a round object of suitable size or use a compass.

♦ Trace the templates on colored paper and cut them out. We make 6 pieces.

♦ Fold each circle and leaf in half.

♦ Glue 3 circles and 3 leaves together in halves.

♦ Cut out branches from green paper.
♦ Glue twigs, cherries and leaves onto colored or white cardboard. This is what happened.

Using circles and other shapes you can make various interesting three-dimensional applications:
"Ladybugs"


"Trees"

And also “Flowers” and “Fruits”.
These three-dimensional applications from colored paper can be made for children and together with children. They can be used for greeting cards to your family and friends.
All photos can be viewed in the gallery; to do this, click on any of them.
I would be very grateful if you click on the social network buttons and share this information with your friends.
Any type of creative activity develops a child’s imagination, perception of colors, textures and shapes, and contributes to the formation of spatial and imaginative thinking in general. Thanks to working with applications, kids learn diligence, patience and perseverance. Applique is the simplest and most accessible form of creativity for a child, because children from the age of 2 can glue cut-out figures onto cardboard.
Applications made from colored paper
For most crafts you will need:
- Colored paper or cardboard
- Scissors
- Markers
For children under 3 years old
- Finger crafts
 For such a lamb or dandelion you will need:
- Pre-cut blanks for a muzzle, eyes and legs or stems for a dandelion.
- White non-toxic paint: watercolor or gouache.
Glue the blanks onto the background, mark the boundaries - the circumference of a flower or a lamb. First, you show what needs to be done, and then let the child dip his fingers in the paint and leave fingerprints on the paper, without going beyond the drawn line.
- Crafts-stamps from pompoms
Another type of craft that even the little ones can do.

To make this craft the following is used:
- Pom-poms as stamps,
- Paints.
Craft ideas: Christmas tree, Easter eggs, ice cream scoops, clouds, tree crown, yellow chickens.
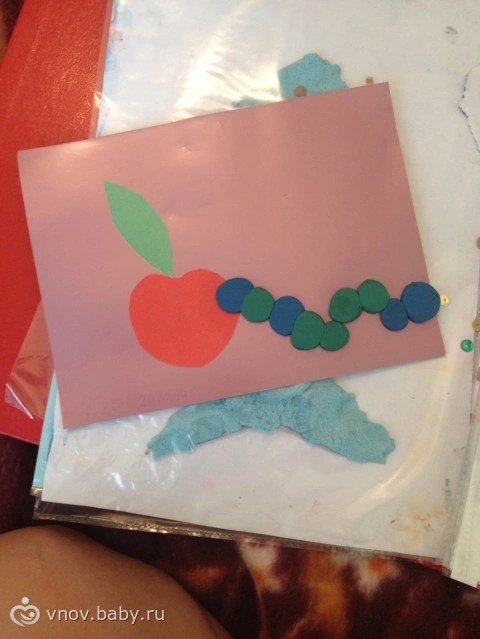
- Caterpillar made of circles
First, you will need to draw a line on paper - the basis of the future caterpillar, and then place the circles you cut out on this line. After that, remove them and show the child where to glue the circles.
- Ice cream

For this ice cream you will need:
- Stationery glitter,
- Cosmetic cotton pads.
Cut out an ice cream cone from paper or cardboard, paint cotton sponges yellow, blue and pink. The child’s task is to stick a cone and “balls” of ice cream on paper. Sprinkle the top of the cotton pads with multi-colored glitter, which can be found in any stationery store.
- Rabbit made of cotton pads and plasticine
 Materials:
- Plasticine,
- Spaghetti optional
- Cotton pads - 4 pcs.
You cut one disk in half - these will be the ears, and the second into 4 parts - these will be the rabbit's legs. Spaghetti is used as a mustache, but they can also be made from plasticine. Form balls from plasticine or you can ask your child to make them. Then the child simply glues the details of the craft onto paper, and you make antennae for the rabbit.
- Multilayer applications
 At the age of 2-3 years, children especially love multi-layered appliqués.
You cut out the parts, show them in what order they need to be glued, and entrust the task to your child.
There is a second option for this craft - print a stencil, cut out parts from it and paint them with paints.
 For them you will need:
- Green felt-tip pen or marker,
- Cotton pads.
Cut two cotton pads in half - this will be snow, then cut out snowdrop flowers from the discs and green leaves from paper. And the child is already gluing the details of the flower onto the paper.
For children from 3 to 5 years old
These applications are more complex; the child will have to independently cut out simple parts and glue them onto paper.
- Bunny

For it you need:
- Colored paper for background,
- Green for the grass
- Pink or red for ears and nose.
The child cuts out the parts according to the template, pastes them onto the background and draws the bunny’s mustache and eyes with a felt-tip pen (if there are no blanks).
 To make ladybugs we will use red and black paper or cardboard.
Cut out 4 circles from red paper and 1 oval from black paper. We cut the oval in half, glue its parts onto the background, then glue one red circle, as shown in the image - the ladybug itself, and on top of the fold we glue the second circle, which will be the wings. We do the same with the second bug, then draw dots with black markers. Eyes can be made from paper or drawn with a felt-tip pen.
What you will need:
 Colored paper - dark blue or black for the background, red for the apples, brown for the basket and green for the leaves.
Cut out apples from red paper. We cut the brown paper into 3 long strips and 2 slightly shorter ones. Cut out leaves for apples from green paper. First we glue two apples, then 2 short strips on the side - the edges of the basket. Then we glue two strips, one on top of the apples, the other on the bottom. Glue on another apple. And the final touch is the strip from the basket in the middle.
 First we cut out an oval, which will be the penguin. Then two black hearts are the wings, one white one will be the belly, two orange ones will be the legs and one pink one will be the decoration.
Now let the child simply glue the details onto the background step by step.
- Goose made of cotton wool and seeds
 Materials for the goose:
- cotton wool,
- Colored orange napkins or white napkins and orange paint,
- Pumpkin seeds.
First, draw the outline of a goose on paper.
Glue cotton wool along the contour, glue pumpkin seeds onto the goose’s wing.
We tear the napkin into small pieces and make lumps out of them. We glue these lumps onto the beak and paws of the goose.
Use a felt-tip pen or marker to draw eyes.
- Paper lamb
You can draw such a lamb yourself, cut out the parts from cardboard and paste them onto a stencil, or print out a stencil and paint it. Using this method, you can make other animals - a rabbit, a cat, a dog or an elephant.

Draw the outline of a peacock on cardboard with a simple pencil and cut it out.
We cut out several circles from colored paper (how fluffy the tail will be depends on their number), cut each of them into 4 parts.
From one such part we make an accordion, repeat the same with the rest and glue them into a fluffy tail.
- Cactus

Necessary materials:
Paper: white for the background, green for the cactus and red for the flowers and spines.
In order to make such a cactus, you need to cut out: 3 large circles - this is the largest part of the cactus, which is located at the bottom in the image, 12 circles are slightly smaller in diameter and 3 small circles are the upper part of the cactus. We glue one large circle from below, and on both sides of it we glue two medium circles from above. From the right middle circle up to the left another middle one “grows” and from it up to the right - the smallest one. When the base of the cactus is ready, glue the rest of the corresponding size circles onto these circles and bend them in half. We repeat this procedure a third time and bend the circles in the middle again. Cut small spines from red paper and cut out flowers. Glue all the parts onto the cactus - and you're done!
- Apple tree
From green and red paper, cut out approximately 20 green stripes and 10 red ones. Draw the outline of a tree on brown cardboard, cut it out and paste it onto the background. We glue the ends of the strips together to form a circle, and glue it onto the “tree trunk”.
- Snowman
 The technique for making a snowman is similar to the previous one: we cut out several long strips from white paper, connect their ends - we get a circle. We connect several of these circles together to form a sphere - this is the body of the snowman. We do the same with the head, but for this we use slightly shorter strips. We make a scarf from the red stripe and wrap it around the snowman’s neck. Using a felt-tip pen we draw eyes, a mouth and buttons. To make a carrot nose, cut out 1/4 of a circle as on a stencil and roll it into a cone. For the hat, cut out a circle and cut it like a sun.
- Bouquet of flowers using quilling technique
 At this age, children are already able to create more complex crafts, such as this bouquet.
Quilling is a technique for creating three-dimensional appliqués from rolled strips of paper.
To create such an application you will need:
- 4 green strips of paper for stems,
- 10 shorter ones for leaves,
- 1 long pink one for a bow,
- 5 stripes of red, yellow and blue.
First, we glue long strips of stems onto the background, and glue a bow on top. We glue the ends of the shorter green strips together, slightly squeeze the resulting circle to form an oval from it - these are flower leaves. We twist yellow, red and blue stripes to make flower buds and glue them onto the craft.
- Rose from a lace napkin
 This craft looks very beautiful and is extremely easy to do.
All you need to do is cut off the edge of the lace napkin and carefully twist it into a flower, so that you get a rose.
- Rose made of colored paper
 We draw a spiral on red cardboard, cut out a strip along the line and begin to twist it with our fingers until we get a bud.
The stem for the flower can be made from colored wire.
Cut out leaves from green paper and glue to the stem. Rose is ready!
- Fish - chessboard
 This application is made without glue. To begin, draw the outline of the fish on colored paper and cut it out. We bend the fish in half and start making cuts in the middle. They start approximately after the head and end before the tail. Next, we cut out strips of different colors and different lengths that form the fin.
We insert a strip of one color, for example, orange, in “waves” so that one part is above the cut and the other below it. Same with other stripes. The result should be a checkerboard pattern.
- Volume machine
 Another quite interesting application, which is also very easy to perform.
All you have to do is print out the template, color the car, cut it out and make two cuts on the protruding part at the end.
 This article contains 25 of the most interesting applications and templates for DIY paper crafts for children. It’s no secret that any form of creativity develops a child’s thinking. Paper crafts are a wonderful activity that develops perseverance and patience. In turn, working with scissors, glue, plasticine and cutting out parts of crafts develop fine motor skills.
These crafts are suitable for both home games and activities in kindergarten or classroom. The youngest children can make simple applications that require sticking several figures onto paper. From the age of 3-4, when children begin to master scissors, they can already cut out simple objects from paper and glue them together. Starting from school age, children are already able to make more complex crafts: for example, making applications using the quilling technique or cutting out small figures with a large number of details.
I apologize for the quality of the photo, laziness as always, phone as always. And some of the crafts had already begun to crumble, so I didn’t take them out of the files and left behind reflections.
Creativity from the Baby Club:
1. Coloring large simple pictures with paints
2. We make appliqué balls from colored paper, and then draw strings for them - learn to draw straight lines

3. Fireworks. First we draw it with wax pencils, and then with dark watercolor we draw the night sky on top. Watercolors do not paint on wax, so everything is very simple.

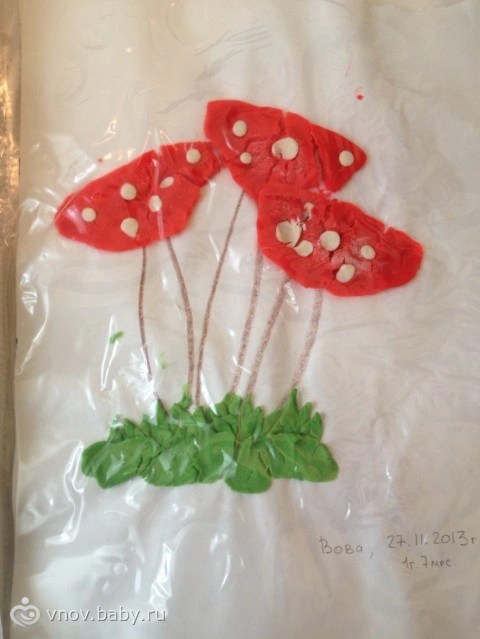
4. Fly agaric. We make an applique from colored paper on cardboard, and then glue on plasticine spots

5. Learn to trace your palms and count your fingers

6. Aquarium. We put plasticine pebbles on the bottom of the aquarium, and then put the fish there. Don't forget to draw a fish eye))

7. An airplane made of colored paper and cotton wool clouds

8. Olympic medal. We make a medal from plasticine. We print some symbol on it using improvised means, and then cover it with gold paint (preferably with the help of an adult)

9. Draw through a stencil. Painting is very simple. But then you can learn to draw figures with a pencil along the contour of a stencil, which greatly develops coordination.

10. Snowman. Colored paper, colored cardboard, cotton wool, cotton pads, a twig, plasticine and beans.

11. Repeat colors and learn to draw using a ruler. We glue the application of balloons from colored paper, and then we draw baskets of the corresponding color with them, and then more strings along the ruler.

12. Chickens. Cotton pads, paints, marker

13. Mimosa. Finger painting

14. Snowdrop made from cotton wool

15. Getting ready for the carnival. Coloring the mask

16. Marinate vegetables. A drawn or printed jar, bay leaf, cloves, plasticine, ribbon. The craft is very fragrant)

17. Shaggy bear. It was painted using something similar to semolina. Unfortunately, it has already crumbled. But the kid liked the process.
Apply glue to the bear and sprinkle it with something small

18. Caterpillar. Colored paper and plasticine
19. Rain. Funny. Just an applique

20. Coloring with plasticine

21. Heart penguins

22. And again fireworks. This time using round sponges

23. Snow. Wood and cotton wool

24. Chicken again. Feathers from small yellow pieces of paper. Apply glue and sprinkle

25. Just a shoe for gifts

26. Flower. Plasticine and colored paper

Creativity from kindergarten:
1. Sponge again. We learned to press it to the paper and make circular movements with it

2. I forgot the name of the technique (if anyone knows, write). Some kind of garbage, such as ox bile, is poured into a large container of water. Then they spray paint on top and begin to draw on the water with a thin object. The resulting patterns are like this. Then a sheet of paper is placed on this water, and the film with the pattern remains on it.
This can be used for all kinds of backgrounds, cards, etc.

3. The actual postcards. And here’s everything: scrap, and decoupage, and the previous unknown crap
Bus for dad:


Emptiness for mom:


4. Easter egg. Decoupage. The equipment is mature, but the baby was very helpful

5. Felting wool. While I was felting the petals, Vova helped a lot with the balls.

Homemade creativity:
1. Plasticine drawings. Our P “lei Do” is more dough, so it dried out and cracked. Learning to mix colors (we made green ourselves)
2. New Year's card. Carefully glued the letters

3. Our advent calendar. The numbers from 1 to 31 are hidden under the beard, and every day of December we glued a piece of cotton wool until a full beard grew.

4. Learn the colors of the rainbow. We sculpt and draw with plasticine

5. And about the weather

6. Fish. We sculpt dough or plasticine onto a piece of cardboard in the shape of a fish. Then we decorate with sparkles, beads, etc.

7. Just sunshine for dad. I made it completely myself a little over a year ago (only I cut it out)

8. Ladybug. I preferred to leave my legs on one side, it turned out to be almost a side view)))))

9. These are New Year's cone animals. They were wrinkled in the folder, but they were cones)

10. Frog

11. Butterfly. Paints, brushes for creativity and colored rice

12. Penguins from semicircles

13. Crazy pasta hedgehog

I wish everyone fresh ideas and more time for creativity.
Children's arts and crafts can take many forms. Applique is a popular type of creative activity for children. Paper easily takes on different shapes, so while working with it, imagination and fantasy develop. An applique made of colored paper can be simple or voluminous. This material is suitable for work by very young children. It’s easy to organize lessons correctly if you know the features of the material, choose a topic and a technique for performing crafts.
Simple crafts are divided into the following types:

Kids always start mastering appliqué with simple crafts. For them, just stick the pre-cut shapes onto a sheet of paper. The first works do not have silhouettes or drawings. The child is asked to place the colored pieces on a background sheet that has already been smeared with glue in advance. This is one of the subtypes of simple or classic applications. It is distinguished by the absence of theme and plot. The lesson is aimed only at mastering the skill.
Simple paper crafts include creating pictures from natural materials: dried leaves, flowers, twigs of herbs. Such works develop imagination.

You can use craft books to make simple crafts. They provide ready-made templates and background images. The child can only cut out parts of the picture and place them correctly. This kind of work is more interesting than one made from simple colored sheets. You can study from books from the age of 3. With the help of manuals, three-dimensional pictures are made. To do this, just buy a book for children over 5 years old.
Unusual types of applications
Children over 5 years old find it boring to glue the figures to the background sheet. They are more suitable for voluminous crafts that combine several applied art techniques.
In addition to paper, they use:
- pasta;
- matches;
- cereals;
- cotton pads;
- cotton buds;
- disposable tableware;
- napkins.
Three-dimensional applications from colored paper are created with children of any age.
They are classified by technique:
- Made only from colored sheets folded in a certain way. Simple volumetric options involve smearing only part of the sheet with glue, while more complex ones involve preliminary preparation of parts using quilling or origami techniques.
- Creating a three-dimensional image without using scissors. They are suitable for little ones. Lumps of torn, crumpled paper are glued to the background. Scraps are shaped by twisting, folding, flattening and compression.
Before you make an application with your child, you need to choose its theme. With the little ones, create crafts using well-known objects: animals, flowers, the sun. For older preschoolers, role-playing options with several characters and a carefully designed background are suitable.

- From identical small elements of different colors, a three-dimensional applique is obtained, unusual in appearance. Pieces of sheets are crumpled and turned into balls from which a picture is laid out. For ease of work, an outline is drawn on the background sheet. Plain colored paper will look sloppy, so to use this technique it is replaced with corrugated paper or napkins.
- A difficult version of the work is the trimming technique. It is only suitable for schoolchildren or adults. Training most often takes place in circle classes. The essence of the technique is that corrugated paper is cut into squares with a side of 1 centimeter. Glue is applied to the center of the workpiece, then the element is pressed to the paper with a pencil or pen. At the same time, the free edges rise up to form a stack. This technique is very complex, but the paintings turn out very beautiful, with an unusual texture.
- Paper flowers and plants are made in different ways. Best techniques: fringe, quilling, loops. The last option is extremely simple - strips of colored paper are folded in half, but not ironed, to form a voluminous loop. Its edge at the edges of the element is smeared with glue. The finished modules are placed in a circle, and covered on top with a circle, which acts as the core of the bud. It will turn out very beautiful.

You can make any applique from colored paper at home. To complete the work, they use their own imagination or a ready-made master class. For independent lessons with your child, it is enough to look at several ready-made lesson plans for preschool educational institutions, so that you can then create your own.
How to conduct a lesson correctly?
Many children are often sick or do not attend kindergarten at all. In this case, responsibility for their development lies with the parents. Application made from colored corrugated or plain paper is a popular and affordable way to create creative work.
Before starting work, parents need to decide on:
- topic;
- necessary materials
- additional visual aids;
- literary works appropriate to the topic.

The big problem is that children often do not perceive their parents as teachers. Therefore, the DPI lesson should be based on cooperation. Choose a theme on which you will create beautiful applications together with your baby. Choose suitable poems or fairy tales that will interest your child.
Flowers applique is a suitable option for the warm season. Show your child photographs of beautiful flowers and read a suitable poem. After the introductory stage, you can start working.
You can build a lesson around the fairy tale “The Scarlet Flower”, but this work is long, so divide it into 2 parts or replace reading by watching a cartoon.
Choose a work technique that is accessible to your child according to his age. Don't demand the impossible. The process of making the craft will depend on the type of application chosen. Praise your child for his work, but gently point out mistakes.
Karina is a regular expert on the PupsFull portal. She writes articles about games, pregnancy, parenting and learning, child care and the health of mother and child.
Articles written
Paper crafts are a wonderful way for children and their parents to spend time together. Working with applications is no more difficult than folding origami out of paper: it is enough to outline the contours of the future figure and cut it out if we are talking about flat options. And volumetric products allow you to use them to create entire pictures, which are interesting precisely because of their relief. And, of course, you can make many attractive home accessories with them.
Volumetric applique of paper flowers: production


Of all the possible templates for appliqués, flowers can rightfully be considered the most interesting and multifunctional. In addition to the fact that their types are diverse, almost everything can be decorated with flowers: from a postcard to a large panel, small interior details, etc. Therefore, this element is required for anyone who begins to get involved in paper crafts to master this element. Depending on which flower you chose, the level of difficulty is determined.
For example, to make a classic chamomile, it will take no more than half an hour. To do this, oval petals are drawn on white paper, which can be slightly compressed on the sides to obtain narrower elements. If you remember the structure of a real chamomile, it will become clear that its petals are arranged in several rows: this will also be displayed in the application. Additionally, you will need green paper as a background, as well as a small piece of yellow paper from which the core of the flower will be cut out.
Petals are cut out in quantities of 16 pieces. the largest size, and then 12 more pieces, reduced in length by 3 mm and in width by 2 mm. With their bases they are glued onto the selected background, forming a circle: the lower one from the large petals, the upper one from the smaller ones. The last step is to add the yellow circle-core. It can be made more interesting if you tear a small double-sided yellow sheet into small pieces, smear the intended location of the core on the chamomile with glue, and, observing the shape of a circle, pour yellow scraps there. Then the center of the flower will turn out fluffy.
But not all flowers are as easy as chamomile. For example, a three-dimensional peony ball is created using a different technology: you will need soft paper, not dense; corrugated paper or one similar in texture to paper napkins is best. It is cut into squares, the length of the sides of which is chosen arbitrarily, but the circumference of the future flower must fit into the square. Layers of paper (8-10 pieces) are placed on top of each other, pierced in the middle with a thread, which is tied into a knot on the wrong side.
A peony template is drawn on thick cardboard, after which it is transferred by tracing to the top layer of colored paper. All layers are cut at once along the drawn contour, then their transformation into petals begins. Since the peony is fluffy and voluminous, the algorithm of work is as follows. The top paper circle rises, held by the center with a thread, its edges come together, and you need to crumple the paper a little. This layer should remain in this vertical position.
The next sheet of paper rises behind it, also folds the edges, but not so tightly, and again slightly crumples. It is necessary to lift each layer upward, each time reducing the degree of convergence of its ends: the lowest one should move very slightly away from the surface on which the peony lies.
New Year's applications made of colored paper: three-dimensional models

Before the New Year, all paper craft schemes become especially relevant: it’s so nice to receive a gift made with your own hands. And it will never be superfluous to decorate your own home. Using voluminous paper applications, you can make a beautiful card or picture that will hang in the living room during the holidays. The central object on any of these products will be the Christmas tree.
The easiest way to create it is bulk volume applique. For this purpose, the outline of the future Christmas tree is drawn on a background sheet of paper, which is filled with glue inside. It is best to use PVA, since the glue in the stick will not fix the necessary elements firmly enough if you do not press them down. But this cannot be done in this case.
Now small squares or triangles are cut from double-sided green paper, which are crushed by hand and, in a deformed state, fall into a pre-planned shape. They are lightly pressed against the adhesive surface and, if necessary, adjusted along the contour.
Otherwise, you can fill out the template if you roll up dense balls from each piece of colored paper, which also seals the entire silhouette of the drawn Christmas tree. But in such a situation, you will need to work more scrupulously, carefully gluing each element. But here it is easier to immediately “decorate” the tree if you roll several balls from paper of a different color than green and arrange them in rows diagonally, forming a garland. In exactly the same way, you can make an imitation of Christmas tree balls, which will look especially interesting if the basis for them is not colored paper, but foil.
Or you can make a card with a surprise: cut out 3 circles from green paper, each of which is 2-3 cm larger in diameter than the other. Thus, their approximate diameters will be 5, 8 and 11 cm. The number of circles can be increased to 5- ty, adding sizes accordingly: they should increase smoothly. On each of them, a radius line is drawn towards the center, and a cut is made along it with scissors.
Then you need to fan out each circle. Open the card, place the base of the small circle at the top point inside the fold of the card, and glue the sides of the “fan” to its halves. Repeat the same for the remaining “fans”, placing them so that the largest one is at the bottom: you get a voluminous Christmas tree that will appear every time the card is opened.


How presentable your picture will be depends not on the complexity of a particular application, but on the initial idea and arrangement of all elements against the general background. For example, some fashion illustrators complement their drawings with voluminous appliqués not only made of paper, but also of other small elements: flower petals, beads, beads, etc. In their works you can find inspiration for your own crafts: for example, not completing the entire picture using voluminous appliques, but only part of it.
Draw silhouettes of ballerinas, color them, and add fluff to the skirts using appliqué: tear colored double-sided paper into small pieces and lay it on glue, without pressing it tightly to the background, so as not to kill the volume. The work will be more painstaking if the paper is cut into long strips that are twisted into “snails”, and these parts fill the entire space of the tutus.
A sprig of mimosa, the template for which looks quite simple, can become more interesting if the sides of the oval leaves are turned into smaller and longer fringes. To do this, the incisions are made more frequent and extended to the central vertical, not reaching it 1-2 mm. And so that not only the leaves, but also the flowers become more alive, pieces of paper for them are cut not into squares, but in any shape, then carefully treated with glue and connected together into fluffy, but small balls.
The more chaotically you act, gluing the “petals” without controlling the order of their connection, the more natural the flowers will look. As a stem around which the leaves and flowers will be located, you can use soft wire covered with dark green velvet paper.
Volumetric paper applique: photo


The most interesting look are those volumetric applications in which alternating textures occur: for example, flat parts can be made of thick cardboard with a velor surface. And soft and voluminous ones are made from thinner paper: corrugated, shiny, completely matte. If the craft is dedicated to a holiday, nothing will prevent you from decorating it at the final stage with cut rain, confetti, and other small paper parts that are fixed with transparent glue.
After you manage to master the options for volumetric paper appliqués proposed in the article, you can try using the same patterns to make products using the quilling technique, which is also a type of volumetric applique, but at a higher level of complexity.


