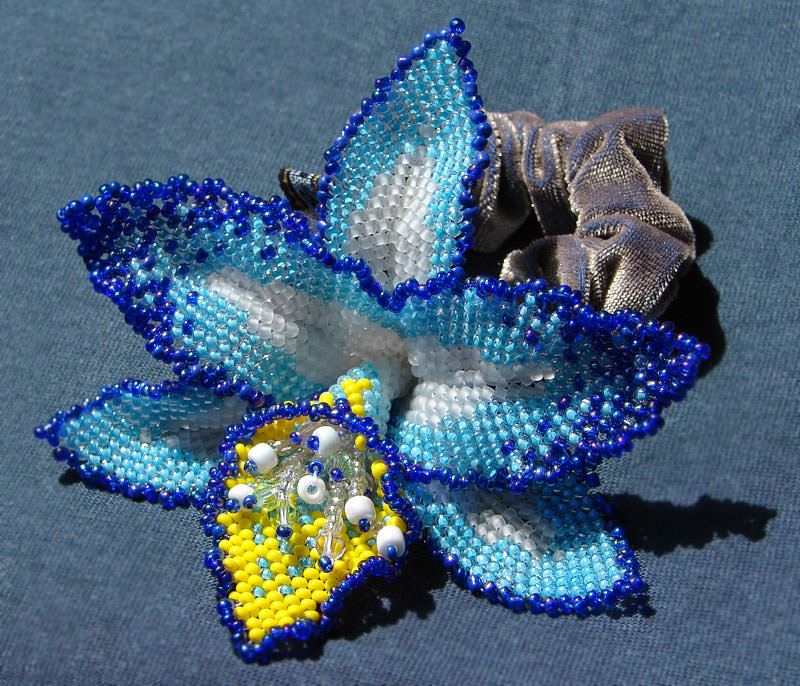
Gloxinia from beads. Parallel weaving. Do-it-yourself gloxinia flower from beads Gloxinia from beads weaving pattern with step-by-step
Weaving gloxinia from beads is exciting because you can liven up the atmosphere in your home and distract yourself from everyday work. Gloxinia in nature is incredible and captivating with its beauty. But a real bud will not please the eye for a long time, but it is possible to reproduce real beauty by making it yourself.
Working material
To work you will need:
- wire with a diameter of 0.25 – 0.30 mm. And also 0.40 mm.
- tongs, wire cutters, etc.
- beads
Beads colors:
- red
- pink
- green
- white

One flower will consist of:
- Bowl of leaves (2 pcs.)
- Leaves (2 pcs.)
- Stamens
- Petals: External (3 pcs.) Internal (4 pcs.)
Gloxinia weaving technology
Inner petal
In order to assemble the internal one, you will need to repeat a few simple steps:
- 18 red ones are put on the wire, thus forming an axis.
- Then we string arcs around. Four arcs will be adjacent to this area on top. Each one is made very simply. Two branches are gathered around the main thread on both sides, this creates an arc. Afterwards, the shape is fixed around the arcs and wrapped on top. These steps must be repeated 4 times, each time increasing the number of beads strung by 2 pieces.
- The final note of the design is its openwork part. At the base of the extreme arc with a free edge, 5 beads are collected.
- The free edge with the finished 5 beads is grabbed by the edge of the pink petal. This is how the white lace headband is folded. In order to determine the uniform distance of the lace, you just need to count 3-4 pieces. the petal itself. The result is miniature lace, which needs to be duplicated throughout the entire shape.

Outer petal
- It is not necessary to use only pink for the outer part of the petal. For volume and play of color, you can use scarlet or red.
- The external has the same basis as the internal. We repeat stringing 18 beads, and then weave 4 circles around.
- On the basis of the 4th arc we weave slopes on both sides. We string up enough beads onto the free edge of the arc so that it does not reach the top of the previous part.
- Completing this layer of cloves, the same amount of beads is collected downwards.
- We fix the new layer of the slope tooth very well.
- When creating subsequent layers, you must remember that the number of stringed beads now needs to be increased in order to create an openwork flower.
- This action is repeated 2 more times and so on one side of the outer petal we get a small protruding tooth.
- We must not forget that on the other side there is the same clove, since the petal itself must be full.
- Having completed the work with the shape of the outer petal, it is decorated like the inner petal of the gloxinia. White beads are strung and braided around the entire form.
Weaving green leaves
For sepals you need:
- Place green beads on the wire. You will get an axis of 12 beads.
- As with the inner petal of gloxinia, 3 arches are also formed around the base of the sepal.
Then we collect a large green gloxinia leaf:
- To weave this leaf you will need a denser wire of 0.40 mm, since the finished leaves must hold their shape.
- 25 pcs per wire.
- We weave three arcs onto the finished axis. (Actions are repeated as with external parts).
- We braid the bases of the green leaf with cloves. (The teeth will be much smaller and less frequent).

Making the stamen of a bud
- White beads are placed on a fishing line, this method is called “needle”. 40 beads are placed on the wire.
- Count out 10 beads from 40 stringed beads and separate them.
- We bend the separated section with the free edge and form a hook.
- Place the free edge in a row. A stick with a loop is formed - this is one part of the stamen. You need 3-4 of these sticks with a loop. and you will get a full-fledged stamen.

You can assemble such a structure together with your family and friends. And most importantly, the bouquet will delight the eye for decades.
For a more detailed study, a video of gloxinia weaving is attached:
made of beads, thanks to which you can diversify your interior with this cute little thing.
Necessary materials:
- thin wire for weaving;
- white (b.) and red (red.) beads.
Instructions
To begin, take a wire 85 cm long and string 7 white beads onto it, placing them in the middle of the wire segment. After this, we pass the left end of the wire through four beads in the opposite direction and tighten - 2 rows are ready.
Next, we work in the following order: on either end of the wire we collect four red, one white, one red, one white beads. Pass the opposite end of the wire through all the strung beads and tighten - the 3rd row is ready.


Starting from the 5th row, we weave gloxinia from beads according to the following weaving pattern:
- 5 rubles: 7 cr., 1 b., 1 cr., 1 b.;
- 6 rubles: 8 cr., 1 b., 1 cr., 1 b.;
- 7 rubles: 8 cr., 1 b., 1 cr., 1 b.;
- 8 rubles: 8 cr., 1 b., 1 cr., 1 b.;
- 9 rubles: 7 cr., 1 b., 1 cr., 1 b.;
- 10 rubles: 6 cr., 1 b., 1 cr., 1 b.;
- 11 r.: 8 cr.;
- 12 rubles: 8 cr;
- 13 r.: 7 cr.;
- 14 r.: 7 cr.;
- 15 r.: 6 kr.;
- 16 rubles: 6 cr;
- 17 r.: 6 cr.;
- 18 r.: 6 cr.;
- 19 r.: 6 cr.;
- 20 rub.: 5 kr.;
- 21 rubles: 2 b., 3 cr.;
- 22 rubles: 3 b., 2 cr.;
- 23 rubles: 3 b., 2 cr.;
- 24 rubles: 4 points;
- 25 rubles: 3 points;
- 26 rubles: 2 points;
- 27 rubles: 1 b.
The first half of the petal is ready. We weave a similar half to it, for which we again take 85 cm of wire, thread it between the 1st and 2nd rows of the finished half, and collect 7 white beads on the lower end. We pull the second end through four beads and tighten.

We weave the second half of the petal according to the same pattern as the first, not forgetting to braid them to each other. Each time we put beads on the wire that is closer to the finished half. As a result, a petal like this should come out.

To attach the 2nd petal, you must first weave 10 rows according to the pattern of the 1st half, then thread the end of the wire between the 10th and 11th rows of the finished petal, pick up 8 red beads, thread the opposite end through them and tighten. Continue weaving according to the pattern until row number 20. And from the 21st, we string the beads in a mirror order.
In total we weave 5 petals in this way. We weave the fifth petal to the first, and the result is a beaded gloxinia flower like this.

Also, do not forget to check out other master classes on.
- To weave gloxinia from beads we will need:
Beads No. 10 in four colors
0.3mm diameter wire and thick wire for rod.
Winding threads and PVA glue
Alabaster solution.
Beaded flower for gloxinia
Take a piece of wire 85 cm, collect 7 white beads on it, place them in the middle of the wire

Now take the left end of the wire and pass it in the opposite direction through 4 beads. We tighten the wire. The result is 1st and 2nd row


We take the other end of the wire and pass it through the beads, after which we tighten the wires. The result is row 3.


Then we take the other end of the wire, pass it through the beads and tighten the wires. The result is row 4.


We continue to weave according to the pattern starting from the fifth row, because four rows have already been woven
1st row: 3 white
2nd row: 4 white
3rd row: 4 red, 1 white, 1 red, 1 white
4th row: 6 red, 1 white, 1 red, 1 white
5 row: 7 red, 1 white, 1 red, 1 white
6th row: 8 red, 1 white, 1 red, 1 white
7th row: 8 red, 1 white, 1 red, 1 white
8 row: 8 red, 1 white, 1 red, 1 white
Row 9: 7 red, 1 white, 1 red, 1 white
Row 10: 6 red, 1 white, 1 red, 1 white
11th row: 8 red
Row 12: 8 red
Row 13: 7 red
Row 14: 7 red
Row 15: 6 red
Row 16: 6 red
Row 17: 6 red
Row 18: 6 red
Row 19: 6 red
Row 20: 5 red
21 row: 2 white, 3 red
22 row: 3 white, 2 red
23 row: 3 white, 2 red
24 row: 4 white
Row 25: 3 white
Row 26: 2 white
Row 27: 1 white
The result is half a petal.

Now you need to weave the exact same half to this half of the petal. To do this, take a piece of wire 85 cm and thread it between the 1st and 2nd rows of the petal halves. Next, to the end of the wire, which is from below, we collect 7 white beads


Then we take the other end of the wire and pass it through the four white beads that are at the other end of the wire. We tighten it.


Now, to weave the third row, you need to thread the wire, which is closer to half of the petal, between the 2nd and 3rd rows and pull it up


We tighten the wire. The result is a third braided row.

Now, to weave the fourth row, you need to thread the wire, which is closer to half of the petal, between the 3rd and 4th rows and pull it up


Next, we collect beads according to the pattern of 4 rows and continue to weave similarly to the previous weaving according to the pattern, not forgetting to braid. Please note that in the future, when weaving, beads must be placed on a wire that is closer to the product. The result should be a petal for gloxinia made from beads.


Then we take the end of the wire, which is on the side of the white beads, and thread it between the 10th and 11th rows of the petal. We collect eight red beads on the same wire, and pass the other end of the wire through these red beads. We tighten it.


To weave the next row, the wire must be inserted between the 11th and 12th rows.

We continue to weave until the 20th row, and starting from the 21st row, we collect beads in a mirror order. Let's finish until the end.


We continue to weave, weaving in petals. In total you need to weave 5 full petals.


To weave the last half of the fifth petal to the first, you need to thread the wire of the fifth petal between the 10th and 11th rows of the first petal and pull it up. Continue weaving according to the pattern, not forgetting to braid.

The result is a gloxinia flower made from beads.

Beaded stamens for gloxinia
Take a piece of wire 20 cm, put 20 white and 5 yellow beads on it.


We twist the five finished stamens together.

Beaded sepals for gloxinia
Gloxinia from beadsGloxinia made from beads in a step-by-step master class (photo)For those who are interested in beadwork, I introduce you to an incredibly beautiful flower and a master class. The flower is called Gloxinia and is woven in a parallel weave.
For those who don’t know how to weave with parallel weaving, read and learn:
parallel weaving (in English this technique is called the Victorian method).
The simplest petal or leaf is made as follows.
Three beads are strung on a wire approximately 20-30 cm long (Fig. 1), then one end of the wire is passed through two beads towards the other (Fig. 2), the beads are tightly attracted to each other - and a small triangle is obtained. The ends of the wire should be approximately the same length.
Then three beads are collected on one end, and the other end passes towards it again (Fig. 3), the new row is well pulled up to the previous one, then a row of four beads is made in the same way. Work continues in accordance with basic scheme No. 1.
When the last row is completed, the ends of the wire are tightly twisted so that the petal does not fall apart.
Petals and leaves can have a flat shape, which was described above, or they can be concave or convex.
In order to make such a petal, you first need to make half of the petal according to basic pattern No. 1. Then take a wire of the same length and thread it into the loop between the first and second rows. Then one bead is strung on one end of the wire, the other end is passed through it towards the first, and the loop is tightened well.
Next, the end of the wire that is closer to the finished part of the sample is threaded into the loop between the second and third rows, as many beads are strung on it as the third row of the first half consists of, the second end of the wire passes towards the first, and the row is pulled tight.
Execution of the sample continues in accordance with basic scheme No. 2.
You should pay attention to the fact that it is necessary to tighten the rows well, since a loosely tightened product turns out loose and does not hold the desired shape.
Now let's look at the principle of making a sheet with a carved edge - basic scheme No. 3.
Up to the fourth row, everything is done as before (basic diagram No. 1), and then we string two beads onto each wire, move the last bead a little to the side, pass the end of the wire through the first and tighten the loop.
Then we perform 2-3 rows in the usual way and again repeat the technique described above. This sequence of actions is repeated the required number of times.
In order not to present diagrams that repeat the basic ones in configuration, but differ in a different number of beads in the rows, use the numerical form of the element.
This formula gives the sequence of rows and the number of beads in each. For example, a scheme presented as basic scheme No. 1 in the form of a formula will look like this: 1-2-3-4-5-4-3-2-1.
If someone doesn’t understand the description at all, watch the video tutorial
It's clear? Let's move on to the flower itself.Gloxinia (parallel weaving).
A gloxinia flower consists of 6 petals connected to each other.
Each petal is woven from two parts in a parallel weave.
Place 5 white beads on the wire (I did not measure the length of the wire, but approximately one and a half meters), pass through three. You will get the first two rows, i.e. we can write it like this
1 rub. - 2 white
2 r. - 3 white
3 r. - 3 red, 2 white
4 rub. - 5 red, 2 white
5 rub. - 6 red, 2 white
6 rub. - 7 red, 2 white
7 rub. - 7 red, 2 white
8 rub. - 7 red, 2 white
9 rub. - 7 red, 1 white
10 rub. - 6 red, 1 white
11 rub. - 6 red
12 rub. - 5 red
14 rub. - 5 red
15 rub. - 4 red
16 rub. - 4 red
17 rub. - 4 red
18 rub. - 4 red
19 rub. - 4 red
20 rub. - 4 red
21 rub. - 3 red
22 rub. - 1 white, 2 red
23 rub. - 2 white, 1 red
24 rub. - 2 white, 1 red
25 rub. - 3 white
26 rub. - 2 white
27 rub. - 1 white.
The second half of the petal is woven into the first as it is weaved. The arrangement of the beads is mirrored.
The second petal (and each subsequent petal to the previous one) is woven to the first after the 10th row.
That is, we braid the first half of the petal to the previous petal, and we braid the second half to the first half of the petal.If you want there to be more white in the throat of the flower, start stringing white beads higher, from about the 17th row.
Gloxinia made from beads in a step-by-step master class (photo)
Flowers are a delightful surprise given to us by nature. They decorate and complement our interiors with their splendor. In today's beading tutorial, we will look at the process of making a beautiful decorative indoor gloxinia flower. 


The process of weaving gloxinia from beads
We string 7 white beads onto the wire. Now you need to pass its left tip through 4 beads in the opposite direction and tighten. This way we will get the first two rows. Then, string beads onto an arbitrary end of a piece of wire in the following sequence:
- 4 red beads + 1 white + 1 red + 1 white.


After this, we pass the opposite tip of the wire through the beads and tighten. We have formed the 3rd row. 

We form the 4th row according to this principle: we take the wire located on the side of the red beads and string the following order of beads on it: 6 red beads + 1 white + 1 red + 1 white. The other tip must be pulled through the beads and tightened. 


Next, we will continue our weaving process according to this principle:
- 5th row: 7 red beads + 1 white + 1 red + 1 white;
- 6th row: 8 red beads + 1 white + 1 red + 1 white;
- 7th row: 8 red beads + 1 white + 1 red + 1 white;
- 8th row: 8 red beads + 1 white + 1 red + 1 white;
- 9th row: 7 red beads + 1 white + 1 red + 1 white;
- 10th row: 6 red beads + 1 white + 1 red + 1 white;
- 11th row: 8 red beads;
- 12th row: 8 red beads;
- 13th row: 7 red beads;
- 14th row: 7 red beads;
- 15th row: 6 red beads;
- 16th row: 6 red beads;
- 17th row: 6 red beads;
- 18th row: 6 red beads;
- 19th row: 6 red beads;
- 20th row: 5 red beads;
- 21st row: 2 white beads + 3 red;
- 22nd row: 3 white beads + 2 red;
- 23rd row: 3 white beads + 2 red;
- 24th row: 4 white beads;
- 25th row: 3 white beads;
- 26th row: 2 white beads;
- 27th row: 1 white bead;
After completing this simple procedure, you and I will receive half a gloxinia petal. 
The next stage will be the weaving of two identical halves. We pass a piece of wire between the first and second rows of the petal halves, and string 7 white beads onto the lower tip of the wire. We pass the other end of the wire through 4 white beads and tighten. 


To weave the third row, we thread a wire close to half of the petal and pull it between the second and third rows. 

Then we attach beads to the tip of the wire, which is closest to our half, as in the diagram of the third row, and we pass the opposite tip through these beads and tighten our wire as usual. Thus we wove in the third row. 


To weave the next, fourth row, we thread the nearest wire and pull it between the third and fourth rows. Now, string the beads, according to the diagram, 4 rows and weave in the same way, weaving in the petals. Remember that we always string the beads onto the wire that is closest to the petal. 


We weave the second half to the resulting petal of our future gloxinia flower. In this case, it is necessary to weave 10 rows of halves of the petal according to the pattern. The tip of the wire on the side of the white beads must be threaded between the 10th and 11th rows. Next, string 8 red beads onto the wire, and then pass and tighten the opposite end through the red beads. 


We braid the next row, stretching the wire between rows No. 11 and 12. Continue the weaving process until the 20th row. And from row No. 21 it will be necessary to string the beads in a mirror order. Our task is to weave five petals. 


We weave the final half of the fifth petal to the first, threading and pulling its wire between rows No. 10 and 11. 

The result of the current weaving process will be a finished beaded Gloxinia flower.
Weaving a stamen for gloxinia We string 20 beads of white and 5 yellow flowers onto a wire. Then its tip from the side of the yellow beads must be pulled in the opposite direction through the white beads. In total we make five such stamens for our gloxinia flower.
We must twist the resulting beaded stamens together. 


The process of making leaves First, we will weave sepals in the amount of five pieces. We take a wire with 9 beads on the axis and make six arcs in three turns.
We begin weaving leaves for our gloxinia. They will be jagged. How to weave such a jagged sheet can be seen in the video.
We string 10 beads onto the axle and begin to weave a large sheet that will have 9 teeth.
In total we will have to weave:
- 4 large leaves with 9 teeth;
- 2 medium sized leaves with 7 teeth;
- 1 small leaf with 5 teeth.

Gloxinia sepals made of beads 
Gloxinia leaf with serrations
Collecting a flower
We extend the finished stamens into the middle of our flower. Then we attach a thickened wire to it and twist it around the sepal blank. We close the ends of the wire with green threads, having previously soaked them with glue. We collect the flowers together and screw on the leaves. 


At this point, our labor-intensive process of weaving a gloxinia flower from beads is completed and we can admire the finished product.
Video: learning to weave jagged leaves from beads
Comments
Related posts:
 DIY beaded orchid in a master class (photo)


