Knitting from mohair: advantages of yarn and tips for beginners. Knitting from mohair Crochet mohair jacket
Such a unique activity as knitting helps to diversify your wardrobe, engage in creativity, and please your loved ones and friends with an original gift. A large selection of yarn makes it possible to make such creativity very colorful and exciting. Handicraftsmen pay special attention to products made from mohair.
And this is not just a tribute to fashion. Any fluffy soft yarn cannot be called mohair. This is a thread made from the wool of Angora goats. Models made from this fiber are considered one of the best in quality and luxurious in appearance.


 What allowed mohair yarn to become so popular? Firstly, women are attracted by the weightlessness and pleasant feeling of warmth when wearing knitted mohair items. In addition, the yarn has a whole range of advantages that distinguish mohair from regular thread:
- unobtrusive shine;
- elasticity and strength;
- elasticity;
- hyallergenic;
- resistance to pollution;
- hygroscopicity;
- good thermal insulation;
- ability to drape.
Therefore, when comparing these qualities with another thread, many knitters prefer to knit with mohair knitting needles. You should know that mohair yarn is goat hair mixed with natural or artificial thread. If you make it only from hair, it will not be strong and will fall apart into individual hairs. To ensure its strength, as well as an adequate price for mohair, the content of goat hair should not exceed 83% in the yarn composition.
To the positive characteristics of the unique yarn, it is worth adding its pliability. This quality is indispensable when knitting children's toys, bed linen, accessories, even wardrobe items. And in products for women, you can use it to create various decorations and details. The fur of the Angora goat has a uniform color but is very easy to dye. It retains its natural shine in any color and does not fade. Knitting from mohair is also very profitable because work with this yarn progresses quickly. Any patterns, especially openwork.


Many other ornaments are also great for this natural thread.
Features of work
Despite this list of advantages, working with mohair thread requires a little learning. This does not mean that a beginning knitter will not be able to handle the pattern she likes. Simply, there are some nuances that we will now talk about:

One more tip. When purchasing mohair yarn, follow a couple of steps. Pull the end of the thread to check the strength of the twist. The second step is to squeeze the ball in your hands to determine how much the threads creak. This will tell you the percentage of added synthetics. And when you start knitting, combine mohair with bobbin thread of the same color. This will significantly strengthen the shape of the product.
What can you knit from mohair?
 This is a wonderful yarn that will not let you down when knitting children's items, fashion items for women, men, and home decorations. Perfect for warm clothes - sweaters, dresses, scarves, and light ones - turtlenecks, openwork blouses. The thread is available in a range of tones with varying color intensities. This allows you to choose a shade for a delicate children's suit, or for a rich men's pullover. If you don't like the color of the yarn, don't worry. Mohair can be dyed to any color very easily.
After deciding on your color choice, decide on the type of mohair that will suit you. It depends on the age of the animal whose wool was used to create mohair. The main classification includes:
- Kid Mohair is a yarn made from the delicate wool of a small kid. It is collected from the moment of the first haircut. The most gentle of all types;
- Goatling - this type of mohair is obtained from the hair of a goat that has not reached 2 years of age. It is a little tougher, which is explained by the age of the animal;
- Adult Mohair is the stiffest of the types of mohair, but has all its properties. Made from the hair of an adult animal.
This classification will help you choose the right yarn for a children's model, which is very responsible. After all, kids want to knit a warm fluffy thing that will meet all the requirements.

Thicker mohair thread is used to knit hats, scarves for women, blankets, bedspreads, coats and capes. But thin ones make good children's and women's clothing. An excellent option is an openwork wedding shawl.
 Many novice needlewomen are afraid to knit with thin mohair, explaining this decision by lack of experience. But any craftswoman can make a straight sweater from such yarn.
So, let's begin. We choose the shade of the yarn, as well as the pattern and pattern for the model. We take knitting needles according to the recommendation on the label or a number larger. And for the elastic, you can take one number less.
We knit the back. For products made of mohair, you can decorate the bottom with an elastic band or stocking (garter) stitch. In the second option, you will get a rounded bottom edge. In this case, a collar made in the same way looks very good. We calculate the loops as usual. We cast on a small number of loops and knit a pattern repeat. We write it out from the pattern diagram. Then we calculate the knitting density by width and height.
We cast on the first row and perform an elastic band. For mohair, the 1x1 or 2x2 option is perfect.
Note! Things made of mohair should not be unraveled. Firstly, this cannot always be done quickly and efficiently. Long pile gets tangled and loses its attractiveness. Repeated knitting will not look as impressive. Therefore, we knit very carefully so as not to redo it.
 After the elastic band, we move on to the main drawing. If working with mohair is unusual for you, then knit the back with stockinette stitch. Mohair thread is very rewarding to work with. Patterns can only be knitted on the front or sleeves. This will already be enough to make the thing look attractive.
We continue knitting exactly to the armhole line. Then we make a rounding. To do this, at the beginning of the row we gradually close the loops (from 5 to 10, depending on the size). Advice. After turning the fabric, knit the last 2 loops together too. Get a more rounded edge. An excellent option for beginners would be knitting a straight armhole. In this case, you will not need to make any roundings. Cover 5-8 stitches on each side of the back with knitting needles and continue knitting exactly to shoulder level.
Children's models do not require a neckline on the back, but for women it is better to do this. Then the item will fit on the figure much more comfortably. We divide the fabric in half and, having reached the middle, begin to close the loops. The height of the neckline on the back is no more than 2.5 cm. First we knit one half, then the second in a mirror image. Beginning knitters need to write down all their actions so that the design of the sweater is symmetrical.

After finishing knitting the back, we move on to the sleeves. It is very good to do both sleeves at the same time. To do this, you will need to take two skeins of yarn so that each sleeve is knitted from a separate ball. Having cast on the loops from one, we cast on the same knitting needles again for the second sleeve. We knit both at once, turning the fabric. We make all additions or decreases at the same time. If the model has a narrow sleeve at the bottom, then increases are made to the elbow. For a smooth armhole, the sleeve ends straight. If you designed the armhole line with a curve, you will need to knit the sleeve cap. For an accurate calculation, it is better to look at the training material.
Let's move on to the shelf. Here even a novice craftswoman can give scope to her creative imagination. Any patterns, openwork, weaves, combinations with other colors or types of yarn. There are a lot of options. The sweater will find its own uniqueness. For example, a combination of cowny and mohair:
Very simple, but original. Popular patterns for mohair thread:


The collar or neckline is also one of the main decorations of mohair products. It doesn't have to be elaborate or huge. You can simply knit a thickened edge or crochet it. Do not tighten the loops too much. Mohair does not like high density as well as very loose knitting.
The most beautiful patterns made from mohair are openwork or geometric. Finding diagrams for drawings of any complexity is not difficult.
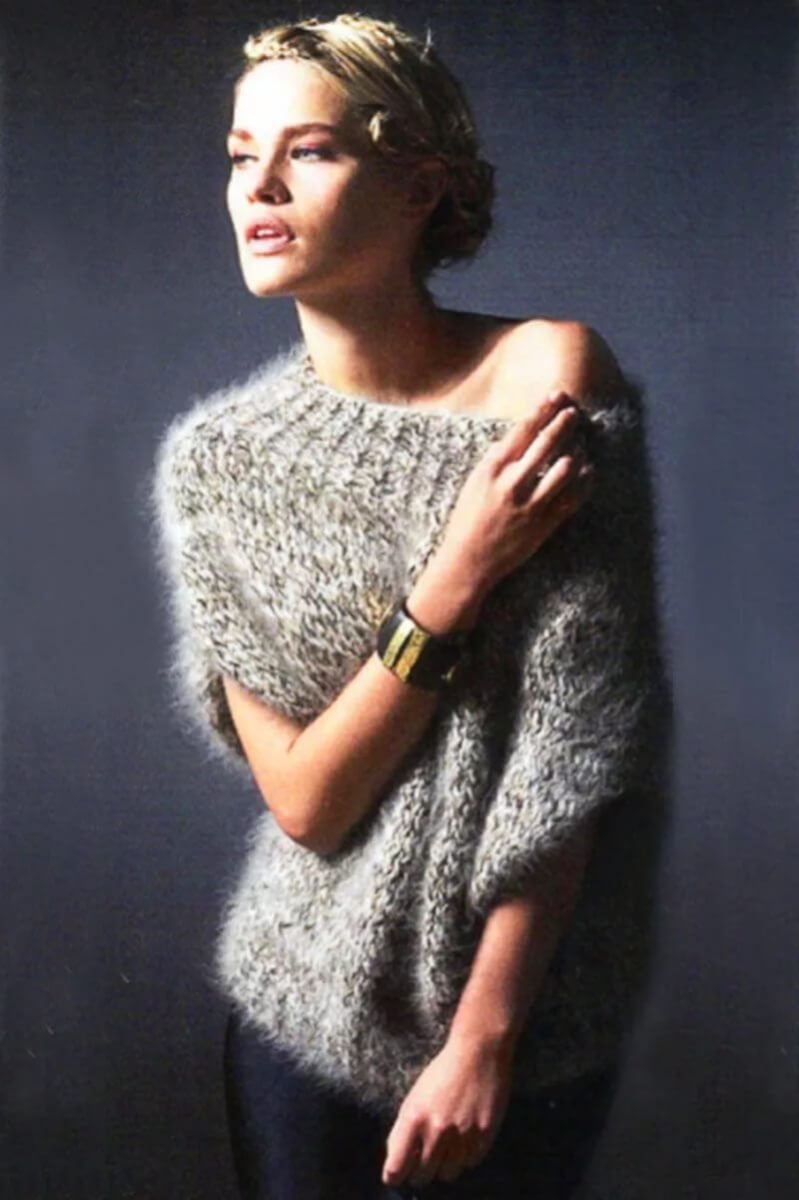
Knitting from mohair for women, in addition to practical benefits, also brings great satisfaction. A beautiful soft item knitted with knitting needles pleases with its appearance and warms you in cool weather.
A warm fluffy sweater should be in every woman's wardrobe. Cozy mohair sweaters pair perfectly with skirts, trousers and jeans. There are many models of women's pullover knitted with knitting needles. A variety of patterns are chosen for this, both embossed and openwork. Since mohair is a rather fluffy yarn, it is better not to mess with complex patterns.
Firstly, you can easily make a mistake during the knitting process - after all, due to the existing fluff, beginners may not be able to see the loops.
Secondly, the pattern may turn out to be so “tricky” that you will waste your time - in the end you will simply not see the openwork implementation.
A little about yarn
Mohair is considered the finest and warmest yarn, most suitable for women's sweaters and blouses. This yarn is made from the wool of Angora goats. Special equipment makes fine and high-quality yarn very convenient to work with. Things made from this material are very warm, soft and beautiful. Even an inexperienced needlewoman can knit a mohair sweater - the models are easy to work with and do not require special skills. To begin with, it is better to use simple patterns and more simplified models - without knitting sleeve caps, fitting and other additions.
Simple mohair sweater


To knit a women's sweater, you will need mohair yarn - you can use it with the addition of wool or polyamide. We recommend using size 5 knitting needles for mohair yarn. Knit a sweater in stockinette stitch, since the knitting needles are thick and the yarn is thin, you will get a sparse, almost openwork knitting.
To make a product of size 48 (taken as an example), you need to cast on 80 loops. If you plan to get a larger or smaller sweater, then the loops should be increased or decreased accordingly. Knitting starts from the bottom of the product. The work should be performed according to this description:
- Cast on 80 stitches for the front and make an elastic band 6 cm wide with a 1x1 pattern, that is, alternate purl and knit stitches. Then continue working with stockinette stitch: alternate knit and purl rows. The back is knitted to a height of approximately 57 cm - this is the length from the bottom of the product to the neck - the sleeve will be lowered, so there will be no need to knit the armhole line.
- Make a notch for the neck. To do this, bind off the central 8 loops and continue knitting the left and right sides separately. To round, make a decrease in knitting from the neck side. To do this, from the front side through the row, decrease two loops at the same time (close them or knit them together). This is done three times, and the remaining loops are closed. The height of the front shelf should be about 64-65 cm.
- The back of the product is knitted in the same way as the front. Only the rounding is done in a slightly modified way - first close the central 12 loops, and then three more times one loop on both sides of the neck.
- Sleeves. Cast on 32 loops and make an elastic band of 5 cm. In the last row, increase the loops by adding them from the broach between the loops - increase by 24 pieces in total. Next, knit in stock stitch, not forgetting to add stitches on both sides of the sleeve to create a bevel. This is required 13 times in every fourth row. Then you need to add one loop 4 times through each row. The length of the sleeve is approximately 47 cm. Knit the second sleeve in the same way.
- When all the parts are ready, they should be sewn together. You need to start by sewing the back and front together. Then sew the sleeves and sew them into the finished sweater.
- Tie the neckline, either crocheted or knitted. Using circular needles, cast on the loops around the neckline and knit 4 rows with an elastic band, then bind them off.
The finished mohair product does not require steaming with an iron, otherwise you can damage the fibers and it will not “fluff” well. To level the products, they can be moistened in cold water and laid out on a dry towel. Let the pieces dry and sew them together.
Openwork sweater


Women's fluffy sweaters can also be openwork. Such work can be performed by craftswomen who have extensive experience in knitting without problems and long calculations. An openwork sweater made of thin mohair will be very light and delicate, but will not lose its ability to retain heat. To make a product of size 44, you will need 250 g of yarn and thin knitting needles No. 2.5. For work, only two patterns are used - for the elastic band and the main pattern. Elastic – it will be at the bottom of the sweater, on the sleeves and neckline. The pattern is made by alternating 2 knit stitches and one purl stitch.
The openwork pattern is the main pattern with which the entire product is knitted. It consists of a repeat of 7 loops. Knitted in the following sequence:
- 1st row: make a double broach - slip 2 loops and pull one of them through both, knit, yarn over, knit, yo, knit, simple broach - slip one loop and pull the next loop through it.
- Knit all odd rows with purl stitches.
- 3rd row: double broach, yarn over, knit 3, yo, simple broach.
- 5th row: knit, yarn over, simple broach, knit, double broach, yarn over, knit.
- Row 7: knit 2, yarn over, knit 2 stitches together, yarn over, knit 2.
- From the 9th row, start rapport all over again.
The technology for knitting a sweater is presented as follows:
- Back. Cast on 140 stitches and knit 2 cm with an elastic band. Then knit in an openwork pattern up to the armholes. Make it by decreasing loops by 2 loops 2 times and removing one loop once. Then you should knit another 18 cm and bind off all the loops. If you don’t have experience or the pattern seems too complicated, you don’t have to do the characteristic knitting of the armholes.
- Before. Knit the fabric in the same way, making armholes. There should be 130 loops left. To knit the neckline, close off the central 28 loops, and then make roundings on both sides of the neckline by decreasing 3 loops at a time across a row and 5 times 2 loops each. Knit the front to the length of the back and finish by casting off the loops.
- Sleeves. Cast on 60 loops, make an elastic band and knit in an openwork pattern, adding loops every sixth row. Roll up the sleeves by decreasing stitches across a row 3 times with 2 loops and 15 times with one. Knit to a height of 15 cm and bind off the remaining loops.
- Assembly. Pre-wet the parts and place them on a towel or blanket. Dry and sew. First you should sew the shoulders, then sew the sleeves and sew all the side seams. Cast on the loops around the neckline on circular needles and tie with an elastic band. The sweater does not require subsequent steaming with an iron.
Knitting allows a woman to realize her ideas and fantasies. All her works will be in a single copy, which means it will allow her to be fashionable and original in her outfit. Mohair products look great here because they are warm, light and very comfortable.


Another advantage of mohair sweaters is their lightness. If you noticed, even the descriptions given indicate a fairly low weight of the yarn necessary to realize your fantasy - only 200-400 g. Moreover, despite their lightness, mohair pullovers are quite warm - they are not inferior to products made from real wool. Mohair is soft and, unlike wool, does not itch at all, so the products are perfect for people with sensitive skin.
Fashion detail: wide boat neckline, the depth of which can be changed.
Size 42 (46). Differing data for larger sizes are indicated in brackets (the pattern is given in Fig. 2)
Material: 300 (350) g
Patterns:
- facial surface
- openwork according to the scheme
- elastic band 3x3
Back. Cast on 74 (84) stitches on the knitting needles and knit an even fabric using stockinette stitch. After 27 cm from the bottom edge of the part, go to the openwork pattern and knit another 6 cm. Then, for the side bevels of the armholes, decrease 1 stitch along the edges of the fabric in each row 4 times every other row - 10 times. When the height of the knitted fabric reaches 43 cm, leave the loops of the last row (there are 46 on the knitting needle) open and slip them onto pins and break the thread.
Before tie like a back.
Sleeves. Cast on 54 loops on the knitting needles and knit 40 cm in stockinette stitch. Then switch to the openwork pattern and knit another 6 cm, after which you begin to make the bevels. Perform them as on the back. Leave the loops of the last row (26) open and slip them onto pins. Knit the second sleeve in the same way.
Assembly. Connect the back and front with the sleeves along the raglan lines. Then sew the side seams and sleeve seams. Transfer the open loops along the neckline from the pins to the knitting needles and knit a 10 cm high bar with an elastic band in a circle. Close the loops of the last row in a straight line, without pulling them together. Bend the strip to the wrong side and carefully sew along the base. The neckline will look “branded” if you design it like this: fold the placket onto the front side of the sweater, and attach the open loops to the base of the placket. You can put a very thin hat elastic in the same color inside the bar.
Suzanne
Due to the loose silhouette of the pullover, the given calculation of loops is suitable for three sizes.
You will need: yarn (75% mohair, 25% polyamide, 80 m/25g) - 425 g yellow-pink; knitting needles No. 4.5; short circular needles No. 4.
Rubber: alternately knit 2, purl 2.
Facial surface: front rows - front loops, purl rows - and back loops.
Knitting density: 18 p x 25 r. - 10 x 10 cm.
Back: cast on 146 sts and knit 3 cm with an elastic band, continue working in stockinette stitch. For narrowing, in the 7th r. knit the 29th and 30th stitches together, knit the 117th and 118th stitches together with a slant to the left (= remove 1 stitch as in knitting, knit 1 stitch and pull the removed stitch through it loop), mark the resulting loops. Repeat these decreases (marked loop and the previous one, respectively marked loop and knit the next one together) 22 times in each next 6th row = 100 p. After 60 cm from the bottom edge of the part, close on both sides for the armholes 1 time 3 p., 2 times 2 p. and 3 times 1 p. in every 2nd r. = 80 p. Knit straight. After 78 cm from the bottom edge of the part, close off the middle 26 stitches for the neckline and finish both sides separately. To round the neckline, close every 2nd p. 1 time 3 sts and 1 time 2 sts. Then close off the remaining 22 sts of the shoulder.
Before: knit like a back, but only 58 cm from the bottom edge of the part for a V-neck, divide the work in the middle and finish both sides separately. To bevel the neckline, decrease alternately in every 2nd r. and the next 4th p. 18 times 1 p. After 80 cm from the bottom edge of the part, close the remaining 22 p. shoulder.
Sleeves: cast on 38 sts and knit. satin stitch For bevels, add 18 times on both sides, 1 stitch in every 4th row. = 74 p. At a height of 32 cm, close on both sides to roll 1 time 3 p., 1 time 2 p. and 3 times 1 p. in each 2nd p., 5 times 1 p. in each 4- m r., 1 time 1 p., 1 time 2 p., 1 time 3 p., 1 time 4 p. and 1 time 5 p. in every 2nd r. Then close off the remaining 18 sts. For the flounce, cast on 38 sts along the bottom edge of the sleeve and knit with an elastic band (start and end with an edge loop). At a height of 2 cm in each purl track add 1 stitch (= 47 stitches), at a height of 3 cm in each front track add 1 stitch (= 56 stitches), at a height of 4 cm in each purl track add 1 p. (= 65 p.), at a height of 5 cm in each front track, add 1 p. (= 74 p.). Knit in a new rhythm - alternately knit 4, purl 4. Having knitted a shuttlecock 10 cm wide, close the loops.
Assembly: make seams. Sew in the sleeves, slightly lowering them. For the collar, cast on 119 stitches along the edge of the neckline and knit 2 rows on circular needles. facial and 1 p. purl loops, while in the 1st and 2nd r. in the middle of the front, knit 3 p. together, and also in the 3rd r. close the middle front loop = 114 p. Knit 2 more p. stitch stitch and 14 cm elastic, then bind off the loops.
Verena 1995-11
Saturday, December 15, 2007

You will need: 750 (800) g beige Belisana yarn (70% royal mohair, 15% wool, 15% polyamide, 115 m/50 g); knitting needles No. 3, No. 7 and No. 9; long circular needles No. 9.
Facial surface: persons R. - persons p., out. R. - purl P.
Patent pattern, faces. and out. R.(odd number of loops).
1st row (purl): chrome, knit 1, *slip 1 st with yarn over as purl, knit 1, repeat from*, chrome. 2nd row: chrome, slip 1 p. with a crochet as purl, * knit a loop with a crochet together, knit, 1 p. slip with a crochet as a purl, repeat from *, chrome.
Row 3: chrome, knit a double crochet stitch together, * slip 1 p. with a double crochet as purl, knit a double crochet stitch together, repeat from * chrome. Repeat 2nd and 3rd rows.
Patent pattern, circular r.(even number of loops).
1st round: * Slip 1 stitch as purl, purl 1, repeat from *.
2nd round: * knit a loop with a double crochet together, remove 1 st with a double crochet as purl, repeat from *.
3rd circular row: * Slip 1 st with double crochet as if purlwise, knit a loop with double crochet together purlwise, repeat from *. Repeat 2nd and 3rd rows.
Knitting density. Persons satin stitch, knitting needles No. 7: 11-12 sts and 15 r. = 10x10 cm; patent pattern, knitting needles No. 9: 9 sts and 18 r. = 10x10 cm.
Attention! Knit the jacket with thread in 2 folds.
Back: On knitting needles No. 7, cast on 59 (67) sts and knit 1 purl. R. purl, then knit. satin stitch, closing for fitting on both sides every 10th r. 3x1 p.; for this, at the beginning of the row after chrome. remove 1 p. as knit., 1 knit. and pull it through the removed loop; knit a row to the last 3 sts, knit 2 sts together knit, chrome. = 53 (61) p.
At a height of 28 cm from the cast-on edge, add 1 x 1 st on both sides, then in every 8th p. 2x1 p. = 59(67) p. At a height of 46(44) cm, close on both sides for armholes 1x3 p., then in every 2nd r. 3x1 p. = 47(55) p. At a height of 62 cm from the cast-on edge for the neckline, close the middle 23 p. directly and on both sides of them after 2 r. another 1x2 stitches. At the same time, at a height of 64 cm, close on both sides for shoulder bevels in every 2nd row. 2x5 p. (2x7 p.). At a total height of 66 cm, close all loops.
Left shelf: On knitting needles No. 7, cast on 4 (8) sts and knit 1 purl. R. purl, then knit. satin stitch, while for the front rounding from the left edge in every 2nd r. again dial 1x3, 7x2 and 4x1 p. At the same time, close from the right edge for fitting in every 10th row. 3x1 p. = 22(26) p. At a height of 28 cm from the cast-on edge, make a side bevel and at a height of 46 (44) cm, knit an armhole, as for the back, and at the same time, at a height of 42 cm, reduce 1x1 p. to bevel the neckline, then every 4th r. 8x1 sts. To do this, knit a row to the last 3 sts, knit 2 sts together. and chrome. At a height of 64 cm, tie the shoulder bevels, as for the back.
Right shelf: knit in mirror image. To reduce the bevel of the neckline after chrome. remove 1 p. as knits. 1 person and pull it through the removed st.
Sleeves: on knitting needles No. 9, cast on 39 (43) sts and * knit with a patent pattern of 11 cm = 20 r. then knitting needles No. 3 2 cm. satin stitch = 6 r., from * repeat 3 times, finish the work with knitting needles No. 9 with a patent pattern. Stripes of faces. In satin stitch, always start knitting from the purl row and end with the front row. At a height of 59 cm, close 1x3 sleeves on both sides to roll up, then in every 2nd r. - 1x2, 7x1 and 1x2 p. After 70 cm from the cast-on edge, close the remaining 11 (15) p. directly.
Assembly: straighten the parts, slightly moisten them and let them dry. Complete all seams and sew in sleeves. For the strap, cast on 252 (266) sts on circular knitting needles: along the lower edge of the back - 42 (48) sts, along the curves - 25 (29) sts, along the straight front sides - 26 sts, along the bevels of the neckline shelves - 42 p. and along the back neckline - 24 p. Knit with a patent pattern in circular rows of 18 cm, then loosely bind off all the loops.
Attention! The bar can also be knitted from 2 parts of faces. and out. R. To do this, start casting on loops from the bottom from the middle of the back and end in the middle of the back neckline (127 (135) stitches for each strap). Sew the sides of the planks; The seam at the bottom of the back is made from the back, along the neck of the back - from the faces. sides.
Knitting not only calms you down, but also gives you the opportunity to express yourself creatively. A beautiful thing made with your own hands is very pleasant to wear on your own or give to a loved one. In addition, knitted products do not go out of fashion, which means that this method of self-soothing can also bring in a small additional income. Needlewomen know that it is important to choose not only an interesting model, but also the right yarn. Mohair has been one of the most popular knitting yarns for several years. Let's look at patterns for mohair that can be made by both beginners and experienced craftswomen.
Indeed, amazing things are made from this extraordinary yarn - thin, light jumpers and sweaters, but at the same time very soft and warm. To really please you with the result, we recommend paying attention to the following points:
- You should only work with this yarn on knitting needles. The openwork weaving of the hook creates a too dense pattern, which is why the long pile rolls down and the item loses all its charm.
- Depending on the thickness of the thread, you should choose the appropriate number of knitting needles. If you choose a tool that is too thin, the knitting will turn out loose. To avoid mistakes, choose knitting needles with a slightly larger diameter than planned. It is better to choose large knitting needles than to try to deliberately pull the thread, making the work shapeless.
- The knitting turns out to be openwork and translucent - this is a feature of the yarn. Regardless of the number of holes, the item will still turn out very tender and warm.
- Be careful when choosing small openwork knitting patterns. The tighter and more uniform the knitting, the more elegant the finished blouse will be.
- Study the threads carefully before purchasing. The better and more reliable the mohair, the greater the chance that the knitting result will be as expected. You can check the strength of the twist by pulling the end of the thread. And the creaking of the ball in your hands will show how high the percentage of synthetics is in the mohair ball.
- To make weaving more reliable, add a thin thread from a sewing spool to the mohair thread while working.
Popular patterns
One of the main features of mohair is its ease of knitting.- with the help of one single pattern you can create a beautiful thing. This rule applies not only when knitting scarves or stoles, but also large openwork items - sweaters or tunics.
Simple openwork diamonds with knitting needles, made according to these patterns with descriptions, will allow you to easily and quickly create an amazing thing. Below you will find tips on how to knit a fashionable dress, top, knitting photos.
Elegant pattern for fine yarns
This beautiful pattern looks very elegant and is an excellent solution for a shawl or stole.
In the diagram, a report consisting of 16 loops is highlighted in green. This is not indicated separately in the diagram, but the empty cells indicate facial loops; there are quite a lot of them in the diagram.
When casting on loops, it is necessary to take into account that before and after the repeating pattern you will need to make 9 loops of an additional pattern.
 Also, this diagram does not indicate the edge loops that are necessary to create a smooth edge.
This pattern looks good when knitting a shawl or a voluminous scarf.. It can also be used to decorate a blouse.
 The openwork diamond knitting pattern is one of the most popular. There are several options for performing it, we suggest trying one of the simplest, but quite effective.
Such a delicate and unobtrusive pattern looks good on blouses, and the weaving itself is so simple that the work will seem very easy. The openwork of this weave will captivate any fashionista who is not afraid to pick up knitting needles to independently knit an elegant and warm thing.
The diagram shows a method for knitting simple rhombuses.

A description of this simple scheme is not required - everything is clear, even for a novice craftswoman. The pattern repeat consists of fourteen loops; when casting on working loops, do not forget about the additional two edge loops. The reverse side of the knitting is not done according to the pattern, but with ordinary purl loops.
In the process of knitting 31 rows, you can make two strips of diamonds. Knitting a scarf or stole continues until the desired length, and if this pattern is used to create a voluminous item, then you need to carefully monitor the size of the fabric.
Trefoil openwork
The trefoil pattern allows you to create very beautiful, voluminous and fluffy things. This is the best option for experienced craftswomen who want a warm shawl.
 As you can see, the pattern of this pattern is quite complicated, so if you don’t have the necessary experience, it’s worth experimenting with simpler patterns.
The openwork is created thanks to a competent combination of weaving threads in the form of classic braids and regular yarn overs with decreases. A rather complex and extraordinary pattern forms a very beautiful and unusual pattern.
The pattern repeat is quite large, consisting of 26 loops. In addition to these working loops, it is also necessary to take into account the set of edge loops. The wrong side is knitted according to the pattern.
Repeating the pattern takes 24 rows.
Delicate pattern of small leaves
 To create a beautiful mohair item, it is not necessary to use complex and intricate patterns. It will be enough to get by with such a simple option.
The pattern of the knitted fabric resembles several fluffy leaves made by hand.
As you can see from the diagram, the pattern repeat is sufficient

small, consists of 14 loops. You will also need to knit additional loops that form a beautiful symmetrical pattern. Do not forget about the edges, which are not indicated in this diagram.
Every sixteen rows the pattern is repeated, which means you can remember it quickly enough. The purl loops must be knitted according to the resulting pattern.
Simple but beautiful pattern
 Finishing the conversation about openwork knitting options from mohair on knitting needles, one cannot help but mention one of the simplest but most effective patterns. A scarf knitted in this way turns out to be quite beautiful, but you will have to spend very little time memorizing the pattern.
A simple pattern that is accessible even to an inexperienced knitter who has not previously worked with yarn overs and additions.
The report of the simplest scheme is only eight loops, but do not forget about the loops,
 which need to be knitted before and after repetitions (they are indicated in the diagram). It is also worth knitting edge loops.
The wrong side is knitted according to the row pattern.
You can knit a beautiful thing from mohair without detailed descriptions of simple patterns. We are offering to you Several interesting options for creating a warm mohair shawl or scarf:
- Scheme No. 1

A large pattern of the fabric of an openwork crochet jacket with patterns makes it possible to make various models from bulky yarn and even mohair. Which adds to the appeal of this pattern.
You can use it to make jackets and cardigans. They will not be bulky, but airy, graceful, which is what is required for a thing to look sophisticated.
Here is only the front view, unfortunately there was no better quality photo. But it also gives an idea of the possibility of using a pattern for things for every day. This is a warm and at the same time cute tunic that can be worn with both a skirt and trousers.

The model is knitted from the bottom up, in the round. To prevent the fabric from mowing, it is best to use rotary knitting. Everything becomes much simpler if you knit something with a clasp.
The strap for the fastener, in this case, can be very narrow, for which transverse crochet borders, which can be viewed at the link, or another type of border are suitable. Also at the link below.


See the diagram where the rows and direction of knitting are indicated, as well as in another diagram the row transition when knitting in the round.
A very nice pattern for a crochet jacket with diagrams and a brief description, which does not weigh down the fabric of the finished item. Mohair is simply a godsend, which I will not fail to take advantage of. I will definitely post photos of the process and the finished jacket here.


