How to make an angel wing. We sew an angel costume. Making angel wings
How to make wings?
Butterfly or angel wings can be an excellent addition to a carnival costume or a child’s party outfit. These wings look very interesting, but not everyone knows how to make them at home. Now we will tell you how to make butterfly wings, angel wings and decoration wings.
Making butterfly wings

These wings are suitable for both a butterfly costume and a fairy costume.
Making angel wings
How to make angel wings with your own hands? Let's consider two options - the first is simpler, the second is more complicated.

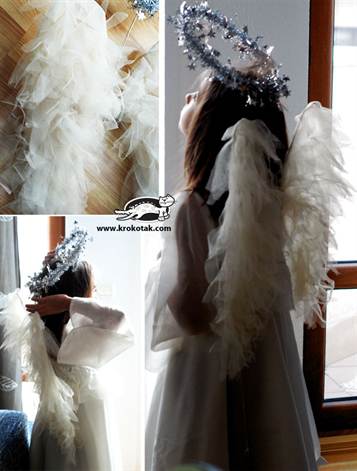
Method No. 1
- Take thick wire or old wire hangers that need to be straightened. Form angel-shaped wings from hangers or wire.
- Now take thin tulle, attach the frame of the future wing to it and cut the tulle 2-3 cm larger than the frame along the contour. Now you need to fold the tulle onto the wrong side of the wing along the contour and sew it on. This operation must be done with both wings.
- Now take the remaining tulle - we will make plumage from it. Divide it into two equal parts. so that the plumage is the same on both wings. Then cut into thin long strips, and make a large fringe along one of the two long edges of each strip. The fringe itself will need to be rounded - it will look more like wings.
- The finished fringe, folded a little to obtain volume, must be sewn to the wings with the fringe down. Try to sew the strips close to each other to make the wings more voluminous and beautiful.
- When both wings are ready, connect the wings together. You can use wire, which will then need to be hidden with a piece of tulle. At the end, sew ribbons to the middle of the wings, which will attach the wings to the body. If desired, you can also make a halo.
You can find instructions for this method in photographs.
Method No. 2
- Take a large piece of thick cardboard, draw the shape of the future wing on it and cut it along the contour. Then place the cut out wing on another piece of cardboard and cut out the second wing.
- You should purchase artificial feathers in advance; they can be purchased in designer stores. Now take the glue and carefully glue the feathers one after another, first on the outside of the wing. You need to start gluing from the bottom, gradually rising to the top of the wing. Each new row should overlap slightly with the previous one - this will be more beautiful and natural. When you have glued all the feathers on the outside of one wing, start gluing the feathers on the same side of the other wing. Then you need to give the feathers time to stick well to the cardboard, and then carefully turn them over, stick the feathers on the wrong sides in the same way and also let the feathers stick well. On the wrong side, you should leave a little free space (at the junction of the wings) for a rectangle that you will glue later.
- If desired, the wings can be spray painted with gold or silver paint. When painting, be sure to wear a respirator and then let the paint dry thoroughly.
- Now you can carefully place the wings on a flat surface with the wrong side facing you. Cut out a neat rectangle from cardboard, attach long ribbons to it, with which you will tie the wings to the body. Then this rectangle needs to be firmly glued from the wrong side to the place that you left for it. The wings are ready!
Making wings-decoration
On the eve of the New Year, many families begin to come up with homemade decorations and toys for the holiday tree. Small cute wings can also become such a decoration. They are easy to make: you need to take a beautiful fabric (you can use any color), draw two wings of the desired shape on it. The wings can be made connected or separate. If the wings are tied, you will need to sew less. You need to draw the contours of the future wings, then cut them out with an additional margin of 5-7 mm. After this, you need to cut out the second side of the wings, then sew both halves to each other from the inside out, leaving a small hole. Then the product must be turned from the wrong side to the front, ironed and stuffed with soft material (for example, cotton wool). After this, the hole must be carefully sewn up and a small loop must be sewn on top in the middle of the wings, with which the wings will be attached to the Christmas tree.
Now you know how to make wings with your own hands. Choose any of the methods you like and start creating!
An angel costume is a popular outfit for any carnival. Such vestments will be useful both at a children's matinee and at an adult party. The main attribute of a cherub can be considered angel wings, which are very easy to make with your own hands. Even a novice handmaker can handle master classes on creating a flying machine for cupid.
How to choose a form
Before starting work, you need to decide what the angel’s wings should be. You can make almost any product with your own hands. But whether it will serve faithfully depends on its owner and the intensity of use. So, products can come in a variety of sizes and shapes. In addition, you can use different materials. But they all have a different “lifespan”, so the nature of the party should be taken into account.
How to choose suitable wings:

Classic feathers and down
The most interesting option, despite numerous ideas, remains feather wings made from natural down. This product looks harmonious on an angel of any age and build. To build a product, you need to visit a craft store and purchase the necessary materials there.
For the craft you will need:

To make angel wings with your own hands, you need to choose their shape and print the pattern on a printer. You can also draw one wing yourself and then repeat it symmetrically. When the pattern is ready, you need to attach it to the back of the future angel and figure out how the product will look. At the template preparation stage, the shape and span of the wings are adjusted.
Symmetrical wings are cut out of thick cardboard. The workpiece must be in the form of a single piece, so as not to fasten the individual parts together later. The blanks cut out of cardboard are covered with white paper. Again, apply the product to the back and mark where the harness will be attached. Glue an elastic band to the designated places and seal the attachment points with white paper. Trying on an aircraft. If you are comfortable in it, you can begin the main part of the work.
Glue the feathers using hot glue. Begin pasting from the bottom of the product, applying subsequent feathers according to the principle of fish scales. Feathers should be attached with a small drop of glue so that the substance does not stick together the feather fibers.
The upper part can be decorated with light natural feathers. This finish looks cute and effectively hides possible defects in the craft.

By the way, if you can get a black feather, you can create a spectacular costume for a negative hero. Black wings might work well at a Halloween party. If you couldn’t find black feathers, you can try dyeing white ones.
Paper or glitter wings
An excellent option for an angelic outfit would be a paper craft. Making angel wings out of paper with your own hands is very simple. True, this will take some time, but the result is worth it.
You will need the following materials:
- Cardboard;
- White paper;
- Glue gun;
- Rubber;
- Pencil;
- Scissors.
 As a basis for the wings, you will need a paper blank on which the feathers will be attached. You can make it yourself without using a template, since the contours of the cardboard in the finished product will not be visible.
After cutting out a cardboard template, try on the wings and attach an elastic band to them. Next, they mask the place of its attachment and move on to the decor. To decorate the wings you will need paper feathers. They are drawn according to a template and cut out. You can also print the required number of blanks on a printer and save time.

To make the wings look airy, they are attached to the top edge. The bottom edge can be slightly curled using scissors.
To get a more original craft, milk tetrapacks are used to create the wings rather than ordinary paper. Cardboard bags covered inside with shiny paper will serve as durable and unusual decor. True, you won’t be able to print feathers on such paper, so you’ll have to draw them by hand.

Durable fabric crafts
You can make angel wings with your own hands in about an hour. But a simple craft will last no more than one matinee, since its quality will certainly suffer from the child’s active rest. In order for the product to serve more than once, you need to pay attention to more durable models. For example, wings made of fabric.
Lace or ribbons
You can make wings from lace or ribbons. To create a craft you will need:
- Wire;
- White fabric or lace;
- Threads, needles, scissors;
- Template paper;
- Rubber.
To begin with, as usual, you should decide on the size and shape of the wings. For the fabric version, hanging folded wings are suitable. A blank is made from paper and then cut out. The wings should be closed together using a strip of paper.
The wire is bent according to the shape of the paper blank, repeating all the bends of the template. The ends of the wire are twisted together and wrapped with adhesive tape so that sharp edges do not damage the finished product. You can immediately attach an elastic band to the wire frame and try on the product. The frame is covered with white fabric and secured around the entire perimeter.
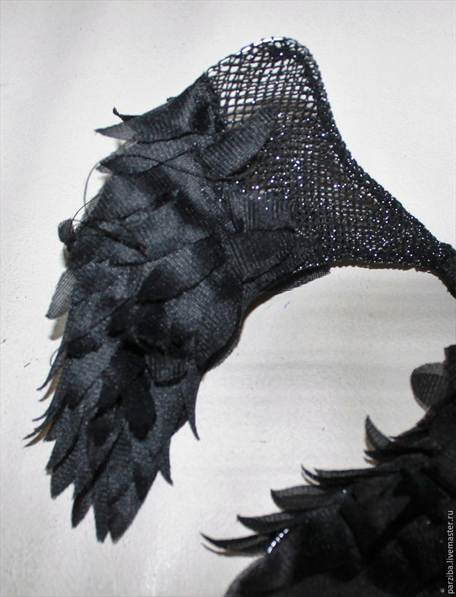
The next step is preparing the fabric for decoration. Lace or thin white fabric is cut into strips of equal width. The size of the stripes depends on the size of the wings themselves. Their width is approximately 10−15 cm.
Fabric strips are attached to the base, starting from the bottom. Using several stitches, sew the strip onto the top edge, leaving the bottom one free. Place the parts one on top of the other, hiding the place where the previous one was attached with the next strip.

You can decorate the finished wings in any way. They use natural fluff, satin ribbons and bows.
Soft plush feathers
 Another option for a durable craft would be soft wings made of fabric. Making such a product is very simple. To do this, you only need a paper template, fabric and tailor's little things. You should use a material that can hold its shape without a frame. If there is no dense white fabric, several layers of sheet padding polyester can be placed inside the wing.
Using a standard pattern, the wings are cut by folding the fabric in half, right side inward. This saves both time and material. The fabric folded in half is stitched, taking into account approximately 1 cm from the edge. Leave a hole for turning inside out. The stitching should be as smooth as possible.
Turn the product inside out carefully. If the edges turn out to be angular, they can be decorated with fabric or lace. Crafts with padding polyester filling are sewn differently. After cutting, the parts are separated. A padding polyester cut according to the same pattern is applied to one of them. The filling is attached to the fabric, and then the two halves of the wings are folded right sides together and sewn together.
Handmade from disposable tableware
Even the most unusual materials can serve as the basis for angel wings. For example, disposable paper plates. Unused utensils left over from a picnic should not be thrown away.
Cardboard plates are the ideal material for paper wings. It’s interesting to make such a craft with your own hands, and creating it won’t take even an hour.
You will need the following materials:
- White cardboard plates;
- Hot glue;
- Scissors;
- Tape or rubber band for fastening.
One of the plates will serve as the basis for the craft. The rest of the dishes should be cut to form crescents. The plate halves are glued to the base starting from the top edge. Place the plates one on top of the other, imitating folded feathers.
These wings will be useful for a short performance in the theater or a small miniature at a school party. If you don’t want to make bulky feather wings for the sake of a one-minute performance, such a craft from plates will come in very handy.
Napkins or coffee filters
Another way to make a craft from scrap materials is to use paper napkins. You will need a lot of them, so it is recommended to purchase a large, economical package and not skimp on material. The degree of airiness of the finished product will depend on the number of napkins.
For the craft you will need:
- Cardboard;
- Rubber;
- Unscented paper napkins;
- PVA glue;
- Scissors.

It is best to use three-layer napkins. They are more expensive, but their thickness will allow the angel to survive until the end of the matinee with minimal loss of feathers. This is especially true for parties where the character will have to sit down, pressing his feathers against the back of the chair. You can also use paper filters for coffee and tea, but these wings can be expensive.
For the wings you will need the same cardboard template. It is covered with white matte paper. An elastic band or tape for fastening is glued and the joints are masked with paper.
Cut the napkins in half and fold each into a triangle. There is no need to equalize it. The edges of the napkin should be chaotic.

Start gluing the triangles from the bottom. Each subsequent layer should slightly cover the previous one. The smaller the distance between the attachment line of adjacent layers, the more magnificent the wing plumage will be.
To get the most voluminous feathers, napkins are glued not in one, but in two rows. It is advisable to cover the top of the wings with down or artificial fur. You can also use white openwork fabric. A cute bow is suitable as decoration.

Instead of napkins, you can use snow-white toilet paper. One roll should be enough for a pair of standard size wings.
To glue the paper to the cardboard template, it is cut into equal parts and crumpled. Glue the paper using a glue stick, since PVA takes too long to dry and also soaks thin paper excessively.

The finished wings look simply incredible. Their only drawback is their fragility. Having survived one matinee, they are unlikely to be suitable for another holiday.
Air tulle flight
Another way to make angel wings involves using tulle and... a hanger. To create a cherub costume you will need two wire clothes hangers, a piece of white tulle and thread.
Step-by-step master class:

An angel costume is a classic for any New Year's party. And beautiful wings will allow their owner to become a real celebrity. You just need to be creative and be inspired.
Attention, TODAY only!
Angel wings made of paper can be of various shapes.
First, let's decide on the initial shape and size.
Let's draw a sketch on paper in real size. If everything suits you, we transfer it to cardboard - this will be the basis of the frame.
Usually the wings are attached like a backpack with straps made of, for example, rubber bands.


This video presents a master class on making angel wings.
For such wings you need white wire, corrugated paper and a little fluff.
Twist the wing frame from soft aluminum wire. Glue white corrugated paper to the wire with PVA glue. Since the angel is white and fluffy on top, we decorate it with white fluff.

The easiest way to make paper angel wings is to take paper plates, cut them in half and cover the cardboard wing blanks.

But if you need small wings, you can glue them directly onto the plate.
Glue with Moment Crystal.

We make fastenings from a wide elastic band or satin ribbon. Glue the crystal at the same moment.

You can make wings from whatman paper, but here the pimples will have to be cut out right on the spot.

But most of all I liked the original version of the wings made from tinted newspaper bags for seeds. Just a masterpiece :)

It's also very easy to do. The wings are cut out of cardboard and the balls are glued to them in a dense row. And if you tint them with white sparkles from a spray can or with liquid snow, it will turn out simply magical.
In order to make your own angel wings for a carnival costume for the New Year or for a photo shoot for Valentine's Day, you will need very little material: chintz for creating feathers on the wings, thick fabric for the base of the wings, cardboard for the wings template.
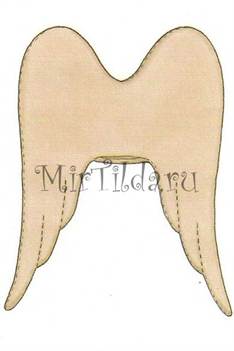
We cut out a wing template from cardboard, for example, like this:

Then we cut out two identical parts from the fabric according to this template and sew them together:

Then we begin to glue chintz onto them from the tip of the wing to imitate feathers:

And thus we glue our wings from bottom to top to the end:

Then you need to tie a ribbon to secure the wings and decorate if desired:

More details here.
A fairly simple version of making wings for an angel from paper with your own hands. And, of course, what is an angel without limbo.
To make the wings, bend the rocker arm into two arcs of 2-3 mm wire. In steps, in a checkerboard pattern, glue strips of paper onto the arcs. You will get descending paper feathers. We will cover the arc with tinsel. So our wings are ready.
It's even easier with a dial. Also wire for the rim, stand and hoop. Also tinsel glued along the edge of the disk.

Angel wings at home for a costume can be made from different materials. It is convenient to make a frame for the wings from wire, and stretch fabric between the wires or glue cardboard or paper.
You can also cut wings out of cardboard.
First option. We make wings from cardboard and glue napkins or coffee/tea filter bags over the entire area, decorate them to your taste.

The wings must be cut out of cardboard.


Both of the wings need to be glued.

We cover the wings with newspaper or unnecessary notes over the entire area.

You can also cover the paper with fabric.

Let's prepare filters from, tea or napkins, fold them in several layers. To do this, bend the filters or napkins in half and in half again.
To be the center of attention at a costume party and catch admiring glances, you need a chic suit. An excellent option would be the image of an angel with large beautiful wings. These wings are often used for photo shoots. You can also dress up your child in a little angel costume for a festive party in kindergarten. This article contains templates for angel wings and several master classes on how to make angel wings with your own hands.
Templates and materials
Such a beautiful detail of the image of an angel can be made from all kinds of available materials. The base for them is most often made of cardboard. The cardboard is then decorated with materials that look like feathers. Elastic bands are attached to the back of the wings to make it easy to put on the shoulders.
Another base option is a rigid wire frame. It is bent into the desired shape and covered with elastic fabric. Then the base is also decorated.
By using your imagination, you can come up with an original decor for the base. The main thing is that the weight of such wings is not too heavy.
Templates can be simple in shape. The main emphasis is on the feathers themselves.

Or a multilayer openwork pattern is cut out, the shape of which looks like almost finished wings.


The most natural decoration is, of course, feathers. You can buy a boa and glue feathers from it to the template.

In feather pillows, you can choose light feathers, grease the template with glue and pour feathers onto it. They will stick well and quickly.

You can also ask people who keep pigeons, but they are unlikely to have the required number.

Therefore, they make imitation feathers from satin fabric, paper, tracing paper, cardboard, fabric ruffles, napkins and other available materials.


Feather wings
Let's create a classic version of feather wings for an angel costume. These wings are perfect for a small child.
To make wings, you need to prepare plastic, a piece of chintz, transparent glue, feathers, and elastic bands.
Cut out a wing template from plastic binders. We glue chintz, also cut according to the template, onto the plastic. You can make a frame from wire and glue chintz parts onto it. The effect will be the same. We make two holes at the base and insert elastic bands. Before making holes, you need to attach the wings to the back and mark the location of the holes.

We cover the edges of the wings with feathers so that the wire frame is not visible.

We sort the feathers by length and glue them in rows from bottom to top, from long to short.


We cover the edges at the top with down feathers.

The results are very realistic wings.

Making from fabric
Wonderful wings are made from fabric ruffles.
Let's prepare cardboard, paper for gluing the back side of the wings, elastic bands for fastening, glue and circles of fabric, tape for connecting the wings.
Cut out a template from cardboard.

Using the template, we cut out the parts from paper with a margin around the edge.

Cover the cardboard with paper. We make holes and insert elastic bands.

We take circles of fabric in the center to form soft, uniform folds.

Starting from the bottom, glue the fabric to the cardboard base.


The result is fluffy wings.

We fasten them with ribbon, and the fabric angel wings are ready.
Another master class on fabric wings. Light and airy wings are made from organza.

To make them you will need rigid wire, nylon or tulle, organza, scissors, thread, and a needle.
The frame is made from wire.

The frame is covered with tulle or nylon mesh. We fasten the parts with wire, which we also glue. We put wide elastic bands on the connection that will be worn on the shoulders.
Strips are cut from organza, and fringe is cut from one edge. The strip is folded and sewn to the frame, starting from the bottom.

The result is delicate airy wings.
Paper product
Huge angel wings can be decorated with paper feathers.


To work, we need to prepare simple cardboard for the base, paper, nightlights, glue and elastic bands.
The template is cut out to the desired size and transferred to thick cardboard.

The diagram shows the principle of gluing feathers of different sizes.

We cut out a lot of feathers and bend them lengthwise.

Glue the feathers in rows.


We make two holes on each wing. We insert an elastic band into them. We mask the holes with feathers.

We fasten the wings. We also mask the junction.

When finished they will look like this.

Napkin wings
Angel wings decorated with napkins are tender and airy.

To create them you need ceiling tiles. It can be replaced with cardboard covered with paper. We will also prepare white napkins, scissors, an awl, elastic bands, and glue.
We cut out the wings according to the template. We make holes in them for attaching rubber bands.
Many caring parents want to make angel wings with their own hands for their children. They will be needed for a themed photo shoot, as well as for matinees in schools and kindergartens. Making the decoration is simple.
This article is intended for persons over 18 years of age
Have you already turned 18?
DIY angel wings: what you need to have
There are a lot of answers to the question of how to make wings on the Internet. Before starting work, you need to collect all the necessary materials. Most often used to make an accessory:
- copper wire;
- glue "Moment";
- goose feathers;
- white boa;
- Velcro;
- transparent cover for binding in A4 format.
Having these materials, you can safely get to work. After watching videos on the Internet, you can choose the most understandable master class to follow when making crafts. It is important to choose the right wing size. Too large ones will resemble a butterfly, and too small ones will be lost against the background of the whole outfit. For a little angel costume, you can use white fabric, which will be light. Most often they choose satin or stretch cotton. It doesn’t matter what kind of costume you buy or make yourself - you still need to sew Velcro onto it to attach the wings. To make a beautiful accessory for your child, you don’t need to use feathers from pillows. They will look old-fashioned. The tail feathers look much better. Also, to decorate the product you will need about 2 m of white boa. When calculating the required amount of materials, it is necessary to take into account that the craft should look identical on both sides.
Angel wings must have a strong frame. To do this, use copper wire in insulation. During the process of decorating the product, it is completely closed. You can also choose napkins, fabric or synthetic padding as materials for decoration. It is not necessary to use Velcro for the suit. They can be replaced with rubber bands. The elastic bands are secured with a stapler. Before fastening, you should try it on to determine the desired length of the elastic bands. For girls, wings can be decorated with sparkles or rhinestones. They can also be painted pink. For boys, it is better to leave the classic white color. We make the wings a few days before the holiday. The glue takes a day to dry, so there is no need to put off making the craft until the last day. Also, many mothers decide to make not only wings, but also a halo. It is also made on the basis of wire, which is completely covered with decorative elements. Before starting work, you need to measure the volume of the child’s head so that the future product is securely attached to the head.
The wings made are ideal for a photo shoot for a one-year-old child. But after completing the photo shoot, there is no need to rush to sell the angel costume: it may be needed at school and in kindergarten. It will also be needed at the wedding during the ceremony. There are many places where an angel costume can be used, so you should approach its production seriously and responsibly. If you don’t know what the simplest wings can be made from, then pay attention to paper. This is a cheap and accessible material that everyone can find at home.
DIY angel wings from paper: manufacturing process
If you want to make wings from fabric, then you should stock up on chintz. It is suitable for creating imitation fluff. You can also use padding polyester, which is laid out. You can buy it at fabric stores. The process of creating all wings begins the same way: by bending the wire into the desired shape. When the form is made, it can be covered with paper. But this is not a very reliable material; it is better to use a transparent cover for A4 brochures. It is covered with fabric to hide the wire. To create an imitation of wings, you can cut chintz into strips and sew it on with small stitches. The edges of the strips must be cut. Thus, you will get an imitation of fabric. But it is still advisable to decorate the edges with feathers. They must be attached from the bottom up, starting with the largest and ending with the smallest. Duck or goose feathers are suitable for this. Also, instead of chintz, you can take a boa, which will also look good on a craft.
The New Year's accessory made from napkins also deserves attention. The cheapest white napkins, which are glued to the base with PVA glue, are suitable for this. First, they need to be cut along the edges, creating the desired shape.
A craft made entirely of feathers will look as natural as possible. To do this, you need to sort the feathers by size. The longest and strongest ones are suitable for decorating the edges, and the small ones are suitable for decorating the middle. Feathers must be glued to the fabric, lubricating it and attaching the feathers. It is imperative to dry the layers so that the craft turns out strong and reliable.

The frame can be made not only from wire. In some cases it is simply not needed.
Feathers can be made from isolon. This material has some disadvantages that should be taken into account when creating crafts. Izolon has a ribbed surface, so the workpieces need to be cut along the strips. It is advisable to choose a thicker isolon, then it will look very voluminous. It is glued to the isolon base using hot glue. It is important not to overdo it with the amount so that the product does not melt. For such wings it is better to avoid using wire. To do this, it is better to take a plastic pipe of small diameter.
You can create luxurious and voluminous wings from tulle. To do this, you need to give it the desired shape by stitching it with ribbons, and laying the ribbons overlapping each other. Tulle products will look especially beautiful when moving, creating a feeling of weightlessness and flight.
The base can be made of insulation. This material will help create wings that are light in weight but very voluminous. You don’t have to buy insulation; it can be cut from old jackets or coats. It doesn’t have to be covered with fabric; if it’s in excellent condition, you can simply glue feathers on it.
The base is often made from whatman paper. Then you will get large wings that are suitable for older children. If you don’t need to make large ones, then whatman paper is cut into two parts. The decor of the wings can be made from cotton pads. For this purpose, unstitched disks are suitable, which must be divided into two parts. This will help you use less material. But if there are many packs of cotton pads, then you can skip this step and move on to the next one. The cotton pads must be folded in four and the base secured with a stapler. You will need a lot of such blanks, so first you need to start making them. They are attached to the base using PVA glue. You need to start decorating from the bottom up. The cotton pads must be glued overlapping each other so that the staple of the stapler is not noticeable. Wings made from cotton pads turn out very realistic.
Goose wing feathers are expensive, but they look the most beautiful. When purchasing, you should correctly calculate their number, including feathers for the halo. It is advisable to have smaller feathers on the halo. You can also do without them altogether by simply decorating the wire with gold glitter ribbon or painting the wire with yellow acrylic paint.
The foam wings must be cut out in parts, fastening them together with hot glue. Using polystyrene foam, you can give the product a wide variety of shapes. Basically, foam products with large and long feathers are obtained. They can be made as long as possible at the bottom of the product. But this may interfere with the child, so the wings must be measured, adjusting all sizes to the baby.
Large wings are suitable not only for creating the image of an angel or for a photo shoot. They will be useful for creating the image of a swan from fairy tales. Often large wings are needed for a school play. If a child needs to play the role of a black swan, then the entire product must be coated with black acrylic paint. Initially, you can take a black base and black fabric. Feathers are painted with spray paint. The black swan costume will look original against the general background of snowmen and snowflakes at the New Year celebration at school.


